Aller au contenu principal

BlackBerry Curve 8520 Keyboard Cover Replacement

Ce dont vous avez besoin

  1. BlackBerry Curve 8520 Keyboard Cover Replacement, Back Panel: étape 1, image 1 de 2 BlackBerry Curve 8520 Keyboard Cover Replacement, Back Panel: étape 1, image 2 de 2
    • Insert a plastic opening tool into the small notch on the rear cover of the phone.

    • Pry the rear cover up from the phone.

  2. BlackBerry Curve 8520 Keyboard Cover Replacement, Battery: étape 2, image 1 de 2 BlackBerry Curve 8520 Keyboard Cover Replacement, Battery: étape 2, image 2 de 2
    • Locate the slit between the top of the battery and the casing.

    • Gently apply pressure on the top of the battery to trigger the spring release.

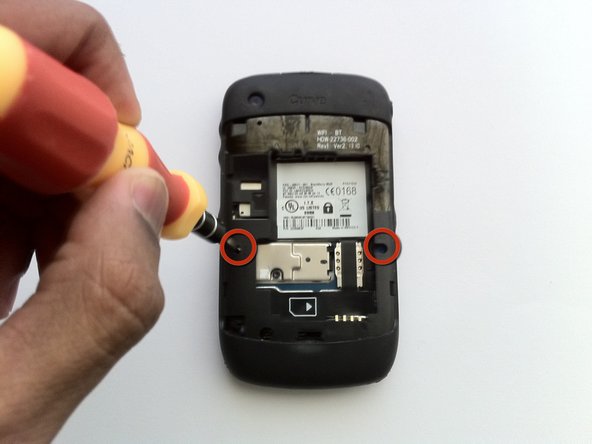
  3. BlackBerry Curve 8520 Keyboard Cover Replacement, Keyboard Cover: étape 3, image 1 de 2 BlackBerry Curve 8520 Keyboard Cover Replacement, Keyboard Cover: étape 3, image 2 de 2
    • Remove the two Torx T6 screws to the left and right of the battery.

  4. BlackBerry Curve 8520 Keyboard Cover Replacement: étape 4, image 1 de 2 BlackBerry Curve 8520 Keyboard Cover Replacement: étape 4, image 2 de 2
    • Using hairdryer or heat gun, warm the front panel to soften the adhesive beneath.

    • Starting from one side, use a plastic opening tool to pry up the screen cover.

    • Work carefully to avoid bending the screen cover.

    • Once one side is loose, gently peel up the entire cover.

  5. BlackBerry Curve 8520 Keyboard Cover Replacement: étape 5, image 1 de 3 BlackBerry Curve 8520 Keyboard Cover Replacement: étape 5, image 2 de 3 BlackBerry Curve 8520 Keyboard Cover Replacement: étape 5, image 3 de 3
    • Insert the plastic opening tool in the seam along the side of the device.

    • Slide the tool along the length of the seam, applying moderate force with the plastic opening tool.

    • Carefully remove the faceplate.

  6. BlackBerry Curve 8520 Keyboard Cover Replacement: étape 6, image 1 de 3 BlackBerry Curve 8520 Keyboard Cover Replacement: étape 6, image 2 de 3 BlackBerry Curve 8520 Keyboard Cover Replacement: étape 6, image 3 de 3
    • Remove four T6 Torx screws from the front of the phone.

    • Using tweezers, remove the keyboard buttons from the phone.

Conclusion

To reassemble your device, follow these instructions in reverse order.

27 autres ont terminé cette réparation.

Matt

Membre depuis le 04/07/11

1 722 Réputation

5 tutoriels rédigés

Équipe

Cal Poly, Team 9-62, Walters Spring 2011 Membre de l'équipe Cal Poly, Team 9-62, Walters Spring 2011

CPSU-WALTERS-S11S9G62

5 membres

5 tutoriels rédigés

0 commentaires

Ajouter un commentaire

Nombre de vues :

Dernières 24 heures : 0

7 derniers jours : 3

30 derniers jours : 3

Total : 35,154