Aller au contenu principal

Blu Studio 5.5 Micro USB Port Replacement

Ce dont vous avez besoin

  1. Attention : les étapes 1 à 2 sont issues d'un tutoriel marqué comme en cours.

    Blu Studio 5.5 Micro USB Port Replacement, Battery: étape 1, image 1 de 1
    • Flip over your Studio 5.5 so the back is facing you.

    • Use either the spudger or your fingernail to pull up on the slot in the lower left corner and remove the back cover.

  2. Blu Studio 5.5 Micro USB Port Replacement: étape 2, image 1 de 2 Blu Studio 5.5 Micro USB Port Replacement: étape 2, image 2 de 2
    • Place your finger in the small groove beneath the battery.

    • Push the battery toward the top of the phone and lift it out.

  3. Blu Studio 5.5 Micro USB Port Replacement, Micro USB Port: étape 3, image 1 de 1
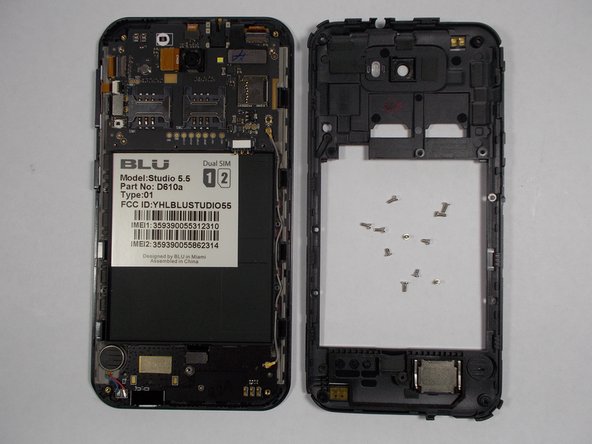
    • Begin by removing the 12 screws along the back of the device.

    • 1 of these screws will be underneath a white sticker. Just press the screwdriver through it and remove it normally.

    • 5 of these screws are 3.5mm, while the remaining 7 are 5mm.

  4. Blu Studio 5.5 Micro USB Port Replacement: étape 4, image 1 de 2 Blu Studio 5.5 Micro USB Port Replacement: étape 4, image 2 de 2
    • Using your plastic opening tool, begin carefully prying the plastic shell from the phone.

    • Make your way around the edge slowly and lift the shell off when you have made a full circuit.

  5. Blu Studio 5.5 Micro USB Port Replacement: étape 5, image 1 de 1
    Outil utilisé dans cette étape :
    Tweezers
    $4.99
    J'achète
    • Using your tweezers, locate the small gold-colored plug in the bottom left corner and pull it straight out.

  6. Blu Studio 5.5 Micro USB Port Replacement: étape 6, image 1 de 1
    • Use the tweezers again to pull out a small black plug in the bottom middle.

  7. Blu Studio 5.5 Micro USB Port Replacement: étape 7, image 1 de 1
    • Grip the entire circuit board firmly with your tweezers and pull it towards the bottom of the phone and out.

  8. Blu Studio 5.5 Micro USB Port Replacement: étape 8, image 1 de 1
    • Pry the speaker from the phone with your tweezers.

    • The speaker is glued to the rest of the phone and soldered to the circuit board.

Conclusion

To reassemble your device, follow these instructions in reverse order.

6 autres ont terminé cette réparation.

Brian Sullivan

Membre depuis le 10/22/14

647 Réputation

3 tutoriels rédigés

Équipe

UMass Dartmouth, Team 1-2, Shastany Fall 2014 Membre de l'équipe UMass Dartmouth, Team 1-2, Shastany Fall 2014

UMASSD-SHASTANY-F14S1G2

3 membres

3 tutoriels rédigés

3 commentaires

Should I change the other parts aswell?

branfay1 - Réponse

i want buy chargin port sir my blue cahrging port was dead plz help me i want buy

muhammadfaisalkhan98 - Réponse

Where do i buy the %#*@ micro usb port

PoPeYe MaStEr - Réponse

Ajouter un commentaire

Nombre de vues :

Dernières 24 heures : 0

7 derniers jours : 2

30 derniers jours : 4

Total : 4,316