Introduction
Le cache de la batterie est le rabat en caoutchouc (situé sous le haut-parleur) qui recouvre la batterie Bose SoundLink Mini. Il ne peut être retiré sans passer par plusieurs étapes préalables. Ce tutoriel vous indiquer les étapes faciles à suivre pour retirer le cache de la batterie Bose SoundLink Mini.
Ce dont vous avez besoin
-
-
Retirez le cache batterie en caoutchouc et enlevez les 4 vis de 6,0 mm entourées avec un tournevis Torx T8.
-
Attention : notez que le cache reste fixé dans le coin supérieur à gauche. Ne tentez pas de l'enlever complètement.
-
-
-
Pendant que vous retenez le cache en arrière, retirer la batterie en tirant vers le haut pour la sortir.
Where can I buy this battery
Well that part was simple. What I need is how to disconnect the ribbon cable which is soldered in on both ends. No help here.
soweit sogut..aber die Kabel sind verlötet ?
das ist ja das problem
also sehr schlechte Anleitung da ja das wichtigste fehlt !!
Bonjour pas aussi simple car les câbles de la batterie d origine sont soudés…
On remark though: the original Bose battery has a thin foam gasket at the base. This foam gasket makes sure the room behind the speakers is airtight, which is essential for a clean sound. Most aftermarket batteries do not have this gasket, leading to a thumping noise when you turn up the music. This is easy to fix: with a sharp cutter, gently peel the gasket from the original battery and reinstall is on the new battery. That solved the problem for me. Alternatively, you can cut a think sheet of PE foam to fit the base of battery.
Cable is not soldered on BOSE SoundLink Mini!
The situation is different on BOSE SoundLink Mini II. The procedure to replace battery is more demanding as the cable is soldered.
iFixit日本語版からこのバッテリーパーツの購入ボタンを押すと、米国サイトにリンクされていて、当然ながらバッテリーは米国内以外では買えません!となります。何のための購入ボタンなんでしょうかね。時間の無駄でした。
-
-
-
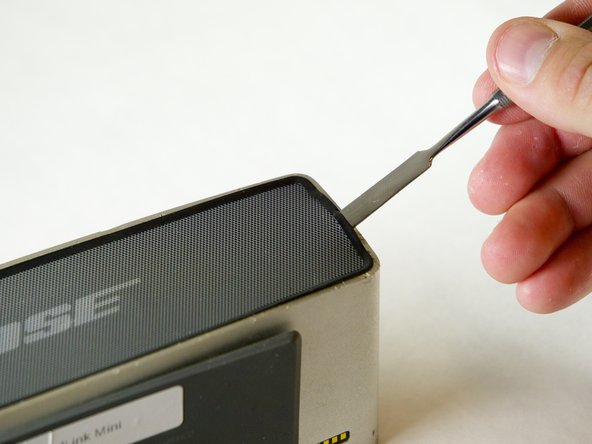
Insérez la spatule (spudger) métallique entre le bord en caoutchouc de la grille et le boîtier en aluminium.
-
-
-
-
Répétez les étapes pour retirer la grille arrière.
Attention à la longueur des vis (les 4 vis du côté du circuit sont les 4 plus longue) et si vous vous trompez et plaçez ces 4 vis ailleurs vous risquez de les briser et que le bout de celles-ci demeurera dans la partie du chassis.
-
-
-
Retirez les quatre vis de 15,0 mm sur la gauche et les quatre vis de 9,0 mm sur la droite, à l'aide du tournevis Torx T8.
-
-
-
Tirez délicatement sur le cache de la batterie jusqu'à ce que la languette en caoutchouc glisse hors du boîtier en aluminium.
I just want to emphasize that the rubber tab (that is part of the cover) is supposed to sit ON TOP of the circuit board. In my case, my son managed to pull of the battery cover off completely, so as I was taking it apart I didn’t see how the rubber tab was actually supposed to sit inside the box. Because these instructions have you unseat the circuit board, I thought it was implying the tab was supposed to sit under the circuit board. But that is NOT the case! If I had looked at the pictures 7 and 9 more carefully, I would have seen how things were supposed to sit. Instead I first jammed things back together with the rubber underneath the board (really hard to do), only to find that the slightly squeezed rubber tab pushed the cover out a millimeter so it wouldn’t sit right on the charger. On closer inspection, I figured things out.
-


Pour réassembler votre appareil, suivez ces instructions dans l'ordre inverse :-)
Pour réassembler votre appareil, suivez ces instructions dans l'ordre inverse :-)
Annulation : je n'ai pas terminé ce tutoriel.
7 autres ont terminé cette réparation.
Merci à ces traducteurs :
100%


Ces traducteurs nous aident réparer le monde ! Vous voulez contribuer ?
Commencez à traduire ›
Équipe

Cal Poly, Team 1-23, Maness Fall 2015 Membre de l'équipe Cal Poly, Team 1-23, Maness Fall 2015
CPSU-MANESS-F15S1G23
4 membres
21 tutoriels rédigés
3 commentaires
@rajpotus: I had the same problem. If the little rubber tab is not damaged (mine was fine), you should be able to follow these instructions to replace it. But I have these comments on the instructions:
1) You do NOT need to remove the front grill. I have no idea why they suggest you do that here.
2) I think the reason you remove the battery is to make sure the circuit board has zero power on it when you work on it — otherwise a touch of the screwdriver to an unlucky spot on the board might short/burn something out. But I don’t think there’s any mechanical reason to remove it.
3) Once you pop off the back grill cover, you should be able to slide the tab through the slot and coax it up (maybe with a tooth-pick and/or tweezers) on top of the circuit board, but it’s probably better to unscrew the circuit board (as directed here) which makes it easier to push the rubber tab through. Then slide the circuit board back under the tab and screw it back into place.
Help I removed the part which I'm not supposed to next to the battery charger how do I put it back?
Sooraj murali - Réponse
Where can I actually get a replacement battery????
appreciate any help bc I couldn’t find it anywhere.
Kamil M. - Réponse
Where can I get an actual replacement battery???
appreciate any help bc I couldn’t find it anywhere.
Kamil M. - Réponse
Hi Brent and thank you for this easy fix.
Still I have a problem I did not have while the original battery was in place: the sound is now buzzing even at a middle-of-the-range volume.
I used the original screws and everything seems in place and the screws are tightened “right” I would say. I am usually fine fixing things. And I do not see what I could have done wrong…
Any suggestion?
Thank you.
MBP - Réponse
Which battery is the correct one. Two model are shown to be purchase
Ruben Roman - Réponse
What is not discussed is the wires that connect the battery to the speaker. In mine, I think I destroyed the speaker, because I pulled out the battery and dislodged the wires from the electronic board. I think they must have been soldered on, and now am having trouble attaching the new wires to the board.
horseylawgal - Réponse
I have lost the 4 battery screws. What size are they? I think they are metric but what is the length? They were Philips head flat as I remember.
Wolfgang Mitchell - Réponse