Aller au contenu principal

Bose Soundlink Flex Driver Replacement

Ce dont vous avez besoin

  1. Bose Soundlink Flex Driver Replacement, Grille: étape 1, image 1 de 1
    • Use a heat gun to warm up the device.

    • This will allow for an easier removal of the grille and prevent damage to the device during the replacement. If you do not have access to a heat gun, a hair dryer works as well.

  2. Bose Soundlink Flex Driver Replacement: étape 2, image 1 de 1
    • Use an iFixit opening tool to pop off the eight clips on the grille.

    • Be patient and do not rush this process as you may otherwise damage the device.

  3. Bose Soundlink Flex Driver Replacement: étape 3, image 1 de 2 Bose Soundlink Flex Driver Replacement: étape 3, image 2 de 2
    • Once the clips have been released, the only thing holding the grille on is glue.

    • Apply minimal force and the grille should pop right off the device.

    • Reheat the device to warm up the glue if there is difficulty in removing.

  4. Bose Soundlink Flex Driver Replacement, Driver: étape 4, image 1 de 3 Bose Soundlink Flex Driver Replacement, Driver: étape 4, image 2 de 3 Bose Soundlink Flex Driver Replacement, Driver: étape 4, image 3 de 3
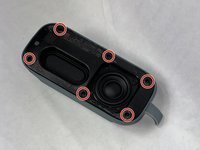
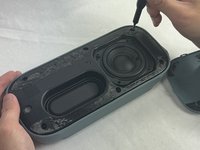
    • Remove the four 2.3 mm screws holding the driver in place using a TR8 Torx screwdriver.

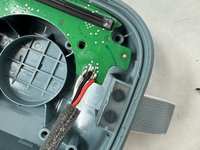
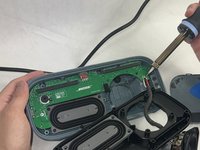
    • Lift the driver out, being cautious of the wires still connected to the device.

  5. Bose Soundlink Flex Driver Replacement: étape 5, image 1 de 3 Bose Soundlink Flex Driver Replacement: étape 5, image 2 de 3 Bose Soundlink Flex Driver Replacement: étape 5, image 3 de 3
    • Remove the six 2.3 mm screws around the edge with a TR8 Torx screwdriver.

    • Pull the back panel off exposing the motherboard.

  6. Bose Soundlink Flex Driver Replacement: étape 6, image 1 de 2 Bose Soundlink Flex Driver Replacement: étape 6, image 2 de 2
    • Desolder the joints that are connecting the speaker to the motherboard.

    • Solder the new speaker with the wire color in the same order.

    • Be cautious when removing and adding the solder to not damage the motherboard or burn yourself.

Conclusion

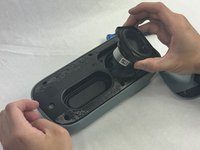
To reassemble your device, follow these instructions in reverse order.

Kalvin Lee

Membre depuis le 03/19/24

413 Réputation

3 tutoriels rédigés

Équipe

UMass Dartmouth, Team 4-1, Shaddix Spring 2024 Membre de l'équipe UMass Dartmouth, Team 4-1, Shaddix Spring 2024

UMASSD-SHADDIX-S24S4G1

4 membres

6 tutoriels rédigés

0 commentaires

Ajouter un commentaire

Nombre de vues :

Dernières 24 heures : 1

7 derniers jours : 8

30 derniers jours : 40

Total : 97