Aller au contenu principal

Bose Wave Radio AWR1-1W Speaker Replacement

Ce dont vous avez besoin

  1. Bose Wave Radio AWR1-1W Speaker Replacement, Base: étape 1, image 1 de 2 Bose Wave Radio AWR1-1W Speaker Replacement, Base: étape 1, image 2 de 2
    • Remove the four 19mm Phillips #2 screws from the base of the device.

  2. Bose Wave Radio AWR1-1W Speaker Replacement: étape 2, image 1 de 3 Bose Wave Radio AWR1-1W Speaker Replacement: étape 2, image 2 de 3 Bose Wave Radio AWR1-1W Speaker Replacement: étape 2, image 3 de 3
    • Turn the device over, holding the base on with your thumbs.

    • Hold the device tightly to prevent the base from falling off.

  3. Bose Wave Radio AWR1-1W Speaker Replacement: étape 3, image 1 de 3 Bose Wave Radio AWR1-1W Speaker Replacement: étape 3, image 2 de 3 Bose Wave Radio AWR1-1W Speaker Replacement: étape 3, image 3 de 3
    • Gently lift the top off of the device.

    • Lift in the direction shown to avoid damaging the wires connecting the top and base of the device.

  4. Bose Wave Radio AWR1-1W Speaker Replacement: étape 4, image 1 de 3 Bose Wave Radio AWR1-1W Speaker Replacement: étape 4, image 2 de 3 Bose Wave Radio AWR1-1W Speaker Replacement: étape 4, image 3 de 3
    • Pinch and unplug the white connector from the device.

  5. Bose Wave Radio AWR1-1W Speaker Replacement: étape 5, image 1 de 3 Bose Wave Radio AWR1-1W Speaker Replacement: étape 5, image 2 de 3 Bose Wave Radio AWR1-1W Speaker Replacement: étape 5, image 3 de 3
    • Gently pinch and pull on the white ribbon cable to disconnect it from the base.

  6. Bose Wave Radio AWR1-1W Speaker Replacement: étape 6, image 1 de 1
    • The base should now be completely detached from the device.

  7. Bose Wave Radio AWR1-1W Speaker Replacement, Front Grill: étape 7, image 1 de 3 Bose Wave Radio AWR1-1W Speaker Replacement, Front Grill: étape 7, image 2 de 3 Bose Wave Radio AWR1-1W Speaker Replacement, Front Grill: étape 7, image 3 de 3
    • Wedge the spudger between the top and front panel on the right side of the device.

    • Push down on the spudger, lifting the front panel away from the top panel until it pops out of the right side.

    • Repeat for the left side of the device.

    • Too much pressure may break the panel, but it should flex slightly before it pops out.

  8. Bose Wave Radio AWR1-1W Speaker Replacement: étape 8, image 1 de 3 Bose Wave Radio AWR1-1W Speaker Replacement: étape 8, image 2 de 3 Bose Wave Radio AWR1-1W Speaker Replacement: étape 8, image 3 de 3
    • Once the panel is released on the left side, wedge the spudger between the top panel and front grill of the device as shown.

    • Apply pressure and move the spudger upward until the front grill pops out.

    • Repeat for the right side of the device.

  9. Bose Wave Radio AWR1-1W Speaker Replacement: étape 9, image 1 de 1
    • Lift the front grill away from the device.

  10. Bose Wave Radio AWR1-1W Speaker Replacement, Speakers: étape 10, image 1 de 3 Bose Wave Radio AWR1-1W Speaker Replacement, Speakers: étape 10, image 2 de 3 Bose Wave Radio AWR1-1W Speaker Replacement, Speakers: étape 10, image 3 de 3
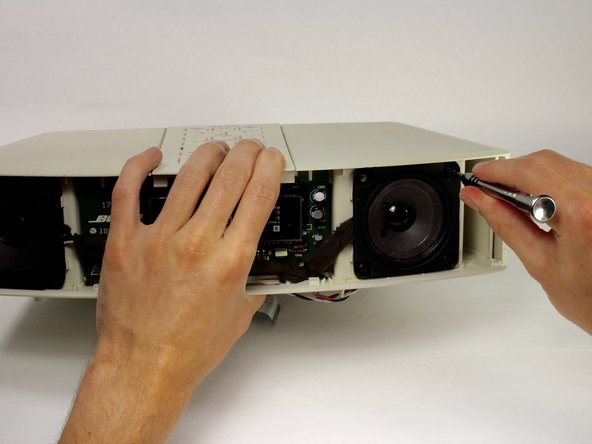
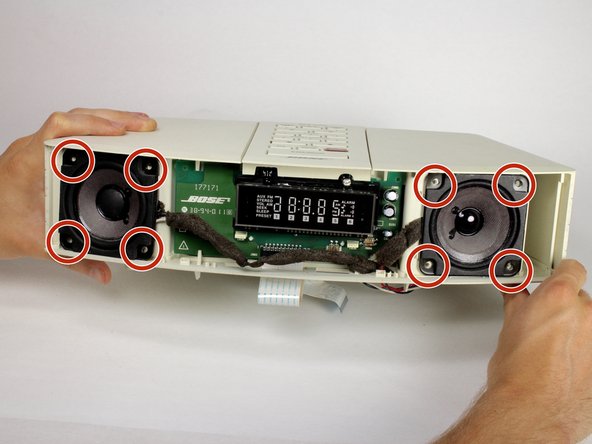
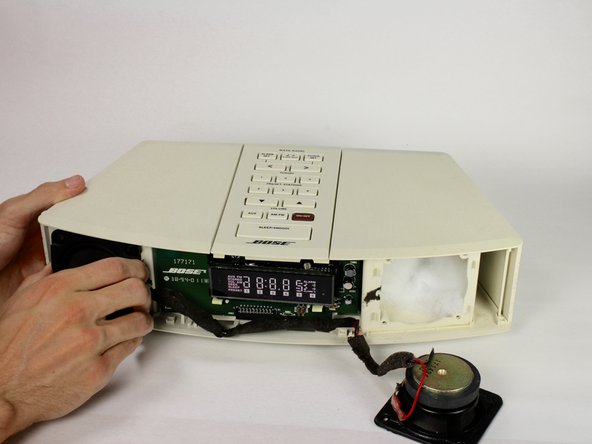
    • Remove a total of eight 15mm Phillips #2 screws surrounding each speaker.

  11. Bose Wave Radio AWR1-1W Speaker Replacement: étape 11, image 1 de 3 Bose Wave Radio AWR1-1W Speaker Replacement: étape 11, image 2 de 3 Bose Wave Radio AWR1-1W Speaker Replacement: étape 11, image 3 de 3
    • Gently pull each speaker out of the device.

  12. Bose Wave Radio AWR1-1W Speaker Replacement: étape 12, image 1 de 3 Bose Wave Radio AWR1-1W Speaker Replacement: étape 12, image 2 de 3 Bose Wave Radio AWR1-1W Speaker Replacement: étape 12, image 3 de 3
    • Pull the wire connected to the speakers out of the device.

    • You already disconnected this wire from the inside of the device earlier.

Conclusion

To reassemble your device, follow these instructions in reverse order.

6 autres ont terminé cette réparation.

Cassie Harriman

Membre depuis le 04/18/17

1 033 Réputation

5 tutoriels rédigés

Équipe

Cal Poly, Team S15-G2, Banghart Spring 2017 Membre de l'équipe Cal Poly, Team S15-G2, Banghart Spring 2017

CPSU-BANGHART-S17S15G2

4 membres

6 tutoriels rédigés

0 commentaires

Ajouter un commentaire

Nombre de vues :

Dernières 24 heures : 2

7 derniers jours : 13

30 derniers jours : 78

Total : 6,894