Aller au contenu principal
Pour réparer ensemble - Je crée un compte

Breville JE98XL Juice Fountain Plus Safety Locking Arm Replacement

Ce dont vous avez besoin

    1. Breville JE98XL Juice Fountain Plus Safety Locking Arm Replacement, Pulp Basket: étape 1, image 1 de 1
      • Place the juicer on a flat surface. Make sure the juicer is unplugged and in the "off" position. For the following steps, the pulp basket is on the left.

      Demander à FixBot

      Ajouter un commentaire

    2. Breville JE98XL Juice Fountain Plus Safety Locking Arm Replacement: étape 2, image 1 de 1
      • Tilt the juicer slightly to the right so the pulp basket is off of your surface.

      Demander à FixBot

      Ajouter un commentaire

    3. Breville JE98XL Juice Fountain Plus Safety Locking Arm Replacement: étape 3, image 1 de 1
      • Pull the pulp basket down and out from under the juicer cover.

      Demander à FixBot

      Ajouter un commentaire

    1. Breville JE98XL Juice Fountain Plus Safety Locking Arm Replacement, Safety Locking Arm: étape 4, image 1 de 2 Breville JE98XL Juice Fountain Plus Safety Locking Arm Replacement, Safety Locking Arm: étape 4, image 2 de 2
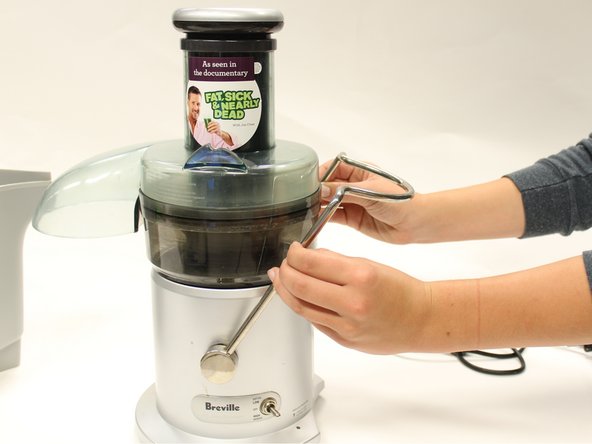
      • Place one hand on either side of the safety locking arm.

      • Disengage the locking mechanism by pulling down on the lever with even pressure. The lever should be free to move up or down once it has been properly disengaged.

      Demander à FixBot

      Ajouter un commentaire

    2. Breville JE98XL Juice Fountain Plus Safety Locking Arm Replacement: étape 5, image 1 de 2 Breville JE98XL Juice Fountain Plus Safety Locking Arm Replacement: étape 5, image 2 de 2
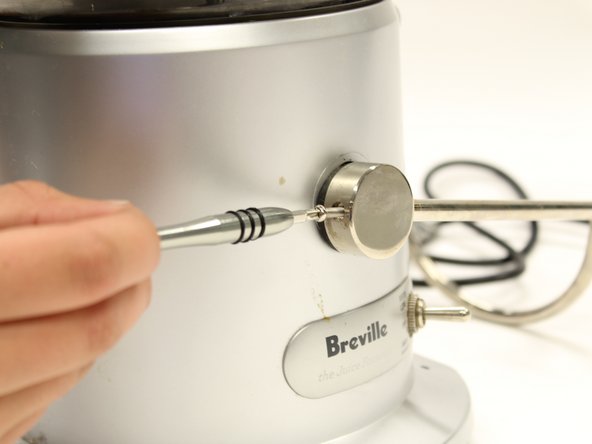
      • Locate the two 1 inch Phillips #1 screws on the back of the safety arm.

      Demander à FixBot

      Ajouter un commentaire

    3. Breville JE98XL Juice Fountain Plus Safety Locking Arm Replacement: étape 6, image 1 de 2 Breville JE98XL Juice Fountain Plus Safety Locking Arm Replacement: étape 6, image 2 de 2
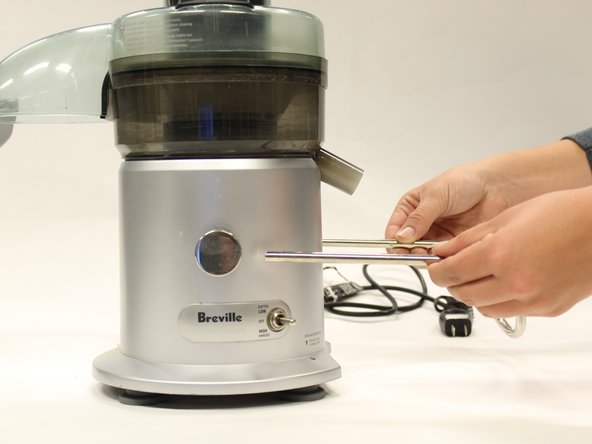
      • Remove the safety locking arm by gripping both sides and pulling horizontally away from the juicer.

      Demander à FixBot

      Ajouter un commentaire

Conclusion

To reassemble your device, follow these instructions in reverse order.

Annulation : je n'ai pas terminé ce tutoriel.

Madison Burgess

Membre depuis le 10/06/16

499 Réputation

3 tutoriels rédigés

Équipe

Cal Poly, Team 15-1, Livingston Fall 2016 Membre de l'équipe Cal Poly, Team 15-1, Livingston Fall 2016

CPSU-LIVINGSTON-F16S15G1

3 membres

16 tutoriels rédigés

0 commentaires de tutoriel

Ajouter un commentaire

Nombre de vues :

Dernières 24 heures : 1

7 derniers jours : 4

30 derniers jours : 27

Total : 1,670