Aller au contenu principal

Busch + Müller Toplight 2C permanent battery replacement

Ce dont vous avez besoin

  1. Busch + Müller Toplight 2C permanent battery replacement, Sawing to open the housing: étape 1, image 1 de 2 Busch + Müller Toplight 2C permanent battery replacement, Sawing to open the housing: étape 1, image 2 de 2
    • Saw the lamp along the ultrasonic welding seam with a fine saw (e.g. Japanese saw).

    • A total of four straight cuts must be made

    • Saw carefully so that the electronics or the battery do not get damaged

  2. Busch + Müller Toplight 2C permanent battery replacement, Open housing: étape 2, image 1 de 3 Busch + Müller Toplight 2C permanent battery replacement, Open housing: étape 2, image 2 de 3 Busch + Müller Toplight 2C permanent battery replacement, Open housing: étape 2, image 3 de 3
    • The housing should fall apart into two halves after sawing

  3. Busch + Müller Toplight 2C permanent battery replacement, Remove battery: étape 3, image 1 de 2 Busch + Müller Toplight 2C permanent battery replacement, Remove battery: étape 3, image 2 de 2
    • Pull the old battery out of the socket

    • The plug may be relatively tight in the socket. Simply wiggle it until it can be pulled out or use pliers

  4. Busch + Müller Toplight 2C permanent battery replacement, Disassemble & recycle battery: étape 4, image 1 de 3 Busch + Müller Toplight 2C permanent battery replacement, Disassemble & recycle battery: étape 4, image 2 de 3 Busch + Müller Toplight 2C permanent battery replacement, Disassemble & recycle battery: étape 4, image 3 de 3
    • Under the black foil there are two Li-Io cells in AAA size.

    • At the two outer ends are the negative terminals, which are connected with a metal clip

    • Remove the round stickers and the long metal clip

    • Remove the cables including the socket

  5. Busch + Müller Toplight 2C permanent battery replacement, Prepare new batteries: étape 5, image 1 de 3 Busch + Müller Toplight 2C permanent battery replacement, Prepare new batteries: étape 5, image 2 de 3 Busch + Müller Toplight 2C permanent battery replacement, Prepare new batteries: étape 5, image 3 de 3
    • Buy 2x ICR10440 with solder tag

    • (The batteries used here are ICR10440; 3,7V each 320mAh with Z-solder tag)

    • Put the batteries with the positive side to each other and solder the lugs

    • Now solder the red connection cable

  6. Busch + Müller Toplight 2C permanent battery replacement, Soldering and packing new batteries together: étape 6, image 1 de 3 Busch + Müller Toplight 2C permanent battery replacement, Soldering and packing new batteries together: étape 6, image 2 de 3 Busch + Müller Toplight 2C permanent battery replacement, Soldering and packing new batteries together: étape 6, image 3 de 3
    • The outer solder lugs are soldered to the sheet metal (paper clip as soldering aid).

    • The black connection cable is also soldered to the sheet metal

    • Stick the yellow adhesive tape on the open contacts

    • Stick the circular red stickers on the outer positive terminals again

    • Fix the new battery pack with insulating tape.

  7. Busch + Müller Toplight 2C permanent battery replacement, Assembly / Mounting: étape 7, image 1 de 3 Busch + Müller Toplight 2C permanent battery replacement, Assembly / Mounting: étape 7, image 2 de 3 Busch + Müller Toplight 2C permanent battery replacement, Assembly / Mounting: étape 7, image 3 de 3
    • Plug the power connector into the socket of the board

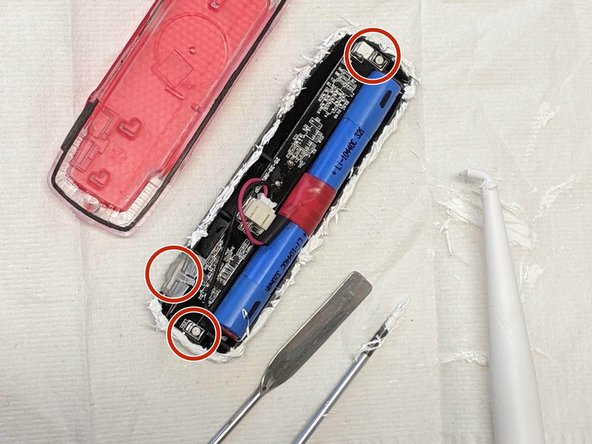
    • Insert the board into the black housing with the USB socket pointing downwards

    • Put on the reflector

    • To make the housing watertight again, the previously sawed seam must be glued together with a gap-filling adhesive. This can be done for example with Sikaflex

  8. Busch + Müller Toplight 2C permanent battery replacement, Bonding the housing: étape 8, image 1 de 3 Busch + Müller Toplight 2C permanent battery replacement, Bonding the housing: étape 8, image 2 de 3 Busch + Müller Toplight 2C permanent battery replacement, Bonding the housing: étape 8, image 3 de 3
    • Apply glue carefully along the contour (e.g. Sikaflex)

    • Make sure that the LEDs and the switch remain clean.

    • Close the housing and let the glue harden.

  9. Busch + Müller Toplight 2C permanent battery replacement, Ready, function test: étape 9, image 1 de 3 Busch + Müller Toplight 2C permanent battery replacement, Ready, function test: étape 9, image 2 de 3 Busch + Müller Toplight 2C permanent battery replacement, Ready, function test: étape 9, image 3 de 3
    • Clip the lamp into the holder

Conclusion

Work through the steps in reverse order to reassemble your device.

Merci à ces traducteurs :

de en

100%

oldturkey03 nous aide à réparer le monde ! Vous voulez contribuer ?
Commencez à traduire ›

Fritz

Membre depuis le 07/11/17

154 Réputation

1 tutoriel rédigé

0 commentaires

Ajouter un commentaire

Nombre de vues :

Dernières 24 heures : 0

7 derniers jours : 16

30 derniers jours : 91

Total : 1,078