Aller au contenu principal

Canon EOS Rebel XS 35mm Back Latch Replacement

Ce dont vous avez besoin

  1. Canon EOS Rebel XS 35mm Back Latch Replacement, Bottom Cover: étape 1, image 1 de 1
    • Remove 6 screws using a PH000 Screwdriver.

    • Remove 1 (7mm) screw

    • Remove 5 (4mm) screws

  2. Canon EOS Rebel XS 35mm Back Latch Replacement: étape 2, image 1 de 1
    • With your fingers, push on the bottom cover with a horizontal force until it clicks and separates.

  3. Canon EOS Rebel XS 35mm Back Latch Replacement: étape 3, image 1 de 1
    • With tweezers - although you can also use your fingers - you may remove these 5 gears (shown with colored squares around them) and place them somewhere else for the time being. They fall out easily while you're working, so this will help you stay organized.

  4. Canon EOS Rebel XS 35mm Back Latch Replacement, Top Cover: étape 4, image 1 de 2 Canon EOS Rebel XS 35mm Back Latch Replacement, Top Cover: étape 4, image 2 de 2
    • Using a PH000 screwdriver bit, remove the three black screws shown in the two pictures that are all 4 mm in length and 1 mm in diameter.

  5. Canon EOS Rebel XS 35mm Back Latch Replacement: étape 5, image 1 de 1
    • Using a Phillips #000 screwdriver, remove the two black screws shown in the picture that are both 6 mm in length and 1.25 mm in diameter.

  6. Canon EOS Rebel XS 35mm Back Latch Replacement: étape 6, image 1 de 1
    • Pull off the front cover.

  7. Canon EOS Rebel XS 35mm Back Latch Replacement: étape 7, image 1 de 3 Canon EOS Rebel XS 35mm Back Latch Replacement: étape 7, image 2 de 3 Canon EOS Rebel XS 35mm Back Latch Replacement: étape 7, image 3 de 3
    • Using an opening tool (you can also use your nails, but try not to use something potentially damaging to the camera such as metal), separate the top cover from the rest of the camera!

  8. Canon EOS Rebel XS 35mm Back Latch Replacement, Back Latch: étape 8, image 1 de 1
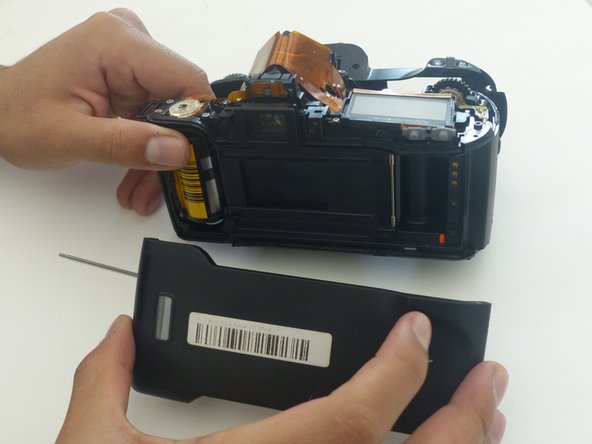
    • Once the front, top, and bottom covers have all been removed, it's time to remove the back latch! Using a paperclip or something similar (anything that's very skinny), push on the end of the skinny, silver, metal rod that vertically travels through the camera. Do this until enough of the rod pops out on the other side for the next step.

  9. Canon EOS Rebel XS 35mm Back Latch Replacement: étape 11, image 1 de 2 Canon EOS Rebel XS 35mm Back Latch Replacement: étape 11, image 2 de 2
    • With a pair of tweezers or just your fingers, pull the rod completely out of the camera. The back latch should then completely detach from the camera.

Conclusion

To reassemble your device, follow these instructions in reverse order.

christiansvezia

Membre depuis le 10/24/18

1 108 Réputation

10 tutoriels rédigés

0 commentaires

Ajouter un commentaire

Nombre de vues :

Dernières 24 heures : 0

7 derniers jours : 5

30 derniers jours : 26

Total : 614