Aller au contenu principal

Canon PowerShot A620 Shutter Button Replacement

Ce dont vous avez besoin

  1. Canon PowerShot A620 Shutter Button Replacement, Side Panel: étape 1, image 1 de 3 Canon PowerShot A620 Shutter Button Replacement, Side Panel: étape 1, image 2 de 3 Canon PowerShot A620 Shutter Button Replacement, Side Panel: étape 1, image 3 de 3
    • Unscrew the three Phillips #00 1.6x3mm screws on the side.

    • Lift loose panel from the case.

    • Unscrew the two Phillips #00 1.6x3mm screws that were previously hidden beneath the panel.

  2. Canon PowerShot A620 Shutter Button Replacement, Bottom Panel: étape 2, image 1 de 1
    • Unscrew the two Phillips #00 1.6x3mm screws on the bottom panel.

  3. Canon PowerShot A620 Shutter Button Replacement, Battery Compartment: étape 3, image 1 de 1
    • Open the battery door.

    • Unscrew the four Phillips #00 1.6x3mm screws in the battery compartment.

  4. Canon PowerShot A620 Shutter Button Replacement, Terminal Cover: étape 4, image 1 de 2 Canon PowerShot A620 Shutter Button Replacement, Terminal Cover: étape 4, image 2 de 2
    • Lift the terminal cover on the side of the camera.

    • Unscrew the three Phillips #00 1.6x3mm screws beneath the terminal cover.

  5. Canon PowerShot A620 Shutter Button Replacement, Top Panel: étape 5, image 1 de 1
    • Gently pull the top panel to separate it from the case.

    • Although the top panel will now be free from the rest of the case, it will still be attached to the camera by a ribbon cable.

  6. Canon PowerShot A620 Shutter Button Replacement, Front Panel: étape 6, image 1 de 2 Canon PowerShot A620 Shutter Button Replacement, Front Panel: étape 6, image 2 de 2
    • Gently pull the front panel to separate it from the camera.

    • The battery terminals are easy to access from this step.

  7. Canon PowerShot A620 Shutter Button Replacement, Terminal Cover: étape 7, image 1 de 2 Canon PowerShot A620 Shutter Button Replacement, Terminal Cover: étape 7, image 2 de 2
    • Gently pull the terminal cover to separate it from the camera.

  8. Canon PowerShot A620 Shutter Button Replacement, Memory Card Cover: étape 8, image 1 de 2 Canon PowerShot A620 Shutter Button Replacement, Memory Card Cover: étape 8, image 2 de 2
    • Slide the memory card cover down.

    • Unscrew the Phillips #00 1.6x3mm screw beneath the memory card cover.

  9. Canon PowerShot A620 Shutter Button Replacement, Back Panel: étape 9, image 1 de 2 Canon PowerShot A620 Shutter Button Replacement, Back Panel: étape 9, image 2 de 2
    • Gently pull the back panel to separate it from the camera.

  10. Canon PowerShot A620 Shutter Button Replacement, Metal Plate Screws: étape 10, image 1 de 2 Canon PowerShot A620 Shutter Button Replacement, Metal Plate Screws: étape 10, image 2 de 2
    • Unscrew the Phillips #00 1.6x3mm screw located on the top panel.

  11. Canon PowerShot A620 Shutter Button Replacement, Metal Plate: étape 11, image 1 de 1
    • Gently lift the metal plate and move it to the side.

  12. Canon PowerShot A620 Shutter Button Replacement, Trigger Button Screws: étape 12, image 1 de 2 Canon PowerShot A620 Shutter Button Replacement, Trigger Button Screws: étape 12, image 2 de 2
    • Unscrew the two Phillips #00 1.6x3mm screws that hold in the trigger button.

  13. Canon PowerShot A620 Shutter Button Replacement, Trigger Button: étape 13, image 1 de 1
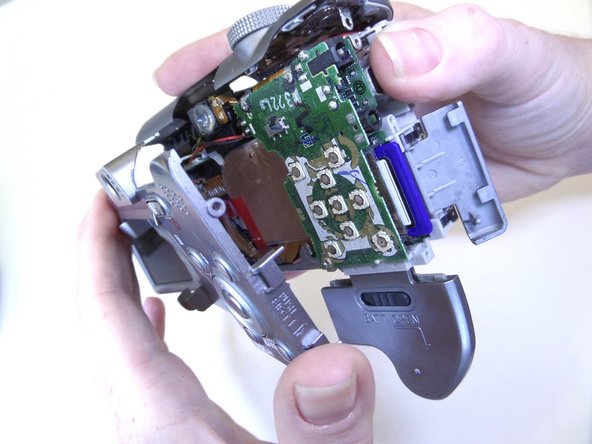
    • The trigger button will fall off once the screws have been removed.

Conclusion

To reassemble your device, follow these instructions in reverse order.

Une autre personne a terminé cette réparation.

Jaime Abraham

Membre depuis le 09/08/14

350 Réputation

3 tutoriels rédigés

Équipe

CSU Fullerton, Team 1-1, Bruce Fall 2014 Membre de l'équipe CSU Fullerton, Team 1-1, Bruce Fall 2014

CSUF-BRUCE-F14S1G1

3 membres

6 tutoriels rédigés

0 commentaires

Ajouter un commentaire

Nombre de vues :

Dernières 24 heures : 0

7 derniers jours : 6

30 derniers jours : 14

Total : 1,235