Introduction
The LCD screen can be removed and replaced. Photos, videos, and the camera menus are displayed on the LCD screen.
Ce dont vous avez besoin
-
-
Remove the 2 screws (3.2mm, Phillips #00) found on the bottom side of the camera.
-
Remove the 2 screws (3.2mm, Phillips #00) found on the side of the camera.
-
Remove the 2 screws (3.2mm, Phillips #00) found on the side of the camera where the terminals are.
-
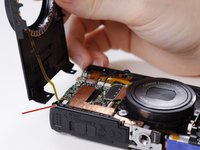
Open the flap revealing the cable inputs and remove the final screw (3.8mm, Phillips #00) found inside.
-
-
Outil utilisé dans cette étape :Tweezers$4.99
-
Turn the camera so that the lens is facing you.
-
Slowly lift the front panel from the camera.
-
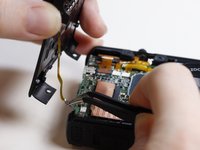
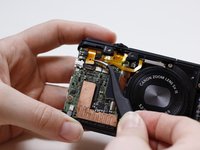
The ribbon cable is connecting the front panel to the camera. Using the tweezers, gently pull the ribbon cable out of its socket.
-
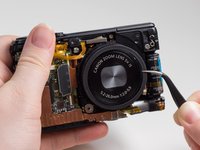
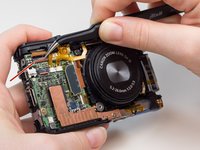
Remove the rubber guard that rests on top of the lens.
-
-
-
Turn the camera over so that the LCD screen is facing you.
-
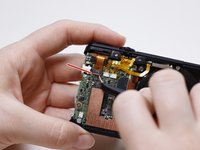
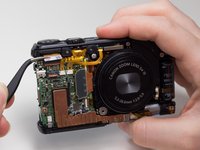
Remove the screw (3.9mm, Phillips #00) that is attaching the thin metal frame to the camera.
-
Remove the 2 screws (3.1mm, Phillips #00) that are attaching the control dial panel to the camera.
-
-


To reassemble your device, follow these instructions in reverse order.
To reassemble your device, follow these instructions in reverse order.
Annulation : je n'ai pas terminé ce tutoriel.
12 autres ont terminé cette réparation.
Équipe

USF Tampa, Team 1-4, Leahy Winter 2015 Membre de l'équipe USF Tampa, Team 1-4, Leahy Winter 2015
USFT-LEAHY-W15S1G4
4 membres
5 tutoriels rédigés
9 commentaires
Thank you for this guide. I managed to strip one of the screws holding down the control dial and had to drill it out -- don't send a software engineer to do a hardware job :-) . I also found re-inserting the cables into the sockets pretty painful.
Overall it was a pretty easy fix. Your guide and $9 on eBay (http://r.ebay.com/jbyswX) saved me a $150 repair from Canon.
Thanks again.
No wonder step 6 - the part that says 'gently lift the flap' is written in red. The 'flap' is glued onto the camera, and 'lifting' it simply breaks it off the camera, never to be returned. It was all going so well until this point; now I have to take/send it to an engineer and hope it can be fixed. I would ignore this part!
simplement bravo de France ! c’est excellent !
Be careful step 5 when you reconnect the ribbon to the dial. it may be misinserted (just under the right place and the screen won’t work.
Step 5 seems simple but it is critical. I had a lens problem but I had to detach the screen. I managed to put the camera back together alright but when I was done the camera would work but the screen wouldn't come on. I finally read the remark on this page about step number 5 so I opened the back up and used some tweezers to detach the ribbon cable that is connected to the dial panel. Then looked closely and reattached the ribbon cable in exactly the right place. That was it! When I turned the camera on the LCD screen turned on as well. Thank you so much.
swlabr -