Aller au contenu principal

Canon PowerShot SD30 Control Panel Replacement

Ce dont vous avez besoin

  1. Canon PowerShot SD30 Control Panel Replacement, Front Cover: étape 1, image 1 de 2 Canon PowerShot SD30 Control Panel Replacement, Front Cover: étape 1, image 2 de 2
    • Be sure to remove the wrist strap and battery before removing the cover.

    • Remove the two 2mm black screws that are located on the underside of the camera.

    • Remove the two 3mm silver screws from the right side of camera.

  2. Canon PowerShot SD30 Control Panel Replacement: étape 2, image 1 de 1
    • Gently remove the front cover.

  3. Canon PowerShot SD30 Control Panel Replacement, Back Cover: étape 3, image 1 de 3 Canon PowerShot SD30 Control Panel Replacement, Back Cover: étape 3, image 2 de 3 Canon PowerShot SD30 Control Panel Replacement, Back Cover: étape 3, image 3 de 3
    • Remove the wrist strap and battery before removing the back cover.

    • Remove the 2mm screw from the back of the camera.

    • Remove two 2mm screws from the bottom of the camera.

    • Remove two 2mm screws the left side of camera.
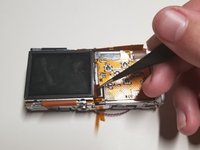
  4. Canon PowerShot SD30 Control Panel Replacement: étape 4, image 1 de 1
    • Gently remove the back cover.

  5. Canon PowerShot SD30 Control Panel Replacement, Control Panel: étape 5, image 1 de 3 Canon PowerShot SD30 Control Panel Replacement, Control Panel: étape 5, image 2 de 3 Canon PowerShot SD30 Control Panel Replacement, Control Panel: étape 5, image 3 de 3
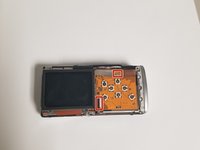
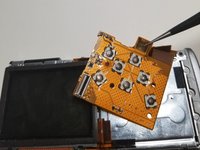
    • Use the tweezers to pull up on the piece of black plastic connected to the ribbon to unhook and remove the ribbon connected to the screen.

    • You also have to pull up on the top part of the control panel because it is connected to the metal by a sticky pad.

  6. Canon PowerShot SD30 Control Panel Replacement: étape 6, image 1 de 3 Canon PowerShot SD30 Control Panel Replacement: étape 6, image 2 de 3 Canon PowerShot SD30 Control Panel Replacement: étape 6, image 3 de 3
    • Turn the camera over to the side with the lens and remove the ribbon on the left side.

    • After removing the ribbon there will be a second ribbon to remove that was hiding underneath the first ribbon.

  7. Canon PowerShot SD30 Control Panel Replacement: étape 7, image 1 de 1
    • Lift up the button that connects to the power button of the camera so you can remove the control panel.

  8. Canon PowerShot SD30 Control Panel Replacement: étape 8, image 1 de 1
    • Remove the control panel from the camera.

Conclusion

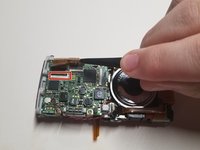
To reassemble your device, follow these instructions in reverse order.

2 autres ont terminé cette réparation.

Diego Hughes

Membre depuis le 09/21/18

139 Réputation

1 tutoriel rédigé

Équipe

0 commentaires

Ajouter un commentaire

Nombre de vues :

Dernières 24 heures : 0

7 derniers jours : 3

30 derniers jours : 6

Total : 226