Aller au contenu principal

Canon PowerShot SD30 Screen Replacement

Ce dont vous avez besoin

  1. Canon PowerShot SD30 Screen Replacement, Front Cover: étape 1, image 1 de 2 Canon PowerShot SD30 Screen Replacement, Front Cover: étape 1, image 2 de 2
    • Be sure to remove the wrist strap and battery before removing the cover.

    • Remove the two 2mm black screws that are located on the underside of the camera.

    • Remove the two 3mm silver screws from the right side of camera.

  2. Canon PowerShot SD30 Screen Replacement: étape 2, image 1 de 1
    • Gently remove the front cover.

  3. Canon PowerShot SD30 Screen Replacement, Back Cover: étape 3, image 1 de 3 Canon PowerShot SD30 Screen Replacement, Back Cover: étape 3, image 2 de 3 Canon PowerShot SD30 Screen Replacement, Back Cover: étape 3, image 3 de 3
    • Remove the wrist strap and battery before removing the back cover.

    • Remove the 2mm screw from the back of the camera.

    • Remove two 2mm screws from the bottom of the camera.

    • Remove two 2mm screws the left side of camera.

  4. Canon PowerShot SD30 Screen Replacement: étape 4, image 1 de 1
    • Gently remove the back cover.

  5. Canon PowerShot SD30 Screen Replacement, Screen: étape 5, image 1 de 2 Canon PowerShot SD30 Screen Replacement, Screen: étape 5, image 2 de 2
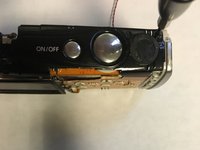
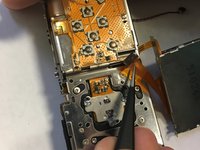
    • Remove top button panel by removing the screw located at the top right of the panel.

  6. Canon PowerShot SD30 Screen Replacement: étape 6, image 1 de 2 Canon PowerShot SD30 Screen Replacement: étape 6, image 2 de 2
    • Remove screws both at the top and the base of the screen to free the screen.

  7. Canon PowerShot SD30 Screen Replacement: étape 7, image 1 de 3 Canon PowerShot SD30 Screen Replacement: étape 7, image 2 de 3 Canon PowerShot SD30 Screen Replacement: étape 7, image 3 de 3
    • Use tweezers to lift the tab that secures the screen wire and remove.

    • You need to do this for both wires.

Conclusion

To reassemble your device, follow these instructions in reverse order.

2 autres ont terminé cette réparation.

Erin Brophy

Membre depuis le 09/21/18

124 Réputation

1 tutoriel rédigé

Équipe

0 commentaires

Ajouter un commentaire

Nombre de vues :

Dernières 24 heures : 0

7 derniers jours : 0

30 derniers jours : 0

Total : 134