Aller au contenu principal

Canon PowerShot SX120 IS Function Buttons Replacement

Ce dont vous avez besoin

  1. Canon PowerShot SX120 IS Function Buttons Replacement, Back Cover: étape 1, image 1 de 1
    • Turning the camera so the screen is facing you.

    • Remove the two black 3.4 mm screws with a Phillips #00 screwdriver.

  2. Canon PowerShot SX120 IS Function Buttons Replacement: étape 2, image 1 de 1
    • Put the camera with the lens facing up and turn it to the side so the DC IN A/V OUT DIGITAL is facing you.

    • Remove the single black 3.4 mm screw with a Phillips #00 screwdriver.

  3. Canon PowerShot SX120 IS Function Buttons Replacement: étape 3, image 1 de 2 Canon PowerShot SX120 IS Function Buttons Replacement: étape 3, image 2 de 2
    • Put the camera with the lens facing up, and turn it to the side where the battery cover is located.

    • Remove the three black 3.4 mm screws with a Phillips #00 screwdriver.

  4. Canon PowerShot SX120 IS Function Buttons Replacement: étape 4, image 1 de 2 Canon PowerShot SX120 IS Function Buttons Replacement: étape 4, image 2 de 2
    • Put the camera with the lens facing up, turn it to the side where the compartment of the battery (CR1220) for time/date is located.

    • Remove the single black 3.4 mm screw with a Phillips #00 screwdriver.

  5. Canon PowerShot SX120 IS Function Buttons Replacement: étape 5, image 1 de 1
    • Put the camera with the lens facing down, and turn it to the side where the DC IN A/V OUT DIGITAL cover and the silver lanyard attachment are located.

    • Open the DC IN A/V OUT DIGITAL cover.

    • Remove the single black 3.4 mm screw with a Phillips #00 screwdriver.

  6. Canon PowerShot SX120 IS Function Buttons Replacement: étape 6, image 1 de 3 Canon PowerShot SX120 IS Function Buttons Replacement: étape 6, image 2 de 3 Canon PowerShot SX120 IS Function Buttons Replacement: étape 6, image 3 de 3
    • Turn the camera with the lens facing down.

    • Opening the camera can be challenging. Don't get discouraged if it takes you a few tries before the camera is opened.

    • Use the iFixit opening tool to make leverage. Insert the opening tool in the seam where the front case and the back case assemble.

    • Carefully put pressure on the opening tool so the cover can gradually open.

    • Slowly slide the opening tool along the gap and around the edge of the camera.

    • When you are dissembling the back cover, the DC IN A/V OUT DIGITAL cover will also disassemble and fall off.

  7. Canon PowerShot SX120 IS Function Buttons Replacement: étape 7, image 1 de 1
    • Remove the back cover and the DC IN A/V OUT DIGITAL cover from the camera.

  8. Canon PowerShot SX120 IS Function Buttons Replacement, Control Dial: étape 8, image 1 de 3 Canon PowerShot SX120 IS Function Buttons Replacement, Control Dial: étape 8, image 2 de 3 Canon PowerShot SX120 IS Function Buttons Replacement, Control Dial: étape 8, image 3 de 3
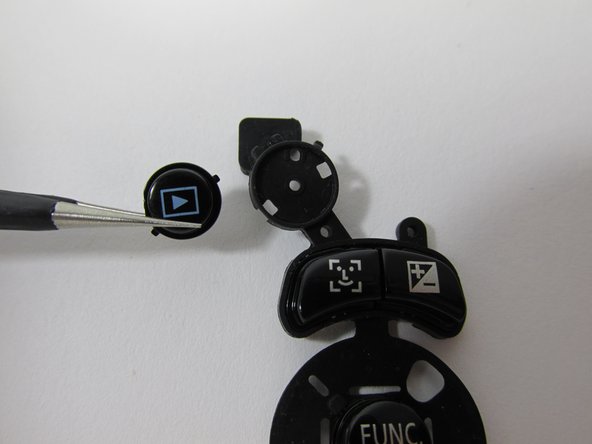
    • Carefully remove the pin underneath the dial using a pair of tweezers and set it aside.

    • Use a pair of tweezers to remove the old control dial and set the new control in the same place.

  9. Canon PowerShot SX120 IS Function Buttons Replacement, Function/Display/Menu Buttons: étape 9, image 1 de 3 Canon PowerShot SX120 IS Function Buttons Replacement, Function/Display/Menu Buttons: étape 9, image 2 de 3 Canon PowerShot SX120 IS Function Buttons Replacement, Function/Display/Menu Buttons: étape 9, image 3 de 3
    • Once casing and control dial have been removed, you will begin removing silicone button pad.

    • Use tweezers to grip the edge of the silicone pad and begin lifting upward.

  10. Canon PowerShot SX120 IS Function Buttons Replacement: étape 10, image 1 de 3 Canon PowerShot SX120 IS Function Buttons Replacement: étape 10, image 2 de 3 Canon PowerShot SX120 IS Function Buttons Replacement: étape 10, image 3 de 3
    • Continue lifting until pad is separated completely from the camera.

  11. Canon PowerShot SX120 IS Function Buttons Replacement: étape 11, image 1 de 2 Canon PowerShot SX120 IS Function Buttons Replacement: étape 11, image 2 de 2
    • Once pad is separated from camera, use tweezers to grip button(s) that need to be removed, and lift until it has been separated completely from the pad.

Conclusion

To reassemble your device, follow these instructions in reverse order.

Brea Baca

Membre depuis le 03/20/14

101 Réputation

1 tutoriel rédigé

Équipe

New Mexico State, Team 1-3, Easley Spring 2014 Membre de l'équipe New Mexico State, Team 1-3, Easley Spring 2014

NMSU-EASLEY-S14S1G3

4 membres

4 tutoriels rédigés

0 commentaires

Ajouter un commentaire

Nombre de vues :

Dernières 24 heures : 0

7 derniers jours : 1

30 derniers jours : 8

Total : 1,529