Aller au contenu principal

Canon PowerShot SX160 IS Outer Case Replacement

Ce dont vous avez besoin

  1. Canon PowerShot SX160 IS Outer Case Replacement, Outer Case: étape 1, image 1 de 3 Canon PowerShot SX160 IS Outer Case Replacement, Outer Case: étape 1, image 2 de 3 Canon PowerShot SX160 IS Outer Case Replacement, Outer Case: étape 1, image 3 de 3
    • Unscrew 2-4.8mm black screws from the front of the camera using a #0 Phillips screwdriver.

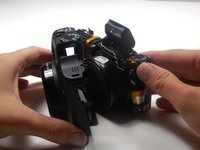
    • Unscrew 2-4.8mm black screws from the side of the camera using a #0 Phillips screwdriver.

    • Unscrew 2-4.8mm black screws from the bottom of the camera using a #0 Phillips screwdriver.

  2. Canon PowerShot SX160 IS Outer Case Replacement: étape 2, image 1 de 2 Canon PowerShot SX160 IS Outer Case Replacement: étape 2, image 2 de 2
    • Using your hands, gently separate the back panel from the camera.

    • Continue to pull the back panel until it completely detaches from the camera.

  3. Canon PowerShot SX160 IS Outer Case Replacement: étape 3, image 1 de 2 Canon PowerShot SX160 IS Outer Case Replacement: étape 3, image 2 de 2
    • Use your hands to gently separate the front panel from the camera.

    • Continue to pull the front panel until it completely detaches from the camera.

Conclusion

To reassemble your device, follow these instructions in reverse order.

2 autres ont terminé cette réparation.

Jamie Secretan

Membre depuis le 03/11/15

1 962 Réputation

6 tutoriels rédigés

Équipe

Colorado Springs, Team 2-3, Panko Spring 2015 Membre de l'équipe Colorado Springs, Team 2-3, Panko Spring 2015

UCCS-PANKO-S15S2G3

3 membres

6 tutoriels rédigés

Un commentaire

guide is missing removal of several screws. Four silver screws for front cover. I removed a total of 12 screws to remove covers. Guide only shows 6. Also requires disconnection of flex strip attached to front cover, from below wheel

Stewie Wewie - Réponse

Ajouter un commentaire

Nombre de vues :

Dernières 24 heures : 0

7 derniers jours : 4

30 derniers jours : 7

Total : 1,795