Aller au contenu principal

Canon PowerShot SX230 HS LCD Screen Replacement

Ce dont vous avez besoin

  1. Canon PowerShot SX230 HS LCD Screen Replacement, LCD Screen: étape 1, image 1 de 3 Canon PowerShot SX230 HS LCD Screen Replacement, LCD Screen: étape 1, image 2 de 3 Canon PowerShot SX230 HS LCD Screen Replacement, LCD Screen: étape 1, image 3 de 3
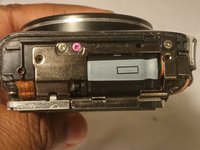
    • Remove the two 2.5 mm screws located on the right side of the camera using the Phillips #000 Screwdriver

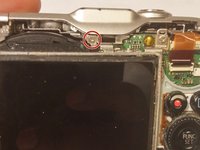
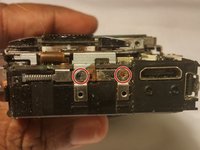
    • Unscrew the two 2.5 mm screws located on the side of the camera. Then, remove the two black 2.5 mm screw located on the bottom of the camera.

  2. Canon PowerShot SX230 HS LCD Screen Replacement: étape 2, image 1 de 1
    • Pull off the back casing and carefully pull the ribbon cable that connects the mode dial and the motherboard using your fingers.

  3. Canon PowerShot SX230 HS LCD Screen Replacement: étape 3, image 1 de 2 Canon PowerShot SX230 HS LCD Screen Replacement: étape 3, image 2 de 2
    • On the inside of the camera, there will is a pink and silver screw. Unscrew the silver 2.5 mm screw only.

    • Remove the screw located right above the LCD screen.

  4. Canon PowerShot SX230 HS LCD Screen Replacement: étape 4, image 1 de 1
    • Using your fingers, carefully remove the ribbon cable located at the top right of the camera. Then pull off the camera's front casing.

    • Make sure the battery/SD Card panel is open.

  5. Canon PowerShot SX230 HS LCD Screen Replacement: étape 5, image 1 de 2 Canon PowerShot SX230 HS LCD Screen Replacement: étape 5, image 2 de 2
    • Remove the two 2.5 mm screws that secures the camera buttons to the camera located on the right side of the camera. Then, remove the screw located on the side of the screen. Now, locate the screw under the LCD screen and remove it.

Conclusion

To reassemble your device, follow these instructions in reverse order.

5 autres ont terminé cette réparation.

KeShayla Thomas

Membre depuis le 03/26/15

245 Réputation

1 tutoriel rédigé

Équipe

Sam Houston State, Team 13-20, Blackburne Spring 2015 Membre de l'équipe Sam Houston State, Team 13-20, Blackburne Spring 2015

SHSU-BLACKBURNE-S15S13G20

1 membre

1 tutoriel rédigé

3 commentaires

I need to take my SX230 apart to replace the battery or capacitor responsible for storing the date and time when you remove the battery to charge it. anytime i remove the battery to charge it, my camera looses its date and time, do you know what i need to do to fix this issue?

jakegaisser - Réponse

Thank you! Just replaced the screen on my SX220 - very similar, a couple of screws in different places, but nothing I couldn't figure out. Did take a good bit longer than 4-5 minutes though - that's perhaps for someone who's done a few before! Thank you again.

Andrew Bowman - Réponse

Suggest additional illustrations for “pull off camera front casing” and steps 6,7, and 8 to show removal of screen, replacement, and reassembly.

Rafael Rosaly - Réponse

Ajouter un commentaire

Nombre de vues :

Dernières 24 heures : 1

7 derniers jours : 1

30 derniers jours : 9

Total : 2,962