Aller au contenu principal

Canon PowerShot SX50 HS Flash Bulb Replacement

Ce dont vous avez besoin

  1. Canon PowerShot SX50 HS Flash Bulb Replacement, Battery: étape 1, image 1 de 1
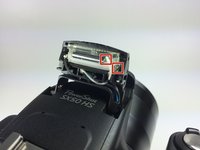
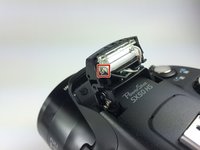
    • Locate the battery compartment on the bottom of the camera.

    • Push the latch on the outside of the battery door to the right to get to the battery pack inside.

  2. Canon PowerShot SX50 HS Flash Bulb Replacement: étape 2, image 1 de 1
    • Pull the brown latch on the inside of the battery door towards your palm (to the left). The battery pack should pop out (battery not pictured).

    • Now remove the battery pack from the camera with your fingers.

  3. Canon PowerShot SX50 HS Flash Bulb Replacement, Flash Bulb: étape 3, image 1 de 1
    • Lift up the flash as you would when using and activating the flash.

  4. Canon PowerShot SX50 HS Flash Bulb Replacement: étape 4, image 1 de 2 Canon PowerShot SX50 HS Flash Bulb Replacement: étape 4, image 2 de 2
    • Remove the two Phillips #000 screws, length 3 mm, on both sides of the flash.

  5. Canon PowerShot SX50 HS Flash Bulb Replacement: étape 5, image 1 de 1
    • Pull off the back encasement of the flash with your fingers. The internals will now become visible.

  6. Canon PowerShot SX50 HS Flash Bulb Replacement: étape 6, image 1 de 2 Canon PowerShot SX50 HS Flash Bulb Replacement: étape 6, image 2 de 2
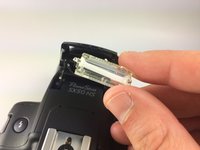
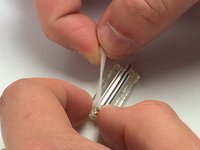
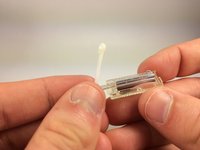
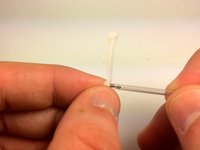
    • Locate the black, white and the beige wires. Desolder these wires at the point of connection with the bulb.

    • See the guide on this link for soldering and desoldering.

  7. Canon PowerShot SX50 HS Flash Bulb Replacement: étape 7, image 1 de 3 Canon PowerShot SX50 HS Flash Bulb Replacement: étape 7, image 2 de 3 Canon PowerShot SX50 HS Flash Bulb Replacement: étape 7, image 3 de 3
    • Once the wires have been desoldered, pull the flash out of its casing.

    • Remove one end of the rubber band holding the bulb in place.

    • Slide the bulb out of the flash.

  8. Canon PowerShot SX50 HS Flash Bulb Replacement: étape 8, image 1 de 2 Canon PowerShot SX50 HS Flash Bulb Replacement: étape 8, image 2 de 2
    • Completely remove the rubber band from the flash bulb.

Conclusion

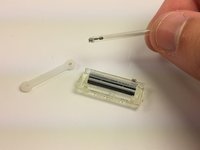
To reassemble your device, follow these instructions in reverse order.

2 autres ont terminé cette réparation.

Daniel Gurrola

Membre depuis le 04/01/15

267 Réputation

2 tutoriels rédigés

Équipe

Cal Poly, Team 12-7, Lancaster Spring 2015 Membre de l'équipe Cal Poly, Team 12-7, Lancaster Spring 2015

CPSU-LANCASTER-S15S12G7

5 membres

7 tutoriels rédigés

5 commentaires

Hello! excellent explanation . Thank you very much! I have a question : could you tell me where I can buy the replacement lamp ? I already tried searching online but can not find anywhere that sells it. Thank you very much , greetings !

German Witt - Réponse

I need a bulb, no one can tell where you can find a bulb, and it says no parts needed. that's stupid since you need a replacement bulb that you can't find. without it all this is useless.

buborek1974 - Réponse

Where can i found the replacement bulb???Why it is written that there is no need for replacement parts?

Audrey - Réponse

Do you know where I can purchase a bulb to go with this type of camera? I can not find just the bulb. Please HELP!

arusso4e - Réponse

Hi, i need know if this piece is the correct


https://es.aliexpress.com/item/328403224...

Thanks


Fredy Cardenas Bolaños - Réponse

Ajouter un commentaire

Nombre de vues :

Dernières 24 heures : 3

7 derniers jours : 7

30 derniers jours : 31

Total : 5,583