Aller au contenu principal

Canon PowerShot SX530 HS Internal Metal Frame Replacement

Ce dont vous avez besoin

  1. Canon PowerShot SX530 HS Internal Metal Frame Replacement, Battery: étape 1, image 1 de 1
    • Flip the camera upside down to find the battery compartment (marked CARD/ BATT. OPEN).

    • Press into the grooves of the battery door and slide the panel in the direction of the arrow.

  2. Canon PowerShot SX530 HS Internal Metal Frame Replacement: étape 2, image 1 de 1
    • Gently press down on the orange release button found inside.

    • After pressing the release button, pull the battery out of the camera.

  3. Canon PowerShot SX530 HS Internal Metal Frame Replacement, Canon PowerShot SX530 HS Back Panel Assembly: étape 3, image 1 de 2 Canon PowerShot SX530 HS Internal Metal Frame Replacement, Canon PowerShot SX530 HS Back Panel Assembly: étape 3, image 2 de 2
    • Flip over the camera.

    • Use a Phillips PH000 to remove the two 4mm screws near the center of the camera.

    • Use a Phillips PH000 to remove the two 6mm screws on the ends of the camera.

  4. Canon PowerShot SX530 HS Internal Metal Frame Replacement: étape 4, image 1 de 2 Canon PowerShot SX530 HS Internal Metal Frame Replacement: étape 4, image 2 de 2
    • Locate the left side of the camera.

    • Use a Philips PH000 to remove the two 6mm screws.

  5. Canon PowerShot SX530 HS Internal Metal Frame Replacement: étape 5, image 1 de 2 Canon PowerShot SX530 HS Internal Metal Frame Replacement: étape 5, image 2 de 2
    • Rotate the camera to the side with the removable cover containing the HDMI and mini USB ports.

    • Use the Phillips PH000 to remove the 7mm screw located next to the HDMI port. This screw has red loctite.

    • Use the Phillips PH000 to remove the 4mm screw near the USB port.

    • Use the Phillips PH000 to remove the 7.4mm screw near the USB port.

  6. Canon PowerShot SX530 HS Internal Metal Frame Replacement: étape 6, image 1 de 3 Canon PowerShot SX530 HS Internal Metal Frame Replacement: étape 6, image 2 de 3 Canon PowerShot SX530 HS Internal Metal Frame Replacement: étape 6, image 3 de 3
    • Rotate the camera to locate the side with the LCD screen.

    • Use a Phillips PH000 to remove the two 6mm screws above the LCD screen.

    • Once the screws are out the back panel, it is ready to be taken off. Grip the backside of the camera and pull it away evenly on every side. The backside must come off straight from the front.

  7. Canon PowerShot SX530 HS Internal Metal Frame Replacement, Internal Button Sensor Plate: étape 7, image 1 de 2 Canon PowerShot SX530 HS Internal Metal Frame Replacement, Internal Button Sensor Plate: étape 7, image 2 de 2
    • Locate the Internal Button Sensor Plate. This is the white and silver plate to the right of the LCD Display.

    • Use a Phillips PH000 to remove the two 3mm screws on the panel.

    • Use a Phillips PH000 to remove the 3mm screw connected to the motherboard.

  8. Canon PowerShot SX530 HS Internal Metal Frame Replacement: étape 8, image 1 de 2 Canon PowerShot SX530 HS Internal Metal Frame Replacement: étape 8, image 2 de 2
    • Peel off the plate. Be careful, as the plate is connected to the motherboard underneath by a ribbon.

    • Use a plastic opening tool to unlock the ribbon tape.

    • Remove the ribbon tape from the motherboard.

  9. Canon PowerShot SX530 HS Internal Metal Frame Replacement, LCD Display: étape 9, image 1 de 2 Canon PowerShot SX530 HS Internal Metal Frame Replacement, LCD Display: étape 9, image 2 de 2
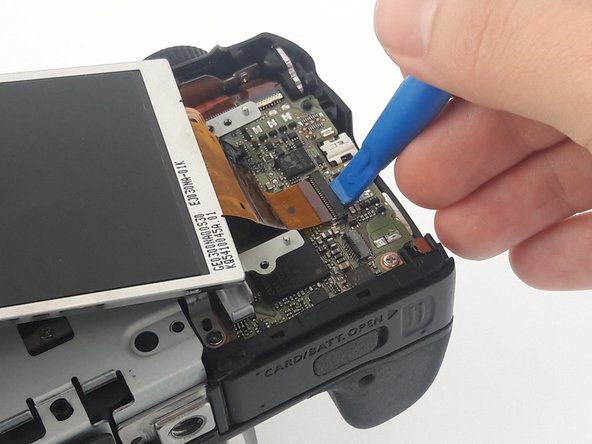
    • Locate the Display screen in the center of the camera.

    • Use a plastic opening tool to pry off the LCD screen. Start on the bottom left corner—this is the furthest away from the ribbon holding it down on the right side.

    • The adhesive holding down the display should be strong enough to put the display back on.

  10. Canon PowerShot SX530 HS Internal Metal Frame Replacement: étape 10, image 1 de 1
    • Use a plastic opening tool to unlock the ribbon tape.

    • Remove the ribbon tape from the motherboard.

  11. Canon PowerShot SX530 HS Internal Metal Frame Replacement, Shutter Back Cover: étape 11, image 1 de 1
    • Remove the two screws (5-6mm) on the left and right side of the shutter panel with a Phillips PH000 screwdriver.

  12. Canon PowerShot SX530 HS Internal Metal Frame Replacement: étape 12, image 1 de 1
    • Lift the shutter light and pull the shutter back panel off the camera.

    • Be careful when pulling out the panel because it is connected to the motherboard.

  13. Canon PowerShot SX530 HS Internal Metal Frame Replacement, Internal Metal Frame: étape 13, image 1 de 2 Canon PowerShot SX530 HS Internal Metal Frame Replacement, Internal Metal Frame: étape 13, image 2 de 2
    • Use a PH000 screwdriver to remove the four 3.5 mm screws holding the plate in place.

    • Use a PH000 screwdriver to remove the two 2.5 mm screws holding the top of the plate.

    • Use a PH000 screwdriver to remove the two 4.5 mm screws connecting the plate to the motherboard.

  14. Canon PowerShot SX530 HS Internal Metal Frame Replacement: étape 14, image 1 de 1
    • Gently pull the plate up and away from the camera.

    • Part of the plate extends inside the camera beneath the shutter, so be sure to not angle the plate as you pull.

Conclusion

To reassemble your device, follow these instructions in reverse order.

Joel groff

Membre depuis le 02/02/17

321 Réputation

2 tutoriels rédigés

Équipe

USF Tampa, Team 16-4, Blackwell Spring 2017 Membre de l'équipe USF Tampa, Team 16-4, Blackwell Spring 2017

USFT-BLACKWELL-S17S16G4

4 membres

9 tutoriels rédigés

0 commentaires

Ajouter un commentaire

Nombre de vues :

Dernières 24 heures : 0

7 derniers jours : 0

30 derniers jours : 3

Total : 398