Aller au contenu principal

Capresso Infinity Power Cord Replacement

Ce dont vous avez besoin

  1. Capresso Infinity Power Cord Replacement, Metal Outside Casing: étape 1, image 1 de 2 Capresso Infinity Power Cord Replacement, Metal Outside Casing: étape 1, image 2 de 2
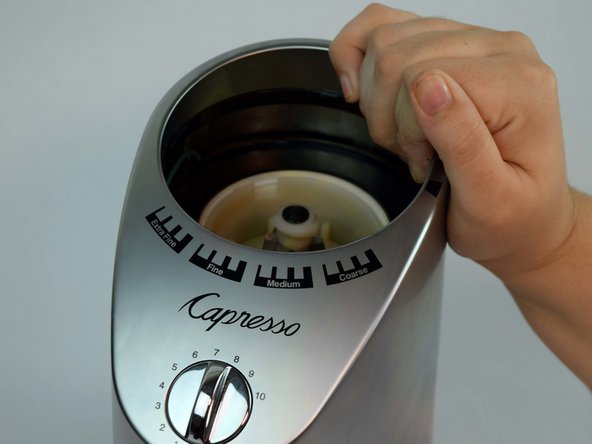
    • Twist the top plastic container to the left counterclockwise.

    • Pull upwards to remove.

  2. Capresso Infinity Power Cord Replacement: étape 2, image 1 de 3 Capresso Infinity Power Cord Replacement: étape 2, image 2 de 3 Capresso Infinity Power Cord Replacement: étape 2, image 3 de 3
    • Twist the top burr to the left counter clockwise.

    • Pull upwards to remove.

  3. Capresso Infinity Power Cord Replacement: étape 3, image 1 de 2 Capresso Infinity Power Cord Replacement: étape 3, image 2 de 2
    • Flip entire device upside down.

    • Remove two rubber coverings on the back of the device.

  4. Capresso Infinity Power Cord Replacement: étape 4, image 1 de 2 Capresso Infinity Power Cord Replacement: étape 4, image 2 de 2
    • Remove four 11.59mm T10 screws.

    • The screws will have small circular washers under them. Put them aside for reassembly.

  5. Capresso Infinity Power Cord Replacement: étape 5, image 1 de 3 Capresso Infinity Power Cord Replacement: étape 5, image 2 de 3 Capresso Infinity Power Cord Replacement: étape 5, image 3 de 3
    • Lift the metal outside casing off the black base.

    • Flip the outside casing forward so you have access to the inside of it.

  6. Capresso Infinity Power Cord Replacement: étape 6, image 1 de 3 Capresso Infinity Power Cord Replacement: étape 6, image 2 de 3 Capresso Infinity Power Cord Replacement: étape 6, image 3 de 3
    • Remove one 11.59mm T10 screw.

    • Let the green wire fall, or place somewhere so it doesn't get in the way.

    • There will be a small metal retainer and washer, put them aside for reassembly.

  7. Capresso Infinity Power Cord Replacement: étape 7, image 1 de 3 Capresso Infinity Power Cord Replacement: étape 7, image 2 de 3 Capresso Infinity Power Cord Replacement: étape 7, image 3 de 3
    • Remove two 11.59mm T10 screws.

  8. Capresso Infinity Power Cord Replacement: étape 8, image 1 de 2 Capresso Infinity Power Cord Replacement: étape 8, image 2 de 2
    • Remove the time/on switch by pulling upwards.

  9. Capresso Infinity Power Cord Replacement, Power Cord: étape 9, image 1 de 3 Capresso Infinity Power Cord Replacement, Power Cord: étape 9, image 2 de 3 Capresso Infinity Power Cord Replacement, Power Cord: étape 9, image 3 de 3
    • Remove two 13.60mm T10 screws.

    • A white, flat plastic piece will have come loose. Place this to the side for reassembly.

  10. Capresso Infinity Power Cord Replacement: étape 10, image 1 de 3 Capresso Infinity Power Cord Replacement: étape 10, image 2 de 3 Capresso Infinity Power Cord Replacement: étape 10, image 3 de 3
    • Using a Flathead screwdriver loosen the two screws connecting the white and black wire to the plastic box.

    • Do not remove the screws from the box, but loosen them enough to disconnect the black and white wire.

  11. Capresso Infinity Power Cord Replacement: étape 11, image 1 de 3 Capresso Infinity Power Cord Replacement: étape 11, image 2 de 3 Capresso Infinity Power Cord Replacement: étape 11, image 3 de 3
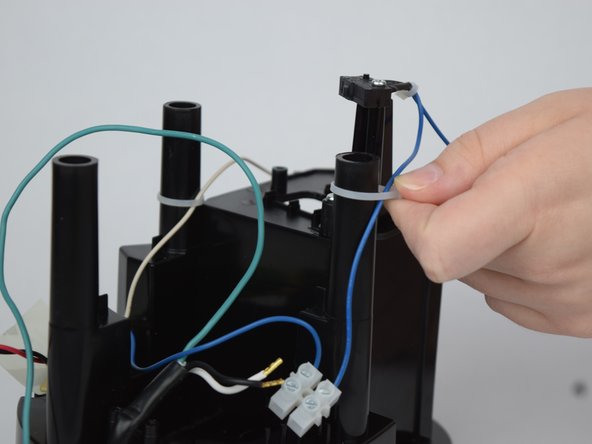
    • Originally attached to the inside of the outer casing, the green wire needs to be fed through the zip tie which keeps it in place.

    • Lift up on the zip tie far enough to create a space to feed the green wire through.

    • Place the zip tie back around the column that you lifted it from.

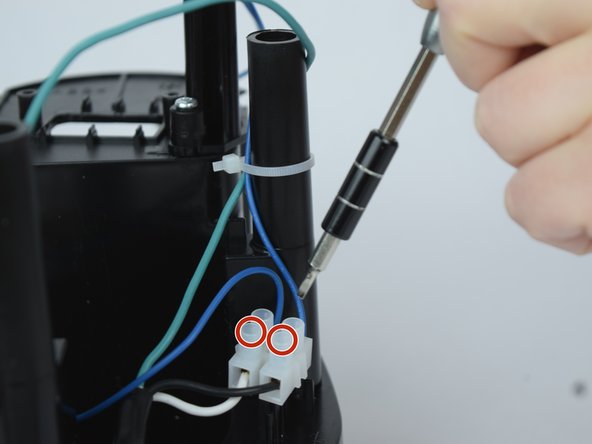
    • All three wires that comprise the power cord should be detached from the coffee grinder.

  12. Capresso Infinity Power Cord Replacement: étape 12, image 1 de 3 Capresso Infinity Power Cord Replacement: étape 12, image 2 de 3 Capresso Infinity Power Cord Replacement: étape 12, image 3 de 3
    • Feed the wires through the small hole at the bottom of the coffee grinder where the external power cord is located.

    • Once the power cord is free of the coffee grinder, you are able to put in the new cord.

Conclusion

To reassemble your device, follow these instructions in reverse order.

Elizabeth Roach

Membre depuis le 10/09/18

233 Réputation

1 tutoriel rédigé

Équipe

USF Tampa, Team S1-G1, Leahy Fall 2018 Membre de l'équipe USF Tampa, Team S1-G1, Leahy Fall 2018

USFT-LEAHY-F18S1G1

4 membres

5 tutoriels rédigés

0 commentaires

Ajouter un commentaire

Nombre de vues :

Dernières 24 heures : 0

7 derniers jours : 1

30 derniers jours : 2

Total : 472