Aller au contenu principal

Capresso Infinity Timer/On Switch Replacement

Ce dont vous avez besoin

  1. Capresso Infinity Timer/On Switch Replacement, Metal Outside Casing: étape 1, image 1 de 2 Capresso Infinity Timer/On Switch Replacement, Metal Outside Casing: étape 1, image 2 de 2
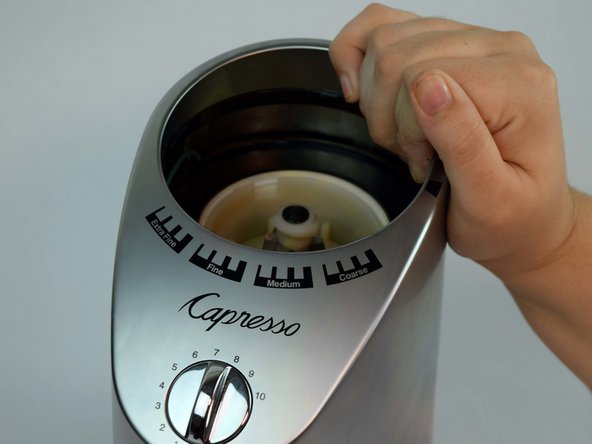
    • Twist the top plastic container to the left counterclockwise.

    • Pull upwards to remove.

  2. Capresso Infinity Timer/On Switch Replacement: étape 2, image 1 de 3 Capresso Infinity Timer/On Switch Replacement: étape 2, image 2 de 3 Capresso Infinity Timer/On Switch Replacement: étape 2, image 3 de 3
    • Twist the top burr to the left counter clockwise.

    • Pull upwards to remove.

    I own a model 560. Removing the grinder requires a Torx 20, which is in the center of the top burr. If used, the screw is coated with coffee grinds.

    nereocystis - Réponse

  3. Capresso Infinity Timer/On Switch Replacement: étape 3, image 1 de 2 Capresso Infinity Timer/On Switch Replacement: étape 3, image 2 de 2
    • Flip entire device upside down.

    • Remove two rubber coverings on the back of the device.

  4. Capresso Infinity Timer/On Switch Replacement: étape 4, image 1 de 2 Capresso Infinity Timer/On Switch Replacement: étape 4, image 2 de 2
    • Remove four 11.59mm T10 screws.

    • The screws will have small circular washers under them. Put them aside for reassembly.

    T8 Torx screws. The two screws towards the front of the machine are below those circled in red in the picture.

    Canbo - Réponse

    My housing is plastic, and was just held on by clips holding the outer part to the base, I gently pried the housing away and lifted the housing off. It’s a Capresso model 560

    panchocole - Réponse

    Mine is as well. I tried digging the “rubber washers” out but it was only scratching plastic.

    There are 5 areas you can slide a slim flathead into and gently wiggle to get the casing to slide out from the base. Be firm yet gentle.

    Joseph Hirn - Réponse

  5. Capresso Infinity Timer/On Switch Replacement: étape 5, image 1 de 3 Capresso Infinity Timer/On Switch Replacement: étape 5, image 2 de 3 Capresso Infinity Timer/On Switch Replacement: étape 5, image 3 de 3
    • Lift the metal outside casing off the black base.

    • Flip the outside casing forward so you have access to the inside of it.

    What about the hard black plastic gasket that fits under the inside lip of the outer metal case?

    Nicole - Réponse

    What about the hard black plastic gasket that fits under the inside lip of the outer metal case?

    Nicole - Réponse

    It sits between the outer metal case & the black plastic flat ring. Please describe how to reassemble that part.

    Nicole - Réponse

  6. Capresso Infinity Timer/On Switch Replacement: étape 6, image 1 de 3 Capresso Infinity Timer/On Switch Replacement: étape 6, image 2 de 3 Capresso Infinity Timer/On Switch Replacement: étape 6, image 3 de 3
    • Remove one 11.59mm T10 screw.

    • Let the green wire fall, or place somewhere so it doesn't get in the way.

    • There will be a small metal retainer and washer, put them aside for reassembly.

    T8 Torx screw.

    Canbo - Réponse

    My unit has a plastic case and a two-prong plug, so there is no ground wire.

    michael.g.safonov - Réponse

  7. Capresso Infinity Timer/On Switch Replacement: étape 7, image 1 de 3 Capresso Infinity Timer/On Switch Replacement: étape 7, image 2 de 3 Capresso Infinity Timer/On Switch Replacement: étape 7, image 3 de 3
    • Remove two 11.59mm T10 screws.

  8. Capresso Infinity Timer/On Switch Replacement: étape 8, image 1 de 2 Capresso Infinity Timer/On Switch Replacement: étape 8, image 2 de 2
    • Remove the time/on switch by pulling upwards.

  9. Capresso Infinity Timer/On Switch Replacement, Timer/On Switch: étape 9, image 1 de 1
    • Strip the two wires of their black covering connecting them to the black box.

  10. Capresso Infinity Timer/On Switch Replacement: étape 10, image 1 de 3 Capresso Infinity Timer/On Switch Replacement: étape 10, image 2 de 3 Capresso Infinity Timer/On Switch Replacement: étape 10, image 3 de 3
    • Solder the two cords holding in the blue and white wire in the black timer box.

Conclusion

To reassemble your device, follow these instructions in reverse order.

3 autres ont terminé cette réparation.

Melayne Spataro

Membre depuis le 10/09/18

272 Réputation

1 tutoriel rédigé

Équipe

USF Tampa, Team S1-G1, Leahy Fall 2018 Membre de l'équipe USF Tampa, Team S1-G1, Leahy Fall 2018

USFT-LEAHY-F18S1G1

4 membres

5 tutoriels rédigés

5 commentaires

do you know where I can get a new black timer box?

geclay@hotmail.com - Réponse

Where can I purchase a timer/on switch?

Rob Gordon - Réponse

Same question here, where can I buy this part?

Dominic Daigle - Réponse

Just piling on,has anyone found where to buy the Timer switch?

Chris DiNicolas - Réponse

Same, looking for part number and/or where to buy the timer dial.

Hans Sorensen - Réponse

Ajouter un commentaire

Nombre de vues :

Dernières 24 heures : 0

7 derniers jours : 10

30 derniers jours : 42

Total : 2,394