Aller au contenu principal

Capresso Perfectea 260 Heating Dome Replacement

Ce dont vous avez besoin

  1. Capresso Perfectea 260 Heating Dome Replacement, Lid: étape 1, image 1 de 1
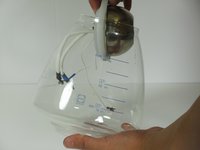
    • Lift the lid of the Perfectea

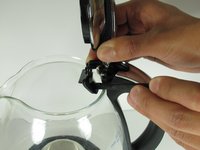
    • Remove the two 12mm Phillips #2 screws located at the brim of the pot.

  2. Capresso Perfectea 260 Heating Dome Replacement: étape 2, image 1 de 3 Capresso Perfectea 260 Heating Dome Replacement: étape 2, image 2 de 3 Capresso Perfectea 260 Heating Dome Replacement: étape 2, image 3 de 3
    • Adhesive tape is left holding the lid to the glass pot.

    • Use the spudger for this step.

    • With one hand, firmly grip the lid while designating your other hand to wedge the spudger between the lid and the glass pot.

    • Working from the outside to the inside, gently pry the adhesive tape from the glass pot, detaching the lid.

  3. Capresso Perfectea 260 Heating Dome Replacement, Handle: étape 3, image 1 de 3 Capresso Perfectea 260 Heating Dome Replacement, Handle: étape 3, image 2 de 3 Capresso Perfectea 260 Heating Dome Replacement, Handle: étape 3, image 3 de 3
    • Use the plastic opening tool for this step.

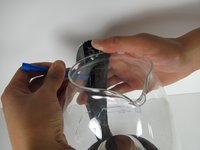
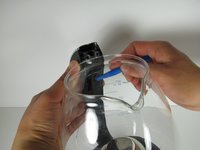
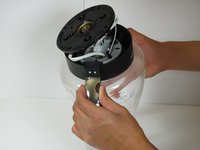
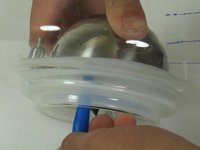
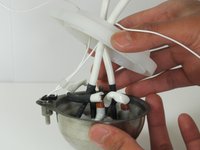
    • Firmly grip the glass pot with one hand while using the other to slip the flat end of the plastic opening tool between the glass pot and the adhesive tape holding the handle to the glass pot.

    • Gently pry the adhesive tape from the glass pot. Work your way around the handle until the handle is loose and not attached to the pot anymore.

  4. Capresso Perfectea 260 Heating Dome Replacement: étape 4, image 1 de 1
    • Once the handle is loose, locate the four 10 mm Phillips #2 screws from the base of the Perfectea and remove them.

    • Remove the base.

  5. Capresso Perfectea 260 Heating Dome Replacement: étape 5, image 1 de 1
    • Locate the two 10 mm Phillips #2 screws at the bottom of the handle and remove them.

  6. Capresso Perfectea 260 Heating Dome Replacement: étape 6, image 1 de 2 Capresso Perfectea 260 Heating Dome Replacement: étape 6, image 2 de 2
    • In order to free the bottom of the handle, remove the plastic piece that was held by the two screws

    • While firmly holding the glass pot, gently slide the bottom of the handle up and out of the base of the pot.

  7. Capresso Perfectea 260 Heating Dome Replacement, Heating Dome: étape 7, image 1 de 3 Capresso Perfectea 260 Heating Dome Replacement, Heating Dome: étape 7, image 2 de 3 Capresso Perfectea 260 Heating Dome Replacement, Heating Dome: étape 7, image 3 de 3
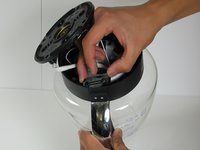
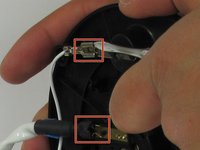
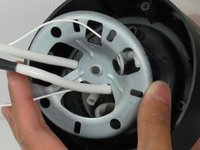
    • The bottom panel has four wires that latch on to four tabs.

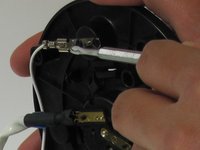
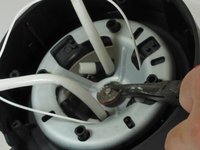
    • Use the metal spudger to pry up one metal tab in the latch.

    • Apply pressure with the metal spudger to the other tab on the latch to slide off tab.

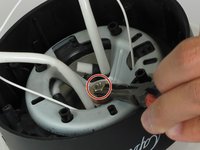
    • Repeat for the remaining three tabs.

    • The bottom panel should now be disconnected from the rest of the kettle.

    • Take note of which cable attaches to which tab so that you will remember how to reconnect the wires properly. Using masking tape to mark which wire goes to which terminal is helpful.

    • Do not push tabs too forcefully otherwise you may damage your device or impale yourself.

  8. Capresso Perfectea 260 Heating Dome Replacement: étape 8, image 1 de 3 Capresso Perfectea 260 Heating Dome Replacement: étape 8, image 2 de 3 Capresso Perfectea 260 Heating Dome Replacement: étape 8, image 3 de 3
    • Remove the 7mm nut using needlenose pliers or a 7mm nut driver.

    • Remove the metal washer and red washer that is under the nut.

    • Wiggle loose and remove the metal brace.

  9. Capresso Perfectea 260 Heating Dome Replacement: étape 9, image 1 de 1
    • Remove the metal spacer and washer from the central threaded rod.

  10. Capresso Perfectea 260 Heating Dome Replacement: étape 10, image 1 de 1
    • Remove the base wall.

  11. Capresso Perfectea 260 Heating Dome Replacement: étape 11, image 1 de 2 Capresso Perfectea 260 Heating Dome Replacement: étape 11, image 2 de 2
    • Wedge a plastic opening tool under the rubber seal on the inside of the kettle.

    • Work the plastic opening tool around to loosen the seal and push the heating dome out of its hole.

    • The heating dome is wedged in the bottom very firmly and will fly out its position suddenly if not controlled. Make sure you are holding the top side of the heating dome while pushing from the bottom so that it does not hit the side of the kettle and shatter the glass.

    • Remove the heating dome from the kettle.

  12. Capresso Perfectea 260 Heating Dome Replacement: étape 12, image 1 de 2 Capresso Perfectea 260 Heating Dome Replacement: étape 12, image 2 de 2
    • Peel the seal off of the heating element.

    • Draw the two temperature probe wires through the seal.

Conclusion

To reassemble your device, follow these instructions in reverse order.

3 autres ont terminé cette réparation.

Kenji Anzai

Membre depuis le 04/14/15

588 Réputation

4 tutoriels rédigés

Équipe

Cal Poly, Team 6-17, Maness Spring 2015 Membre de l'équipe Cal Poly, Team 6-17, Maness Spring 2015

CPSU-MANESS-S15S6G17

4 membres

6 tutoriels rédigés

2 commentaires

Hi, great guide. I learned a lot from this. one question, do you know which site/store sells heating dome for capresso water boiler?? thank you!!!

yanpingye - Réponse

This guide applies almost identically to the Capresso H2O kettle, which doesn't have the control board. Thanks for the guide.

Giovanni Ciriani - Réponse

Ajouter un commentaire

Nombre de vues :

Dernières 24 heures : 4

7 derniers jours : 8

30 derniers jours : 19

Total : 3,065