Cette version peut contenir des modifications incorrectes. Passez au dernier aperçu vérifié.
Ce dont vous avez besoin
-
Cette étape n’est pas traduite. Aidez à la traduire
-
Flip the keyboard over so that the bottom is facing up.
-
Remove the twenty-seven 12 mm screws from the dark-grey panel using a Phillips #2 screwdriver.
-
-
Cette étape n’est pas traduite. Aidez à la traduire
-
Remove the bottom panel by lifting and pulling it towards yourself.
-
-
Cette étape n’est pas traduite. Aidez à la traduire
-
Flip open the top half of the keyboard.
-
Set the keyboard onto the bottom half with the internal parts facing up.
-
-
-
Cette étape n’est pas traduite. Aidez à la traduire
-
Completely unscrew and remove all six of the screws on the central circuit board.
-
-
Cette étape n’est pas traduite. Aidez à la traduire
-
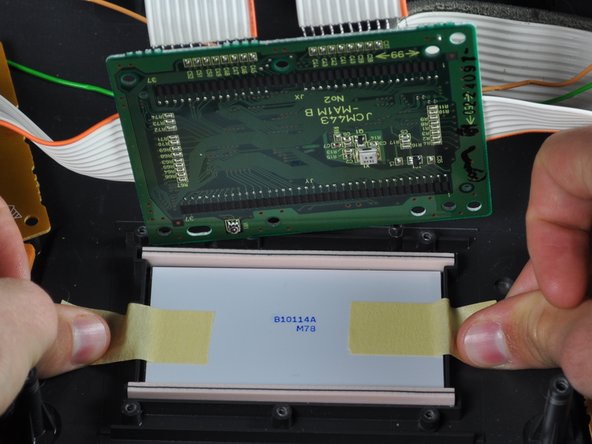
Remove tape from the LCD screen and remove the screen completely.
-
-
Cette étape n’est pas traduite. Aidez à la traduire
-
Replace the LCD screen and tape it down to the top cover.
-
-
Cette étape n’est pas traduite. Aidez à la traduire
-
Place the circuit board back on top of the LCD screen.
-
Screw all of the screws completely in their original positions.
-


Annulation : je n'ai pas terminé ce tutoriel.
2 autres ont terminé cette réparation.
Équipe

Cal Poly, Team 9-16, Amido Fall 2012 Membre de l'équipe Cal Poly, Team 9-16, Amido Fall 2012
CPSU-AMIDO-F12S9G16
4 membres
6 tutoriels rédigés
3 commentaires
Hi. Would this screen work for CTK 481?
hi. I have the ctk 4300. i would like to know where i can get one.Binitintimo@gmail.com