Aller au contenu principal
Pour réparer ensemble - Je crée un compte

Cingular 8125 Speakers Replacement

Ce dont vous avez besoin

    • Hold the phone with the back (camera side) facing you.

    • Press on the battery cover until it slides off.

    Demander à FixBot

    Ajouter un commentaire

  1. Cingular 8125 Speakers Replacement: étape 2, image 1 de 1
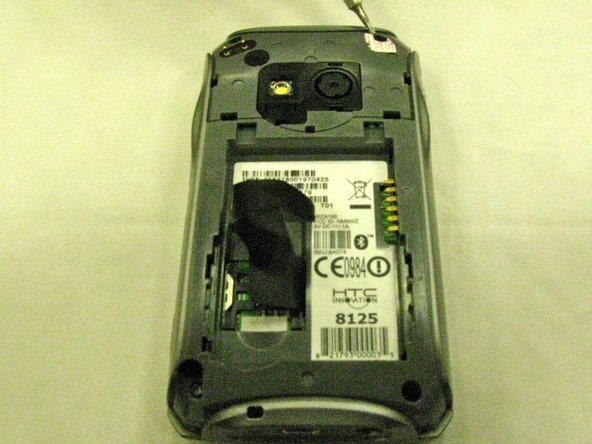
    • Lift up the black tab that sticks out on the battery's side until the battery is pulled out.

    • Using the iFixit Opening Tool, pull on the phone's camera cover until it pops off.

    Demander à FixBot

    Ajouter un commentaire

  2. Cingular 8125 Speakers Replacement: étape 3, image 1 de 1
    • Remove the four black Torx head screws in each corner.

    Demander à FixBot

    Ajouter un commentaire

  3. Cingular 8125 Speakers Replacement: étape 4, image 1 de 1
    • Pull on the back cover of the phone with the iFixit opening tool until the green motherboard is revealed.

    Demander à FixBot

    Ajouter un commentaire

  4. Cingular 8125 Speakers Replacement: étape 5, image 1 de 1
    • Remove the black plastic piece from the motherboard by gently pulling it off.

    • Align the white squares on the motherboard and the speakers.

    • You'll know they are lined up correctly when the speaker's wires face the motherboard's center.

    • Press down on the white squares until they snap together.

    Demander à FixBot

    Ajouter un commentaire

  5. Cingular 8125 Speakers Replacement: étape 6, image 1 de 1
    • Place the back cover of the phone over the motherboard.

    • Check to be sure the speaker's black piece is against the holes in the back cover.

    Demander à FixBot

    Ajouter un commentaire

    • Screw the four Torx head screws with the 64 Bit Driver Handle to connect the back cover to the motherboard.

    • Press the camera cover down on the back cover until it snaps into place.

    Demander à FixBot

    Ajouter un commentaire

    • Line up the copper terminal on the battery with the terminal on the phone, then press the battery back into place.

    • Make sure the black tab sticks out.

    • Slide the battery cover over the camera cover until it snaps back into place.

    Demander à FixBot

    Ajouter un commentaire

Conclusion

To reassemble your device, follow these instructions in reverse order.

Annulation : je n'ai pas terminé ce tutoriel.

Laura Kimberly Simonds

Membre depuis le 09/24/12

301 Réputation

2 tutoriels rédigés

Équipe

University of Maine, Team 1-1, Diaz Fall 2012 Membre de l'équipe University of Maine, Team 1-1, Diaz Fall 2012

UMAINE-DIAZ-F12S1G1

4 membres

4 tutoriels rédigés

0 commentaires de tutoriel

Ajouter un commentaire

Nombre de vues :

Dernières 24 heures : 1

7 derniers jours : 11

30 derniers jours : 47

Total : 798