Aller au contenu principal

Conair Cord-Keeper 169XR Cool Down Button Replacement

Ce dont vous avez besoin

  1. Conair Cord-Keeper 169XR Cool Down Button Replacement, Handle Cover: étape 1, image 1 de 2 Conair Cord-Keeper 169XR Cool Down Button Replacement, Handle Cover: étape 1, image 2 de 2
    • Unscrew the two 18 mm long Phillips #2 screws on the side of the hair dryer.

  2. Conair Cord-Keeper 169XR Cool Down Button Replacement: étape 2, image 1 de 1
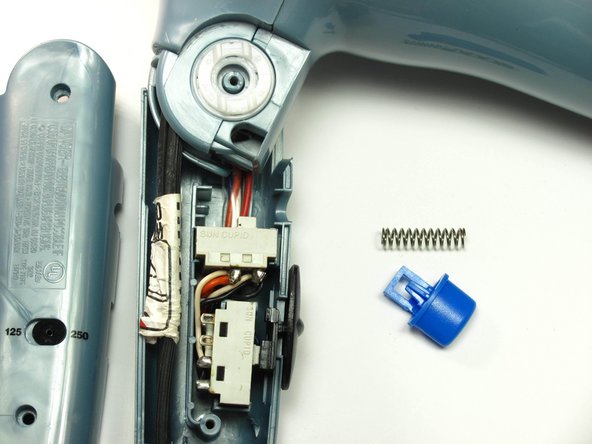
    • Be cautious of pieces that can possibly fall out when removing the face of the handle.

    • Once you have taken the screws out, take the top half of the handle off by lifting it off of the dryer.

  3. Conair Cord-Keeper 169XR Cool Down Button Replacement, Cool Down Button: étape 3, image 1 de 2 Conair Cord-Keeper 169XR Cool Down Button Replacement, Cool Down Button: étape 3, image 2 de 2
    • Take out the cool down button and the spring behind it by gently lifting the button up toward you and pushing it to the right out of its groove.

    • You may need to replace the button and spring depending on which one is broken.

Conclusion

To reassemble your device, follow these instructions in reverse order.

Une autre personne a terminé cette réparation.

Candace

Membre depuis le 01/23/14

992 Réputation

7 tutoriels rédigés

Équipe

Cal Poly, Team 10-33, Maness Winter 2014 Membre de l'équipe Cal Poly, Team 10-33, Maness Winter 2014

CPSU-MANESS-W14S10G33

3 membres

7 tutoriels rédigés

0 commentaires

Ajouter un commentaire

Nombre de vues :

Dernières 24 heures : 0

7 derniers jours : 0

30 derniers jours : 4

Total : 1,246