Aller au contenu principal

Creative Zen Vision W Keypad Replacement

Ce dont vous avez besoin

  1. Creative Zen Vision W Keypad Replacement, Front Cover: étape 1, image 1 de 2 Creative Zen Vision W Keypad Replacement, Front Cover: étape 1, image 2 de 2
    • Remove the two screws (2.5 mm) on the top and bottom of the device using a Phillips #0 screwdriver.

  2. Creative Zen Vision W Keypad Replacement: étape 2, image 1 de 3 Creative Zen Vision W Keypad Replacement: étape 2, image 2 de 3 Creative Zen Vision W Keypad Replacement: étape 2, image 3 de 3
    • Run the spudger along the cover and pry.

    • Do this gently to preserve the screen

    • The button pad may fall off when the cover is removed.

  3. Creative Zen Vision W Keypad Replacement, LCD Screen: étape 3, image 1 de 3 Creative Zen Vision W Keypad Replacement, LCD Screen: étape 3, image 2 de 3 Creative Zen Vision W Keypad Replacement, LCD Screen: étape 3, image 3 de 3
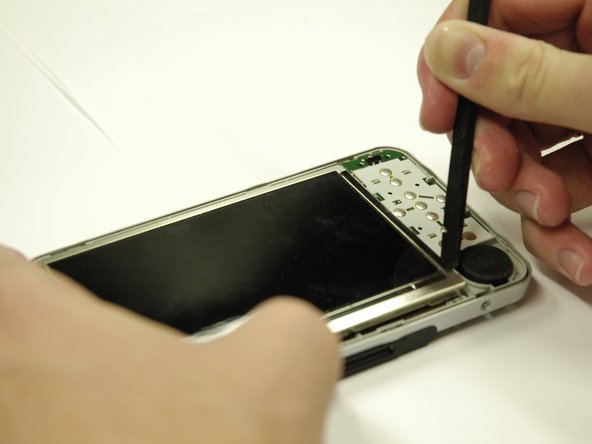
    • Use a spudger to separate the metal tabs that hold the screen in place on the right side.

    • The screen is still attached underneath with two ribbon cables. Lift it very carefully.

  4. Creative Zen Vision W Keypad Replacement: étape 4, image 1 de 1
    • Put the screen face down so you can see where the ribbon cables are attached.

    • Remove the red sticker that covers the ribbon cable connections.

  5. Creative Zen Vision W Keypad Replacement: étape 5, image 1 de 1
    • Use a plastic opening tool to get underneath the black flap on the larger ribbon cable connection and lift it.

  6. Creative Zen Vision W Keypad Replacement: étape 6, image 1 de 3 Creative Zen Vision W Keypad Replacement: étape 6, image 2 de 3 Creative Zen Vision W Keypad Replacement: étape 6, image 3 de 3
    • Use a spudger to slide the two small gray tabs away from the ribbon cable connection.

    • Remove the screen from the device.

  7. Creative Zen Vision W Keypad Replacement, Keypad: étape 7, image 1 de 1
    • Peel the orange sticker off of the motherboard.

  8. Creative Zen Vision W Keypad Replacement: étape 8, image 1 de 2 Creative Zen Vision W Keypad Replacement: étape 8, image 2 de 2
    • Lift the keypad from the left side and use tweezers to slide it out to the left.

  9. Creative Zen Vision W Keypad Replacement: étape 9, image 1 de 2 Creative Zen Vision W Keypad Replacement: étape 9, image 2 de 2
    • Use a small flat head screw driver to slide the white tabs away from the ribbon cable connection.

    • Remove the ribbon cable from the keypad.

Conclusion

To reassemble your device, follow these instructions in reverse order.

Tim Wilson

Membre depuis le 04/11/13

143 Réputation

6 tutoriels rédigés

Équipe

Cal Poly, Team 17-2, Regan Spring 2013 Membre de l'équipe Cal Poly, Team 17-2, Regan Spring 2013

CPSU-REGAN-S13S17G2

4 membres

8 tutoriels rédigés

0 commentaires

Ajouter un commentaire

Nombre de vues :

Dernières 24 heures : 0

7 derniers jours : 0

30 derniers jours : 9

Total : 403