Aller au contenu principal

Cuisinart DCC-1100 Heating Element Replacement

Ce dont vous avez besoin

  1. Cuisinart DCC-1100 Heating Element Replacement, Heating Element: étape 1, image 1 de 3 Cuisinart DCC-1100 Heating Element Replacement, Heating Element: étape 1, image 2 de 3 Cuisinart DCC-1100 Heating Element Replacement, Heating Element: étape 1, image 3 de 3
    • Remove the coffee pot and unplug the maker.

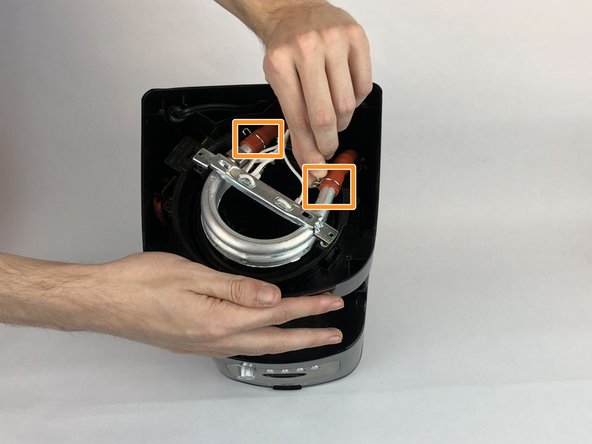
    • Flip the coffee maker over so that way the bottom is facing you.

  2. Cuisinart DCC-1100 Heating Element Replacement: étape 2, image 1 de 3 Cuisinart DCC-1100 Heating Element Replacement: étape 2, image 2 de 3 Cuisinart DCC-1100 Heating Element Replacement: étape 2, image 3 de 3
    • Remove the five 1.6mm Phillips #1 screws from the bottom.

    • Remove the bottom cover.

  3. Cuisinart DCC-1100 Heating Element Replacement: étape 3, image 1 de 2 Cuisinart DCC-1100 Heating Element Replacement: étape 3, image 2 de 2
    • Remove the two 1.6mm Phillips #0 screws from the heating element.

    • Lift up the heating element and remove the hot plate.

  4. Cuisinart DCC-1100 Heating Element Replacement: étape 4, image 1 de 2 Cuisinart DCC-1100 Heating Element Replacement: étape 4, image 2 de 2
    • Disconnect the heating element.

    • Pinch the tube clips and remove from tubes from the heating element.

Conclusion

To reassemble your device, follow these instructions in reverse order.

2 autres ont terminé cette réparation.

Tanvirul Arafin

Membre depuis le 01/25/18

143 Réputation

1 tutoriel rédigé

Équipe

USF Tampa, Team S20-G4, Passmore Spring 2018 Membre de l'équipe USF Tampa, Team S20-G4, Passmore Spring 2018

USFT-PASSMORE-S18S20G4

4 membres

7 tutoriels rédigés

0 commentaires

Ajouter un commentaire

Nombre de vues :

Dernières 24 heures : 1

7 derniers jours : 4

30 derniers jours : 18

Total : 3,162