Aller au contenu principal

Cuisinart Smart Stick CSB-75 Electrical Cord Replacement

Ce dont vous avez besoin

  1. Cuisinart Smart Stick CSB-75 Electrical Cord Replacement, Electrical Cord: étape 1, image 1 de 3 Cuisinart Smart Stick CSB-75 Electrical Cord Replacement, Electrical Cord: étape 1, image 2 de 3 Cuisinart Smart Stick CSB-75 Electrical Cord Replacement, Electrical Cord: étape 1, image 3 de 3
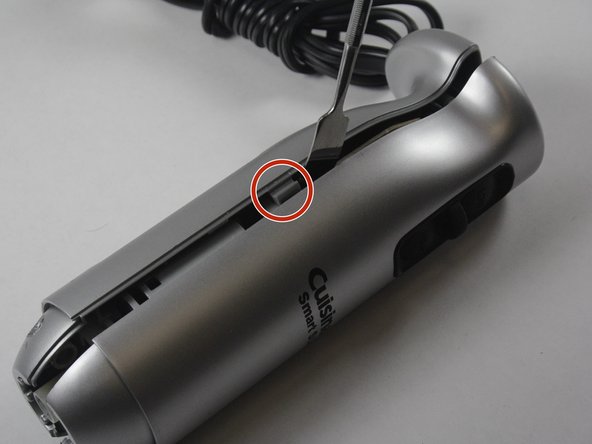
    • Located on the back of the motor body are three screw covers. To remove the three grey screw covers, use a Flat Head Screwdriver (1.0mm or 1.5mm).

    • After prying these off, the screws will be exposed.

  2. Cuisinart Smart Stick CSB-75 Electrical Cord Replacement: étape 2, image 1 de 2 Cuisinart Smart Stick CSB-75 Electrical Cord Replacement: étape 2, image 2 de 2
    • Remove three 13.3 mm Phillips PH#2 screws.

  3. Cuisinart Smart Stick CSB-75 Electrical Cord Replacement: étape 3, image 1 de 3 Cuisinart Smart Stick CSB-75 Electrical Cord Replacement: étape 3, image 2 de 3 Cuisinart Smart Stick CSB-75 Electrical Cord Replacement: étape 3, image 3 de 3
    • Pry open Cuisinart using a plastic opening tool.

    • The metal spudger is great when you need serious prying power, but the regular black nylon spudger or a plastic opening tool should be used whenever possible.

    • Make sure to pry open near the clips of the smart stick for easy opening.

  4. Cuisinart Smart Stick CSB-75 Electrical Cord Replacement: étape 4, image 1 de 3 Cuisinart Smart Stick CSB-75 Electrical Cord Replacement: étape 4, image 2 de 3 Cuisinart Smart Stick CSB-75 Electrical Cord Replacement: étape 4, image 3 de 3
    • Unscrew the 4 screws on the inside.

    • Remove 2 13.3mm Phillips PH#2 screws.

    • Remove 2 17.5 mm Phillips PH#2 screws.

    • Unscrewing these screws will isolate the switch board.

  5. Cuisinart Smart Stick CSB-75 Electrical Cord Replacement: étape 5, image 1 de 3 Cuisinart Smart Stick CSB-75 Electrical Cord Replacement: étape 5, image 2 de 3 Cuisinart Smart Stick CSB-75 Electrical Cord Replacement: étape 5, image 3 de 3
    • Refer to these steps on Soldering to replace the electrical cord in the smart stick.

    • Be careful when soldering; it gets very hot.

Conclusion

To reassemble your device, follow these instructions in reverse order.

Une autre personne a terminé cette réparation.

Jordan Robinson

Membre depuis le 09/02/15

557 Réputation

4 tutoriels rédigés

Équipe

USF Tampa, Team 16-2, Wollert Fall 2015 Membre de l'équipe USF Tampa, Team 16-2, Wollert Fall 2015

USFT-WOLLERT-F15S16G2

4 membres

4 tutoriels rédigés

0 commentaires

Ajouter un commentaire

Nombre de vues :

Dernières 24 heures : 1

7 derniers jours : 9

30 derniers jours : 24

Total : 1,486