Aller au contenu principal

DJI Phantom 4 Advanced Remote Controller Back Con Board Replacement

Ce dont vous avez besoin

  1. DJI Phantom 4 Advanced Remote Controller Back Con Board Replacement, Back Panel: étape 1, image 1 de 1
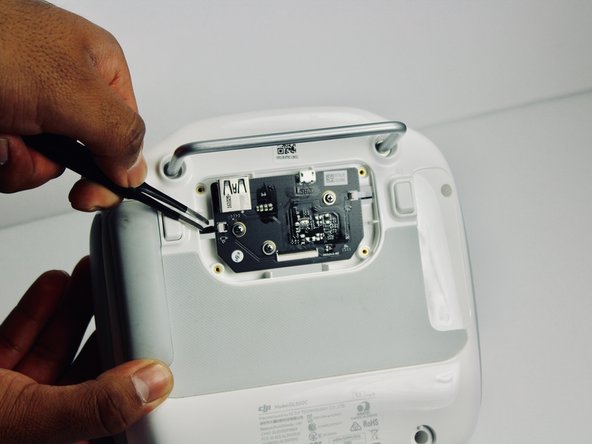
    • Remove the four screws with a Torx T8 screwdriver to access the back con board.

  2. DJI Phantom 4 Advanced Remote Controller Back Con Board Replacement: étape 2, image 1 de 2 DJI Phantom 4 Advanced Remote Controller Back Con Board Replacement: étape 2, image 2 de 2
    • Remove three screws using a Phillips #00 screwdriver.

  3. DJI Phantom 4 Advanced Remote Controller Back Con Board Replacement: étape 3, image 1 de 2 DJI Phantom 4 Advanced Remote Controller Back Con Board Replacement: étape 3, image 2 de 2
    • With tweezers, gently remove the large con board tab.

    • Use your hands to remove the two small clips. Pull out from the socket, in a horizontal direction.

  4. DJI Phantom 4 Advanced Remote Controller Back Con Board Replacement: étape 4, image 1 de 2 DJI Phantom 4 Advanced Remote Controller Back Con Board Replacement: étape 4, image 2 de 2
    • Peel off the rubber grips to access the screw holes.

    • Make sure to save your grips and do not to get them stuck to anything, you are going to want to save the adhesive.

    • Remove the back board and set it aside.

  5. DJI Phantom 4 Advanced Remote Controller Back Con Board Replacement: étape 5, image 1 de 2 DJI Phantom 4 Advanced Remote Controller Back Con Board Replacement: étape 5, image 2 de 2
    • Pull apart the back plastic panel.

    • Recommended tool for this would be the metal spudger, but not required.

    • Once the back panel is off, you will have access to the motherboard.

  6. DJI Phantom 4 Advanced Remote Controller Back Con Board Replacement, Back Con Board: étape 6, image 1 de 1
    • Remove the three PH0 screws securing the PCB to the remote.

  7. DJI Phantom 4 Advanced Remote Controller Back Con Board Replacement: étape 7, image 1 de 2 DJI Phantom 4 Advanced Remote Controller Back Con Board Replacement: étape 7, image 2 de 2
    • Remove each of the three ribbon cables from their tabs by pulling in a horizontal direction away from the socket.

    • Remove the Back Con Board.

  8. DJI Phantom 4 Advanced Remote Controller Back Con Board Replacement: étape 8, image 1 de 1
    • The board can now be replaced.

Conclusion

To reassemble your device, follow these instructions in reverse order.

Gunnar Behny

Membre depuis le 10/02/18

154 Réputation

1 tutoriel rédigé

Équipe

0 commentaires

Ajouter un commentaire

Nombre de vues :

Dernières 24 heures : 0

7 derniers jours : 0

30 derniers jours : 8

Total : 961