Aller au contenu principal

De'Longhi EC155 Coffee PressReplacement

Ce dont vous avez besoin

  1. De'Longhi EC155 Coffee PressReplacement, Water Reservoir: étape 1, image 1 de 2 De'Longhi EC155 Coffee PressReplacement, Water Reservoir: étape 1, image 2 de 2
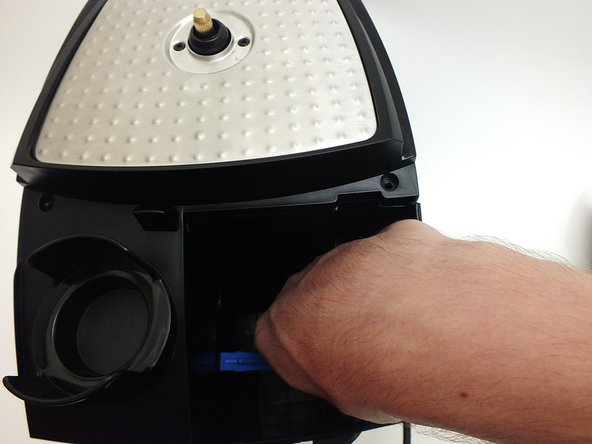
    • Flip open the top panel to reveal water reservoir.

    • Grab the water reservoir by the handle and lift out.

  2. De'Longhi EC155 Coffee PressReplacement, Bottom Panel: étape 2, image 1 de 2 De'Longhi EC155 Coffee PressReplacement, Bottom Panel: étape 2, image 2 de 2
    • Flip the device on its head.

    • Using the Phillips #2 screwdriver, unscrew the four 12 mm screws found at each corner of the bottom panel.

    • Lift the panel off or flip the device over and let the panel drop out.

  3. De'Longhi EC155 Coffee PressReplacement, Top Panel: étape 3, image 1 de 1
    • Before flipping the device, removed the black container and grill.

    • Flip the device on its head, front end facing you.

    • Using the Phillips #2 unscrew the two 52 mm screws found underneath the top portion of the device.

  4. De'Longhi EC155 Coffee PressReplacement: étape 4, image 1 de 1
    • Flip the device back to its proper orientation.

    • Using the Phillips #2 screwdriver remove the two 52 mm screws found on the lip next to the reservoir.

  5. De'Longhi EC155 Coffee PressReplacement: étape 5, image 1 de 2 De'Longhi EC155 Coffee PressReplacement: étape 5, image 2 de 2
    • Insert the two plastic opening tools beneath the top knob.

    • Use the two plastic opening tools as leverage to lift the top knob off.

  6. De'Longhi EC155 Coffee PressReplacement: étape 6, image 1 de 1
    • Grasp the lid firmly with both hands.

    • Pull mightily with both hands away from the device.

    • If you hear a slight snapping sound, it is supposed to do that.

  7. De'Longhi EC155 Coffee PressReplacement: étape 7, image 1 de 2 De'Longhi EC155 Coffee PressReplacement: étape 7, image 2 de 2
    • Use a plastic opening tool to push in the slot on the back panel while lifting.

    • Similarly, reach into where the reservoir used to be and insert a plastic spudger underneath the inside panel.

    • We recommend to not use your fingers for this step because there is a chance they will be pinched.

  8. De'Longhi EC155 Coffee PressReplacement: étape 8, image 1 de 2 De'Longhi EC155 Coffee PressReplacement: étape 8, image 2 de 2
    • You are now ready to lift the top off.

    • Place one hand near the back, the other at the front, and lift.

    • You may want to lift the front and back individually by pulling one a little off the part before the other. Afterwards, lifting the top off entirely will be easier.

  9. De'Longhi EC155 Coffee PressReplacement, Core: étape 9, image 1 de 1
    • Twist the frother clockwise while pulling gently.

  10. De'Longhi EC155 Coffee PressReplacement: étape 10, image 1 de 2 De'Longhi EC155 Coffee PressReplacement: étape 10, image 2 de 2
    • Remove the four 16mm screws with a T20 Screw head.

  11. De'Longhi EC155 Coffee PressReplacement: étape 11, image 1 de 3 De'Longhi EC155 Coffee PressReplacement: étape 11, image 2 de 3 De'Longhi EC155 Coffee PressReplacement: étape 11, image 3 de 3
    • Remove each clip from the valve and core using the precision angled tweezers.

  12. De'Longhi EC155 Coffee PressReplacement: étape 12, image 1 de 2 De'Longhi EC155 Coffee PressReplacement: étape 12, image 2 de 2
    • Pull out each LED with one quick tug.

    • Similarly, remove each set of wires from the setting tuner with one quick tug.

  13. De'Longhi EC155 Coffee PressReplacement: étape 13, image 1 de 2 De'Longhi EC155 Coffee PressReplacement: étape 13, image 2 de 2
    • Flip the device and remove one end of the tube from the reservoir hole.

    • Completely remove the other tube from both the reservoir hole and filter to the water pump.

  14. De'Longhi EC155 Coffee PressReplacement: étape 14, image 1 de 2 De'Longhi EC155 Coffee PressReplacement: étape 14, image 2 de 2
    • Pull the tube through the chamber with the water pump so it comes out of the top end.

    • Twist the valve counter-clockwise while pulling gently.

  15. De'Longhi EC155 Coffee PressReplacement: étape 15, image 1 de 1
    • Tilt the core towards the front while lifting from the back.

    • If the core is proving difficult to remove, a wire might be caught somewhere, likely near the water pump. We recommend shaking slightly as you lift since the frothing tube is at an odd angle.

    • We also recommend that you remove the valve before removing the core so that there is less obstructing movement. But the core can be removed without removing the valve.

  16. De'Longhi EC155 Coffee PressReplacement, Coffee Press: étape 16, image 1 de 1
    • Pinch the two sides of the top of the coffee press to unlatch.

    • Push down into the device as you pinch.

    • Orient the device with the front facing away from you.

Conclusion

To reassemble your device, follow these instructions in reverse order.

7 autres ont terminé cette réparation.

David Griffith

Membre depuis le 10/01/15

1 471 Réputation

9 tutoriels rédigés

Équipe

Cal Poly, Team 4-2, Maness Fall 2015 Membre de l'équipe Cal Poly, Team 4-2, Maness Fall 2015

CPSU-MANESS-F15S4G2

4 membres

25 tutoriels rédigés

0 commentaires

Ajouter un commentaire

Nombre de vues :

Dernières 24 heures : 1

7 derniers jours : 7

30 derniers jours : 31

Total : 4,316