Aller au contenu principal

DeWALT Hammer Drill DW511 Lever Assembly Replacement

Ce dont vous avez besoin

  1. DeWALT Hammer Drill DW511 Lever Assembly Replacement, Back Cover: étape 1, image 1 de 3 DeWALT Hammer Drill DW511 Lever Assembly Replacement, Back Cover: étape 1, image 2 de 3 DeWALT Hammer Drill DW511 Lever Assembly Replacement, Back Cover: étape 1, image 3 de 3
    • Remove three 19 mm T20 Torx screws from the back of the drill.

  2. DeWALT Hammer Drill DW511 Lever Assembly Replacement: étape 2, image 1 de 3 DeWALT Hammer Drill DW511 Lever Assembly Replacement: étape 2, image 2 de 3 DeWALT Hammer Drill DW511 Lever Assembly Replacement: étape 2, image 3 de 3
    • Place an opening tool in the groove line of the handle and pop the back loose.

    • Grab the drill with two hands and pull the cover off.

  3. DeWALT Hammer Drill DW511 Lever Assembly Replacement, Power Cord: étape 3, image 1 de 2 DeWALT Hammer Drill DW511 Lever Assembly Replacement, Power Cord: étape 3, image 2 de 2
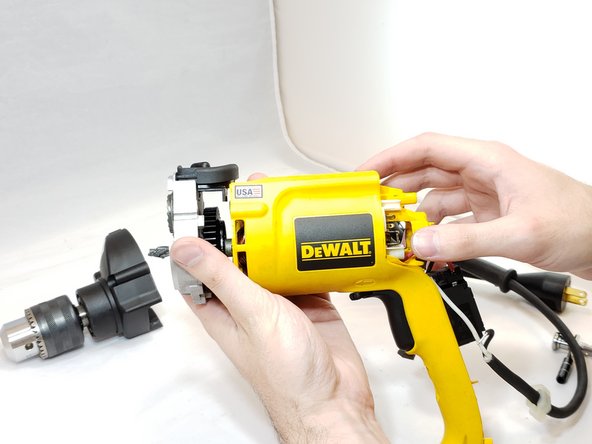
    • Firmly grab the body of the trigger.

    • Slowly pull the trigger until the entire body is out and only attached by wires.

  4. DeWALT Hammer Drill DW511 Lever Assembly Replacement: étape 4, image 1 de 3 DeWALT Hammer Drill DW511 Lever Assembly Replacement: étape 4, image 2 de 3 DeWALT Hammer Drill DW511 Lever Assembly Replacement: étape 4, image 3 de 3
    Outil utilisé dans cette étape :
    Tweezers
    $4.99
    J'achète
    • With sharp point tweezers, push the little metal flap up in the hole holding the wire.

    • Clamp the wire with blunt tweezers, and slowly pull the wire out.

  5. DeWALT Hammer Drill DW511 Lever Assembly Replacement: étape 5, image 1 de 3 DeWALT Hammer Drill DW511 Lever Assembly Replacement: étape 5, image 2 de 3 DeWALT Hammer Drill DW511 Lever Assembly Replacement: étape 5, image 3 de 3
    • With a pair of blunt nose tweezers, grab the white wire.

    • Carefully wiggle the wire loose.

    • Pull the wire slowly until it comes out.

  6. DeWALT Hammer Drill DW511 Lever Assembly Replacement: étape 6, image 1 de 1
    • With both wires free, the power cord is free from the trigger body.

  7. DeWALT Hammer Drill DW511 Lever Assembly Replacement, Brushes: étape 7, image 1 de 3 DeWALT Hammer Drill DW511 Lever Assembly Replacement, Brushes: étape 7, image 2 de 3 DeWALT Hammer Drill DW511 Lever Assembly Replacement, Brushes: étape 7, image 3 de 3
    • Use an opening tool to lift up the spring holding down the brush.

    • Remove the brush from its holding.

  8. DeWALT Hammer Drill DW511 Lever Assembly Replacement: étape 8, image 1 de 2 DeWALT Hammer Drill DW511 Lever Assembly Replacement: étape 8, image 2 de 2
    Outil utilisé dans cette étape :
    Tweezers
    $4.99
    J'achète
    • With a pair of blunt nose tweezers, grab the red wire.

    • Carefully wiggle the wire loose.

    • Pull the wire slowly until it comes out.

  9. DeWALT Hammer Drill DW511 Lever Assembly Replacement, Lever Assembly: étape 9, image 1 de 3 DeWALT Hammer Drill DW511 Lever Assembly Replacement, Lever Assembly: étape 9, image 2 de 3 DeWALT Hammer Drill DW511 Lever Assembly Replacement, Lever Assembly: étape 9, image 3 de 3
    • Remove two 45 mm T20 Torx screws.

    • Remove one 30 mm T20 Torx screw.

  10. DeWALT Hammer Drill DW511 Lever Assembly Replacement: étape 10, image 1 de 1
    • Pull off the top case and set it aside.

  11. DeWALT Hammer Drill DW511 Lever Assembly Replacement: étape 11, image 1 de 3 DeWALT Hammer Drill DW511 Lever Assembly Replacement: étape 11, image 2 de 3 DeWALT Hammer Drill DW511 Lever Assembly Replacement: étape 11, image 3 de 3
    • Grab the gear case cover and gently pull it out just enough to where it exposes the lever assembly.

    • It is important that the brushes are removed before you do this step or you may damage your brushes.

    • The lever assembly can now be lifted out.

  12. DeWALT Hammer Drill DW511 Lever Assembly Replacement: étape 12, image 1 de 1
    • With the old lever assembly removed you can now replace it with a new one.

Conclusion

To reassemble your device, follow these instructions in reverse order.

Une autre personne a terminé cette réparation.

Kodiak Kunder

Membre depuis le 10/03/19

186 Réputation

1 tutoriel rédigé

0 commentaires

Ajouter un commentaire

Nombre de vues :

Dernières 24 heures : 0

7 derniers jours : 2

30 derniers jours : 11

Total : 413