Aller au contenu principal

Dell 3100 (Touch) Battery Replacement

Ce dont vous avez besoin

  1. Dell 3100 (Touch) Battery Replacement, Detach Bottom Cover: étape 1, image 1 de 2 Dell 3100 (Touch) Battery Replacement, Detach Bottom Cover: étape 1, image 2 de 2
    • Unscrew the nine PH#0 captive screws on the bottom of the device.

    • Use a pick to run along the outside of the device popping all the clips. Prying should not be necessary.

  2. Dell 3100 (Touch) Battery Replacement, Unplug the battery: étape 2, image 1 de 2 Dell 3100 (Touch) Battery Replacement, Unplug the battery: étape 2, image 2 de 2
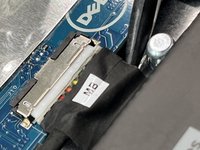
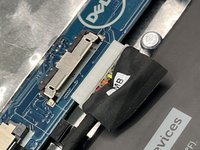
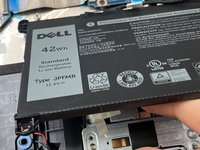
    • Pull carefully, but firmly, on the battery cable until it becomes detached.

  3. Dell 3100 (Touch) Battery Replacement, Remove the battery: étape 3, image 1 de 1
    • Remove these three M2x5 screws and take the battery out

    • If your replacement battery doesn't come with a cable, you will need to remove the cable from the old battery before disposing of it.

    • DO NOT throw batteries in the trash. Take them to a proper battery recycling center.

  4. Dell 3100 (Touch) Battery Replacement, Battery: étape 4, image 1 de 2 Dell 3100 (Touch) Battery Replacement, Battery: étape 4, image 2 de 2
    • Use a plastic spudger to lift up the flap. Use the flap to pull the connector straight away from the board (towards the battery).

  5. Dell 3100 (Touch) Battery Replacement: étape 5, image 1 de 1
    • Remove 3 M2x4 screws

  6. Dell 3100 (Touch) Battery Replacement: étape 6, image 1 de 3 Dell 3100 (Touch) Battery Replacement: étape 6, image 2 de 3 Dell 3100 (Touch) Battery Replacement: étape 6, image 3 de 3
    • Use a spudger to detach the tab, and pull the tab up away from the device. This will break the adhesive holding in the battery.

Conclusion

To reassemble your device, follow these instructions in reverse order.

Une autre personne a terminé cette réparation.

0 commentaires

Ajouter un commentaire

Nombre de vues :

Dernières 24 heures : 0

7 derniers jours : 1

30 derniers jours : 6

Total : 58