Cette version peut contenir des modifications incorrectes. Passez au dernier aperçu vérifié.
Ce dont vous avez besoin
-
Cette étape n’est pas traduite. Aidez à la traduire
-
Lift the connector latch that secures the hard-drive cable to the connector on the system board, and then disconnect the hard-drive cable from the connector on the system board.
-
-
Cette étape n’est pas traduite. Aidez à la traduire
-
Using the pull-tab, lift the hard-drive assembly out of the computer base.
-
-
Cette étape n’est pas traduite. Aidez à la traduire
-
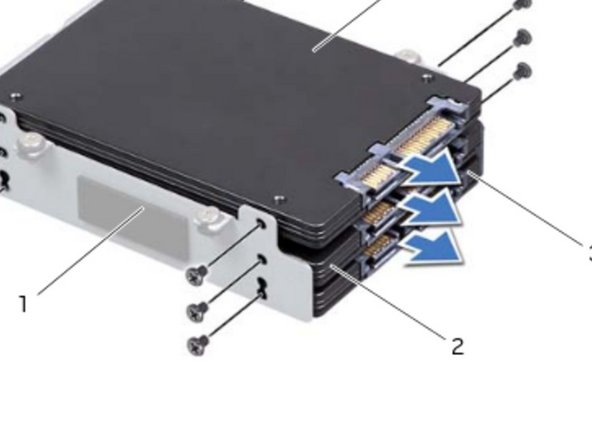
Remove the screws that secure the hard drive(s) and slide the hard drive(s) out of the hard-drive bracket.
-
-
-
Cette étape n’est pas traduite. Aidez à la traduire
-
Place the NEW primary hard drive (HDD 0) in the hard-drive bracket.
-
-
Cette étape n’est pas traduite. Aidez à la traduire
-
If applicable, slide the secondary and tertiary hard drive(s) into the hard-drive bracket.
-
-
Cette étape n’est pas traduite. Aidez à la traduire
-
Replace the screws that secure the primary hard drive (HDD 0).
-
-
Cette étape n’est pas traduite. Aidez à la traduire
-
If applicable, replace the screws that secure the secondary hard drive (HDD 1) and tertiary hard drive (HDD 2) to the hard-drive bracket.
-
Connect the interposer to the hard drive(s).
-
-
Cette étape n’est pas traduite. Aidez à la traduire
-
Place the hard-drive assembly in the computer base.
-
-
Cette étape n’est pas traduite. Aidez à la traduire
-
Tighten the captive screws that secure the hard-drive assembly to the computer base.
-
-
Cette étape n’est pas traduite. Aidez à la traduire
-
Slide the hard-drive cable into the connector on the system board and press down on the connector latch to secure the cable.
-


Équipe

RampUP America, Inc. Membre de l'équipe RampUP America, Inc.
Community
42 membres
1 985 tutoriels rédigés