Aller au contenu principal

Dell Chromebook 11-3120 Speakers Replacement

Ce dont vous avez besoin

  1. Dell Chromebook 11-3120 Speakers Replacement, Back Panel: étape 1, image 1 de 2 Dell Chromebook 11-3120 Speakers Replacement, Back Panel: étape 1, image 2 de 2
    • Use the #J0 screwdriver to unscrew the seven 4mm screws located around the back panel.

  2. Dell Chromebook 11-3120 Speakers Replacement: étape 2, image 1 de 2 Dell Chromebook 11-3120 Speakers Replacement: étape 2, image 2 de 2
    • Use the plastic opening tool to gently pry around the four sides of the back panel until the panel is fully released.

    • Taking the back cover off of the computer may require more force than expected. When using the opening tool, be careful not to use too much force on it, and make sure all the screws are removed.

  3. Dell Chromebook 11-3120 Speakers Replacement, Battery: étape 3, image 1 de 2 Dell Chromebook 11-3120 Speakers Replacement, Battery: étape 3, image 2 de 2
    • Using a JIS #0 screwdriver, unscrew the two 4mm screws securing the battery in place.

  4. Dell Chromebook 11-3120 Speakers Replacement: étape 4, image 1 de 1
    • Using the pointed end of a #2 spudger, remove the connection between the battery and motherboard by slightly pulling on the wires while pushing the tiny hole down using the spudger.

    • Pull out the battery from inside the laptop.

  5. Dell Chromebook 11-3120 Speakers Replacement, Speakers: étape 5, image 1 de 1
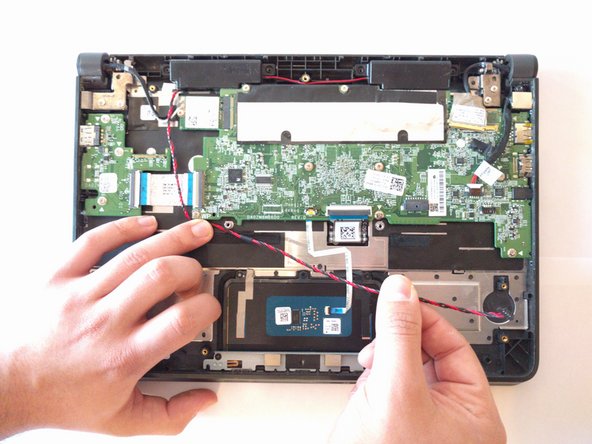
    • Gently remove the 4-pin connector that connects the speakers to the motherboard.

  6. Dell Chromebook 11-3120 Speakers Replacement: étape 6, image 1 de 1
    • Remove the tape securing it to the plastic casing of the device.

  7. Dell Chromebook 11-3120 Speakers Replacement: étape 7, image 1 de 1
    • Carefully lift out the right speaker housing, which is held in place by circular rubber guides, located on both sides of the housing.

  8. Dell Chromebook 11-3120 Speakers Replacement: étape 8, image 1 de 1
    • Moving down the cable, remove the left speaker housing, which is held in place by circular rubber guides, located on both sides of the housing.

Conclusion

To reassemble your device, follow these instructions in reverse order.

Une autre personne a terminé cette réparation.

Joseph Silveira

Membre depuis le 10/19/17

401 Réputation

3 tutoriels rédigés

Équipe

UMass Dartmouth, Team S4-G1, Julie Fall 2017 Membre de l'équipe UMass Dartmouth, Team S4-G1, Julie Fall 2017

UMASSD-JULIE-F17S4G1

3 membres

6 tutoriels rédigés

0 commentaires

Ajouter un commentaire

Nombre de vues :

Dernières 24 heures : 0

7 derniers jours : 3

30 derniers jours : 7

Total : 343