Aller au contenu principal

Dell Inspiron 13-5368 Screen Display Replacement

Ce dont vous avez besoin

  1. Dell Inspiron 13-5368 Screen Display Replacement, Battery: étape 1, image 1 de 2 Dell Inspiron 13-5368 Screen Display Replacement, Battery: étape 1, image 2 de 2
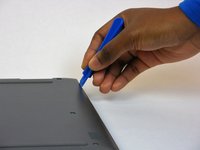
    • Remove the nine 6mm Phillips #0 screws that secure the back cover of the laptop.

  2. Dell Inspiron 13-5368 Screen Display Replacement: étape 2, image 1 de 2 Dell Inspiron 13-5368 Screen Display Replacement: étape 2, image 2 de 2
    • Use a spudger to pry up and remove the back cover.

  3. Dell Inspiron 13-5368 Screen Display Replacement: étape 3, image 1 de 1
    • Remove the four 3mm Phillips #0 screws at the corners of the battery that secure it to the laptop.

  4. Dell Inspiron 13-5368 Screen Display Replacement: étape 4, image 1 de 1
    • Pull the battery cable's black tab towards the battery to disconnect it from the motherboard.

    • Pull the tab parallel to the motherboard, not straight up.

  5. Dell Inspiron 13-5368 Screen Display Replacement: étape 5, image 1 de 2 Dell Inspiron 13-5368 Screen Display Replacement: étape 5, image 2 de 2
    • Remove the battery.

  6. Dell Inspiron 13-5368 Screen Display Replacement, Screen Display: étape 6, image 1 de 3 Dell Inspiron 13-5368 Screen Display Replacement, Screen Display: étape 6, image 2 de 3 Dell Inspiron 13-5368 Screen Display Replacement, Screen Display: étape 6, image 3 de 3
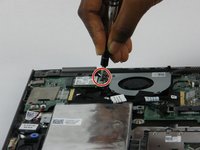
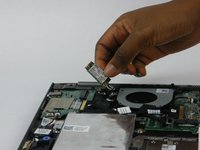
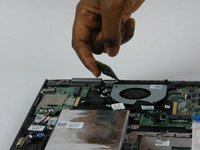
    • Unscrew the 2mm screw that holds the WLAN card. Then carefully remove the WLAN card from the motherboard.

  7. Dell Inspiron 13-5368 Screen Display Replacement: étape 7, image 1 de 1
    • Detach the black and white antenna cables from the WLAN card.

  8. Dell Inspiron 13-5368 Screen Display Replacement: étape 8, image 1 de 1
    • Unplug the two display cables.

  9. Dell Inspiron 13-5368 Screen Display Replacement: étape 9, image 1 de 1
    • Unscrew the screws that are securing the laptop's hinges.

  10. Dell Inspiron 13-5368 Screen Display Replacement: étape 10, image 1 de 1
    • Detach the display from the base.

Conclusion

To reassemble your device, follow these instructions in reverse order.

2 autres ont terminé cette réparation.

Matt Sugrim

Membre depuis le 09/27/17

1 042 Réputation

6 tutoriels rédigés

Équipe

USF Tampa, Team S14-G6, Boczar Fall 2017 Membre de l'équipe USF Tampa, Team S14-G6, Boczar Fall 2017

USFT-BOCZAR-F17S14G6

4 membres

13 tutoriels rédigés

0 commentaires

Ajouter un commentaire

Nombre de vues :

Dernières 24 heures : 1

7 derniers jours : 7

30 derniers jours : 21

Total : 2,146