Aller au contenu principal

Dell Inspiron 13-5378 Display Assembly Replacement

Ce dont vous avez besoin

  1. Dell Inspiron 13-5378 Display Assembly Replacement, Peeling the Tape: étape 1, image 1 de 1
    • WARNING: Before working inside your computer, read the safety information that shipped with your computer and follow the steps in Before Working Inside Your Computer. After working inside your computer, follow the instructions in After Working Inside Your Computer.

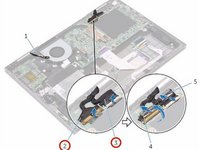
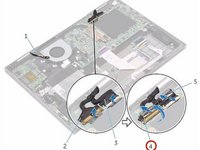
    • Peel off the pieces of tape that secure the display cable and touch-screen board-cable to the system board.

  2. Dell Inspiron 13-5378 Display Assembly Replacement, Open the Latches: étape 2, image 1 de 1
    • Open the latches to disconnect the display cable and the touch-screen board-cable from the system board.

  3. Dell Inspiron 13-5378 Display Assembly Replacement, Open the Display: étape 3, image 1 de 1
    • Turn the computer over and open the display as far as possible.

  4. Dell Inspiron 13-5378 Display Assembly Replacement, Placing the Computer: étape 4, image 1 de 1
    • CAUTION: Place the computer on a soft and clean surface to avoid scratching the display.

    • Place the computer face down on a flat surface.

  5. Dell Inspiron 13-5378 Display Assembly Replacement, Remove the Screws: étape 5, image 1 de 1
    • Remove the screws that secure the display assembly to the palm-rest assembly.

  6. Dell Inspiron 13-5378 Display Assembly Replacement, Lifting the Display Assembly: étape 6, image 1 de 1
    • Lift the display assembly off the palm-rest assembly.

  7. Dell Inspiron 13-5378 Display Assembly Replacement, Placing the Display Assembly: étape 7, image 1 de 1
    • Place the NEW display assembly face down on the palm-rest assembly.

  8. Dell Inspiron 13-5378 Display Assembly Replacement, Align the Screw Holes: étape 8, image 1 de 1
    • Align the screw holes on the display hinges with the screw holes on the palm-rest assembly.

    • Close the display and turn the computer over.

  9. Dell Inspiron 13-5378 Display Assembly Replacement, Sliding the Display Cable: étape 10, image 1 de 2 Dell Inspiron 13-5378 Display Assembly Replacement, Sliding the Display Cable: étape 10, image 2 de 2
    • Slide the display cable and the touch-screen board-cable into their respective connectors on the system board and close the latches to secure the cables.

  10. Dell Inspiron 13-5378 Display Assembly Replacement, Adhering the Pieces: étape 11, image 1 de 1
    • Adhere the pieces of tape that secure the display cable and the touch-screen board-cable to their respective connectors on the system board.

Conclusion

To reassemble your device, follow these instructions in reverse order.

Terrence15

Membre depuis le 12/18/17

79 121 Réputation

441 tutoriels rédigés

Équipe

RampUP America, Inc. Membre de l'équipe RampUP America, Inc.

Community

42 membres

1 985 tutoriels rédigés

0 commentaires

Ajouter un commentaire

Nombre de vues :

Dernières 24 heures : 3

7 derniers jours : 9

30 derniers jours : 24

Total : 3,239