Introduction
This guide provides step by step instructions to remove your Dell Inspiron 13- 7359 cooling fan. You will need a phillips head #0 screwdriver and a small plastic spudger.
Ce dont vous avez besoin
-
-
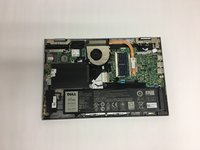
Flip your device over so the back cover is facing you.
-
Using a Phillips #0 Screwdriver, remove the ten 7mm screws holding the back cover in place.
-
-
-
-
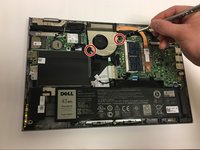
Unscrew and remove the 2 of the 7mm Phillips head screws holding the cooling fan in place.
-


To reassemble your device, follow these instructions in reverse order.
To reassemble your device, follow these instructions in reverse order.
Annulation : je n'ai pas terminé ce tutoriel.
2 autres ont terminé cette réparation.
Équipe

Baylor, Team S1-G6, Johnson Spring 2018 Membre de l'équipe Baylor, Team S1-G6, Johnson Spring 2018
BU-JOHNSON-S18S1G6
3 membres
5 tutoriels rédigés