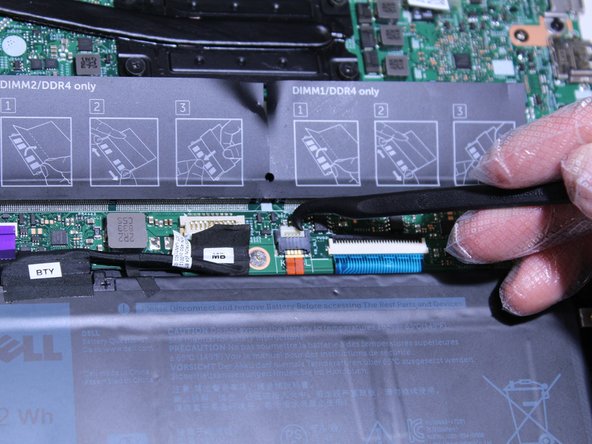
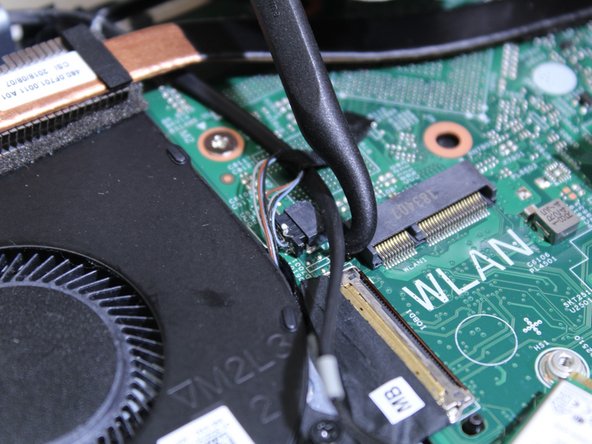
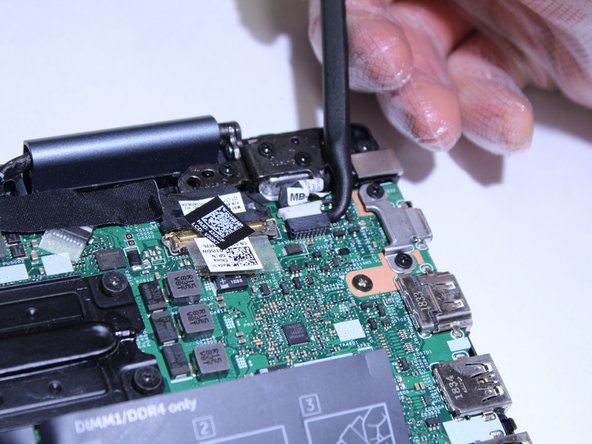
Aller au contenu principal

Dell Inspiron 14 5100 Motherboard Replacement

Ce dont vous avez besoin

  1. Dell Inspiron 14 5100 Motherboard Replacement, Dell Inspiron 14 5100 Disassembly: étape 1, image 1 de 3 Dell Inspiron 14 5100 Motherboard Replacement, Dell Inspiron 14 5100 Disassembly: étape 1, image 2 de 3 Dell Inspiron 14 5100 Motherboard Replacement, Dell Inspiron 14 5100 Disassembly: étape 1, image 3 de 3
    • Make sure to disconnect the power source to the device.

    • Remove nine screws securing the base cover of the laptop's keyboard assembly using the Phillips #0 screwdriver.

    • There are 2 sets of screws.

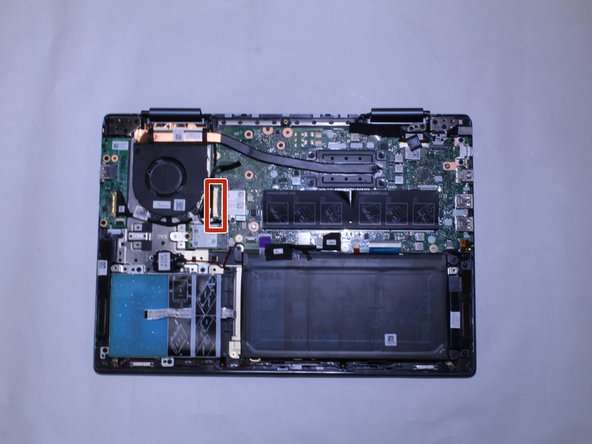
    • Remove the 3 captive screws.

    • Remove the 6M2*6 screws.

  2. Dell Inspiron 14 5100 Motherboard Replacement: étape 2, image 1 de 2 Dell Inspiron 14 5100 Motherboard Replacement: étape 2, image 2 de 2
    • Pry open the laptop to separate the base cover from the keyboard assembly.

    • You may use your fingertips or use plastic opening tools.

  3. Dell Inspiron 14 5100 Motherboard Replacement, RAM: étape 3, image 1 de 1
    • Fold back the thin plastic covers over the RAM slots.

  4. Dell Inspiron 14 5100 Motherboard Replacement: étape 4, image 1 de 2 Dell Inspiron 14 5100 Motherboard Replacement: étape 4, image 2 de 2
    • Using the spudger, pull back the pins holding the RAM in place.

    • The RAM will slightly pop up from the motherboard.

  5. Dell Inspiron 14 5100 Motherboard Replacement: étape 5, image 1 de 1
    • Remove the RAM card from the RAM slot using your fingers. Pull it gently in the direction of the laptop hinge.

    • Repeat Steps 3-5 for the other RAM slot.

  6. Dell Inspiron 14 5100 Motherboard Replacement, Motherboard: étape 6, image 1 de 1
    • Detach the white connector from the motherboard using the spudger.

  7. Dell Inspiron 14 5100 Motherboard Replacement: étape 7, image 1 de 2 Dell Inspiron 14 5100 Motherboard Replacement: étape 7, image 2 de 2
    • Flip up the retaining flap and remove the blue ribbon cable from its connector on the motherboard using a spudger.

  8. Dell Inspiron 14 5100 Motherboard Replacement: étape 8, image 1 de 2 Dell Inspiron 14 5100 Motherboard Replacement: étape 8, image 2 de 2
    • Flip up the retaining flap and remove the orange ribbon cable from its connector on the motherboard using a spudger.

  9. Dell Inspiron 14 5100 Motherboard Replacement: étape 9, image 1 de 2 Dell Inspiron 14 5100 Motherboard Replacement: étape 9, image 2 de 2
    • Detach the CMOS battery connector using the spudger.

  10. Dell Inspiron 14 5100 Motherboard Replacement: étape 10, image 1 de 2 Dell Inspiron 14 5100 Motherboard Replacement: étape 10, image 2 de 2
    • Remove the black connector using the spudger.

  11. Dell Inspiron 14 5100 Motherboard Replacement: étape 11, image 1 de 1
    • Remove the single 3 mm screw from the Wi-Fi card using the Phillips #0 screwdriver.

    • Pull the Wi-Fi card out of the slot and set aside.

  12. Dell Inspiron 14 5100 Motherboard Replacement: étape 12, image 1 de 1
    • Remove the single screw from the SSD using the Phillips #0 screwdriver.

    • Remove the SSD from the motherboard.

  13. Dell Inspiron 14 5100 Motherboard Replacement: étape 13, image 1 de 2 Dell Inspiron 14 5100 Motherboard Replacement: étape 13, image 2 de 2
    • Remove two 2 mm screws using the Phillips #0 screwdriver.

  14. Dell Inspiron 14 5100 Motherboard Replacement: étape 14, image 1 de 2 Dell Inspiron 14 5100 Motherboard Replacement: étape 14, image 2 de 2
    • Disconnect the cable from its connector on the motherboard using the spudger.

  15. Dell Inspiron 14 5100 Motherboard Replacement: étape 15, image 1 de 2 Dell Inspiron 14 5100 Motherboard Replacement: étape 15, image 2 de 2
    • Lift the metal retaining flap using the opening tool.

    • Remove the connector from the bracket.

  16. Dell Inspiron 14 5100 Motherboard Replacement: étape 16, image 1 de 2 Dell Inspiron 14 5100 Motherboard Replacement: étape 16, image 2 de 2
    • Detach the cable using the spudger.

  17. Dell Inspiron 14 5100 Motherboard Replacement: étape 17, image 1 de 2 Dell Inspiron 14 5100 Motherboard Replacement: étape 17, image 2 de 2
    • Detach the connector using the spudger.

  18. Dell Inspiron 14 5100 Motherboard Replacement: étape 18, image 1 de 1
    • Remove six 3 mm screws using the Phillips #0 screwdriver.

  19. Dell Inspiron 14 5100 Motherboard Replacement: étape 19, image 1 de 1
    • Remove the motherboard by lifting it from the rear and then completely removing it from the laptop.

Conclusion

To reassemble your device, follow these instructions in reverse order.

0 commentaires

Ajouter un commentaire

Nombre de vues :

Dernières 24 heures : 0

7 derniers jours : 4

30 derniers jours : 23

Total : 627