Aller au contenu principal

Dell Inspiron 1425 Hard-Drive Assembly Replacement

Ce dont vous avez besoin

  1. Dell Inspiron 1425 Hard-Drive Assembly Replacement, Remove the Screw: étape 1, image 1 de 1
    • WARNING: Before working inside your computer, read the safety information that shipped with your computer. Follow the instructions in "Before You Begin".

    • CAUTION: To avoid electrostatic discharge, ground yourself by using a wrist grounding strap or by periodically touching an unpainted metal surface (such as a connector on your computer).

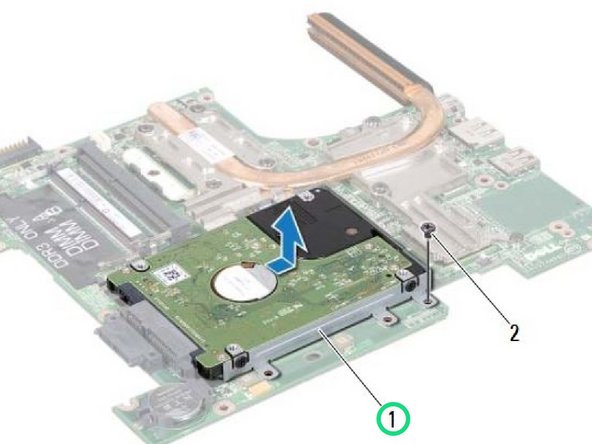
    • Remove the screw that secures the hard-drive assembly to the system board.

  2. Dell Inspiron 1425 Hard-Drive Assembly Replacement, Sliding the Hard Drive Assembly: étape 2, image 1 de 1
    • Slide the hard-drive assembly in the direction shown in the illustration to disconnect it from the connector on the system board.

  3. Dell Inspiron 1425 Hard-Drive Assembly Replacement, Lifting the Hard-Drive Assembly: étape 3, image 1 de 1
    • Lift the hard-drive assembly off the system board.

  4. Dell Inspiron 1425 Hard-Drive Assembly Replacement, Remove the Screws: étape 4, image 1 de 1
    • Remove the four screws that secure the hard-drive bracket to the hard drive.

  5. Dell Inspiron 1425 Hard-Drive Assembly Replacement, Lifting the Hard Drive: étape 5, image 1 de 2 Dell Inspiron 1425 Hard-Drive Assembly Replacement, Lifting the Hard Drive: étape 5, image 2 de 2
    • Lift the hard drive away from the hard-drive bracket.

  6. Dell Inspiron 1425 Hard-Drive Assembly Replacement, Placing the Hard Drive: étape 6, image 1 de 1
    • Place the hard drive in the hard-drive bracket.

  7. Dell Inspiron 1425 Hard-Drive Assembly Replacement, Replace the Screws: étape 7, image 1 de 1
    • Replace the four screws that secure the hard-drive bracket to the hard drive.

  8. Dell Inspiron 1425 Hard-Drive Assembly Replacement, Placing the Hard Drive Assembly: étape 8, image 1 de 1
    • Place the NEW hard-drive assembly on the system board.

  9. Dell Inspiron 1425 Hard-Drive Assembly Replacement, Slding the Hard-Drive Assembly: étape 9, image 1 de 1
    • Slide the hard-drive assembly to connect it to the connector on the system board.

  10. Dell Inspiron 1425 Hard-Drive Assembly Replacement, Replace the Screw: étape 10, image 1 de 1
    • Replace the screw that secures the hard-drive assembly to the system board.

Ligne d'arrivée

Terrence15

Membre depuis le 12/18/17

79 091 Réputation

441 tutoriels rédigés

Équipe

RampUP America, Inc. Membre de l'équipe RampUP America, Inc.

Community

42 membres

1 985 tutoriels rédigés

0 commentaires

Ajouter un commentaire

Nombre de vues :

Dernières 24 heures : 0

7 derniers jours : 0

30 derniers jours : 0

Total : 112