Cette version peut contenir des modifications incorrectes. Passez au dernier aperçu vérifié.
Ce dont vous avez besoin
-
Cette étape n’est pas traduite. Aidez à la traduire
-
Flip the device over so the bottom is facing up.
-
Using a #0 Phillips screwdriver, remove the 4.0mm screw to the right of the disk drive.
-
-
Cette étape n’est pas traduite. Aidez à la traduire
-
Using a #0 Phillips screwdriver, remove the 2.0mm screw from the back of the device beside the vents.
-
-
Cette étape n’est pas traduite. Aidez à la traduire
-
Slide the panel off by placing your hands on top and, while using a little force, sliding your hands down.
-
-
Cette étape n’est pas traduite. Aidez à la traduire
-
Using a #0 Phillips screwdriver, remove the 2.0mm screw beside the black pull tab on the hard drive to the bottom left of the device.
-
-
Cette étape n’est pas traduite. Aidez à la traduire
-
Pull the black tab up and to the left to completely remove the hard drive.
-
Sit the hard drive to the side once it is out.
-
-
Cette étape n’est pas traduite. Aidez à la traduire
-
Turn the device over and open it.
-
You will see 5 notches at the top of the keyboard.
-
Stick the end of the metal spudger between each of these notches to pry the keyboard up. Once you hear a pop sound, stop and move onto the next notch.
-
-
-
Cette étape n’est pas traduite. Aidez à la traduire
-
Once all five notches at the top of the keyboard are loosened, begin pulling it up from the top.
-
-
Cette étape n’est pas traduite. Aidez à la traduire
-
To remove the ribbon cable, use the metal spudger tool to pop the ribbon cable lock up.
-
After popping up the ribbon cable lock, you can pull the ribbon cable out and sit the keyboard to the side.
-
-
Cette étape n’est pas traduite. Aidez à la traduire
-
Flip the device over so the bottom is facing up.
-
Push the two battery locks outwards.
-
-
Cette étape n’est pas traduite. Aidez à la traduire
-
Pull the top of the battery up and out.
-
Sit the bettery to the side once it is out.
-
-
Cette étape n’est pas traduite. Aidez à la traduire
-
Remove the following ten screws with a #0 Phillips screwdriver:
-
Two 8.0mm screws.
-
Eight 4.0mm screws.
-
-
Cette étape n’est pas traduite. Aidez à la traduire
-
Turn the device over and open it.
-
Using a #0 Phillips screwdriver, remove the three 4.0mm screws on the front where the keyboard used to be.
-
-
Cette étape n’est pas traduite. Aidez à la traduire
-
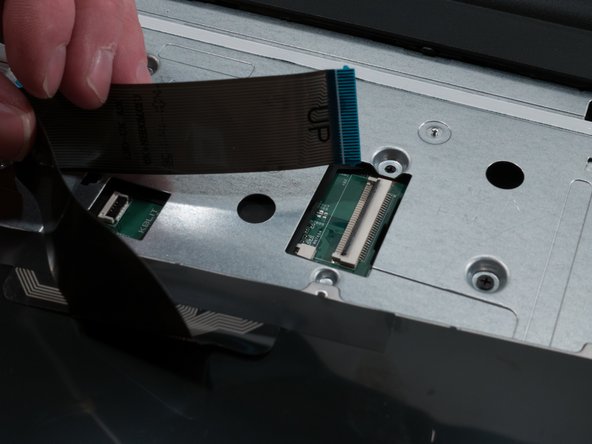
On the front of the device, there will be two ribbon cables. Remove them using the following directions:
-
Pull the black cable ribbon lock up and pull the blue ribbon out using the tab.
-
Pull the white cable ribbon lock up and pull the blue ribbon out using the tab .
-
-
Cette étape n’est pas traduite. Aidez à la traduire
-
Using the one or two opening tools, pry the bottom of the top plate off starting underneath the headphone jack.
-
-
Cette étape n’est pas traduite. Aidez à la traduire
-
Continue going around the device and prying it open until the top panel is off.
-
-
Cette étape n’est pas traduite. Aidez à la traduire
-
On the inside of the top panel, pull the black ribbon cable lock up and pull the ribbon cable out using the tab.
-
-
Cette étape n’est pas traduite. Aidez à la traduire
-
Using a #0 Phillips screwdriver, remove the three 1.0mm screws.
-


Annulation : je n'ai pas terminé ce tutoriel.
Une autre personne a terminé cette réparation.

Équipe

Western Carolina University, Team S1-G6, Virtue Spring 2018 Membre de l'équipe Western Carolina University, Team S1-G6, Virtue Spring 2018
WCU-VIRTUE-S18S1G6
3 membres
5 tutoriels rédigés