Introduction
This is a guide to show you how to replace the Dell Inspiron 15-5548 Wi-Fi chip. Make sure that the laptop is unplugged and powered off before beginning this procedure.
Ce dont vous avez besoin
-
-
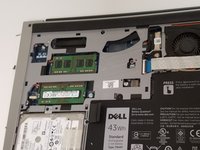
Use a Phillips #00 screwdriver to unscrew both bottom cover screws, and remove the bottom cover.
-
-


To reassemble your device, follow these instructions in reverse order. When inserting new chip make sure it pops up when not secured by the screw.
To reassemble your device, follow these instructions in reverse order. When inserting new chip make sure it pops up when not secured by the screw.
Équipe

University of North Texas, Team S7-G4, Thomas Fall 2017 Membre de l'équipe University of North Texas, Team S7-G4, Thomas Fall 2017
UNT-THOMAS-F17S7G4
4 membres
9 tutoriels rédigés