Aller au contenu principal

Dell Inspiron 15-5552 CD-Drive Replacement

Ce dont vous avez besoin
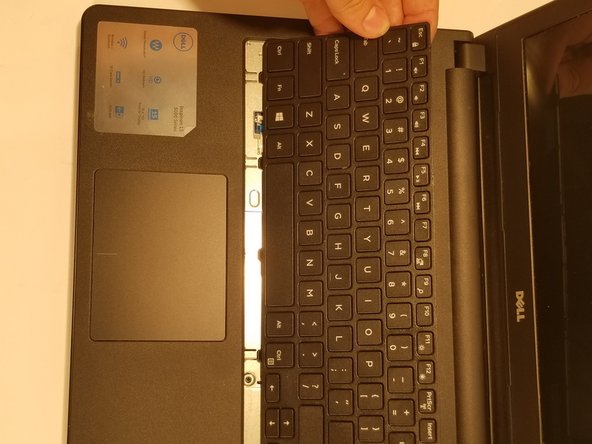
  1. Dell Inspiron 15-5552 CD-Drive Replacement, Battery: étape 1, image 1 de 1
    • Make sure the laptop is powered down before you remove the battery.

  2. Dell Inspiron 15-5552 CD-Drive Replacement: étape 2, image 1 de 1
    • Locate the battery release switch on the bottom of the laptop.

  3. Dell Inspiron 15-5552 CD-Drive Replacement: étape 3, image 1 de 1
    • Slide the battery release switch away from the lock symbol towards the “unlock” position.

    • You can tell that the battery is unlocked once you hear a "click."

  4. Dell Inspiron 15-5552 CD-Drive Replacement: étape 4, image 1 de 2 Dell Inspiron 15-5552 CD-Drive Replacement: étape 4, image 2 de 2
    • Rotate the battery outward by lifting the bottom lip that pops out.

    • Continue rotating the battery towards the top of the laptop until the battery is completely removed.

  5. Dell Inspiron 15-5552 CD-Drive Replacement, Keyboard: étape 5, image 1 de 2 Dell Inspiron 15-5552 CD-Drive Replacement, Keyboard: étape 5, image 2 de 2
    • Keyboard

    • Insert a spudger next to the 5 plastic indents located at the top of the keyboard and gently pry to release the securing clips.

  6. Dell Inspiron 15-5552 CD-Drive Replacement: étape 6, image 1 de 2 Dell Inspiron 15-5552 CD-Drive Replacement: étape 6, image 2 de 2
    • Lift the keyboard off of the computer. *Be careful not to tear the ribbon that attaches the back of the keyboard to the computer when lifting it.*

  7. Dell Inspiron 15-5552 CD-Drive Replacement: étape 7, image 1 de 1
    • Flip the keyboard over onto the palm-rest assembly.

  8. Dell Inspiron 15-5552 CD-Drive Replacement: étape 8, image 1 de 2 Dell Inspiron 15-5552 CD-Drive Replacement: étape 8, image 2 de 2
    • Flip the black securing bar near the base of the ribbon with a spudger to release the ribbon from the computer.

  9. Dell Inspiron 15-5552 CD-Drive Replacement, CD-Drive: étape 9, image 1 de 1
    • CD-Drive

    • Flip the computer over, *screen down* and unscrew the 1 screw in the middle located below the battery with a J0 bit tipped screwdriver.

  10. Dell Inspiron 15-5552 CD-Drive Replacement: étape 10, image 1 de 1
    • Next using the J0 bit tipped screwdriver unscrew the 2 remaining screws shown in the picture.

  11. Dell Inspiron 15-5552 CD-Drive Replacement: étape 11, image 1 de 2 Dell Inspiron 15-5552 CD-Drive Replacement: étape 11, image 2 de 2
    • After all 3 screws are removed take a spudger and pry the CD-Drive out of the computer.

Conclusion

To reassemble your device, follow these instructions in reverse order.

Une autre personne a terminé cette réparation.

Chandler Champion

Membre depuis le 01/23/18

364 Réputation

3 tutoriels rédigés

0 commentaires

Ajouter un commentaire

Nombre de vues :

Dernières 24 heures : 0

7 derniers jours : 0

30 derniers jours : 0

Total : 143