Aller au contenu principal

Dell Inspiron 15-5558 RAM Replacement

Ce dont vous avez besoin

  1. Dell Inspiron 15-5558 RAM Replacement, Battery: étape 1, image 1 de 1
    • Make sure you turn off the device before starting.

    • Flip the device over and so the white bar code is on the right.

  2. Dell Inspiron 15-5558 RAM Replacement: étape 2, image 1 de 1
    • Slide the battery latch all the way to the left until you hear the click and see the battery prop up.

  3. Dell Inspiron 15-5558 RAM Replacement: étape 3, image 1 de 2 Dell Inspiron 15-5558 RAM Replacement: étape 3, image 2 de 2
    • Rotate the battery up and remove it.

  4. Dell Inspiron 15-5558 RAM Replacement, Hard Drive: étape 4, image 1 de 3 Dell Inspiron 15-5558 RAM Replacement, Hard Drive: étape 4, image 2 de 3 Dell Inspiron 15-5558 RAM Replacement, Hard Drive: étape 4, image 3 de 3
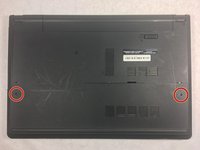
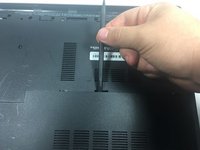
    • Using a Phillips #0 screwdriver, unscrew the two 8mm screws from the panel.

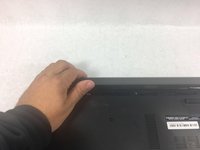
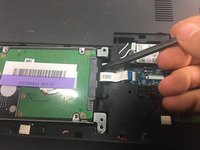
    • Take a spudger and wedge it between the panel and the base of the device.

    • Push down on the spudger until you hear a click sound.

    • Slide the spudger along the panel and continue to push down until the panel is completely detached.
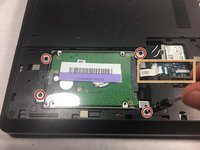
    • Remove the panel.

  5. Dell Inspiron 15-5558 RAM Replacement: étape 5, image 1 de 3 Dell Inspiron 15-5558 RAM Replacement: étape 5, image 2 de 3 Dell Inspiron 15-5558 RAM Replacement: étape 5, image 3 de 3
    • Using the Phillips #0 screwdriver, remove the four 8mm screws holding down the hard drive.

    • Take the spudger and prop up the connector so it is no longer attached.

    • Use the spudger and prop up the hard drive and remove it.

  6. Dell Inspiron 15-5558 RAM Replacement, RAM: étape 6, image 1 de 3 Dell Inspiron 15-5558 RAM Replacement, RAM: étape 6, image 2 de 3 Dell Inspiron 15-5558 RAM Replacement, RAM: étape 6, image 3 de 3
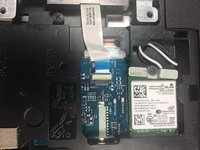
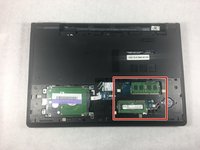
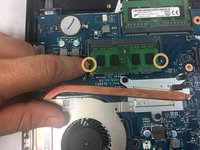
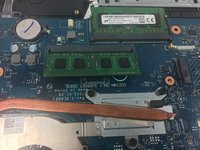
    • Locate the two RAM cards.

    • Using your finger, pull the two small pins back from the RAM causing it to pop up.

  7. Dell Inspiron 15-5558 RAM Replacement: étape 7, image 1 de 1
    • Once popped up, pull the ram out.

Conclusion

To reassemble your device, follow these instructions in reverse order.

Adam Lourenco

Membre depuis le 10/19/17

775 Réputation

5 tutoriels rédigés

Équipe

UMass Dartmouth, Team S3-G4, Bailey Fall 2017 Membre de l'équipe UMass Dartmouth, Team S3-G4, Bailey Fall 2017

UMASSD-BAILEY-F17S3G4

3 membres

5 tutoriels rédigés

0 commentaires

Ajouter un commentaire

Nombre de vues :

Dernières 24 heures : 0

7 derniers jours : 0

30 derniers jours : 8

Total : 1,330