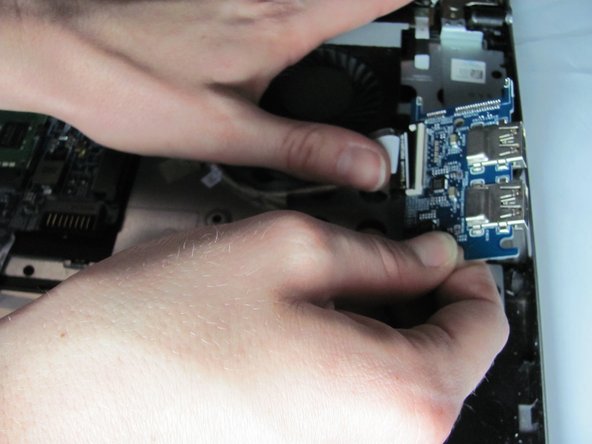
Aller au contenu principal

Dell Inspiron 15-7537 USB Board Replacement

Ce dont vous avez besoin

  1. Dell Inspiron 15-7537 USB Board Replacement, Bottom Case: étape 1, image 1 de 1
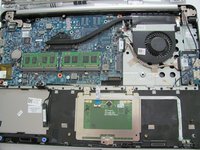
    • Make sure the display is closed. Then, flip the computer over so that you can see the bottom cover.

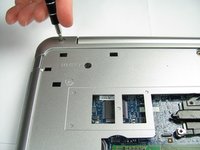
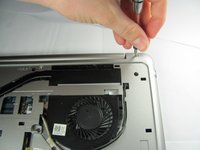
    • Loosen the two 5 mm Phillips #0 on the upper edge of the cover.

    • These screws will stay captive to the case.

  2. Dell Inspiron 15-7537 USB Board Replacement: étape 2, image 1 de 1
    • Remove the two 5 mm interior screws that connect the cover to the assembly using the same Philips head screwdriver from the previous step.

  3. Dell Inspiron 15-7537 USB Board Replacement: étape 3, image 1 de 1
    • Use a spudger to remove the base cover from the rest of bottom cover.

  4. Dell Inspiron 15-7537 USB Board Replacement, Battery: étape 4, image 1 de 1
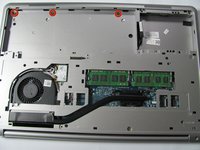
    • Remove the three 5mm Phillips #0 screws that keep the battery connected to the computer.
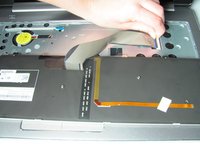
  5. Dell Inspiron 15-7537 USB Board Replacement: étape 5, image 1 de 1
    • Ground the system board by turning over the computer, opening the display, and holding the power button down for about 5 seconds before proceeding.

    • Using the pull tab on the battery, lift the battery out of the computer.

  6. Dell Inspiron 15-7537 USB Board Replacement, Hard Drive: étape 6, image 1 de 1
  7. Dell Inspiron 15-7537 USB Board Replacement, Removing the Keyboard: étape 7, image 1 de 1
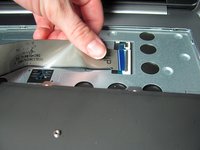
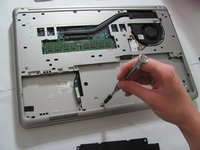
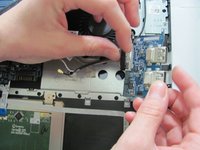
    • Remove the single 5mm screw that connects the keyboard to the palm assembly with the Phillips head screwdriver.

  8. Dell Inspiron 15-7537 USB Board Replacement: étape 8, image 1 de 1
    • Flip over the computer and open the display as far as it can go.

    • Use the spudger to remove the keyboard from the palm assembly.

  9. Dell Inspiron 15-7537 USB Board Replacement: étape 9, image 1 de 1
    • Gently flip over the keyboard and place it on the palm rest assembly.

    • Lift the connector latches and disconnect the keyboard and the keyboard back-light cables.

  10. Dell Inspiron 15-7537 USB Board Replacement: étape 10, image 1 de 3 Dell Inspiron 15-7537 USB Board Replacement: étape 10, image 2 de 3 Dell Inspiron 15-7537 USB Board Replacement: étape 10, image 3 de 3
    • Take the keyboard off the palm rest assembly.

  11. Dell Inspiron 15-7537 USB Board Replacement, Bottom Cover: étape 11, image 1 de 1
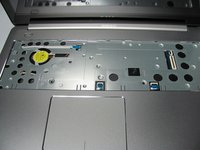
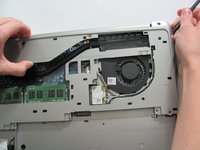
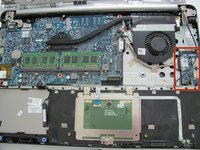
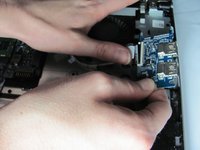
    • Unscrew the two black 5 mm screws underneath the keyboard using a Phillips head screwdriver.

  12. Dell Inspiron 15-7537 USB Board Replacement: étape 12, image 1 de 2 Dell Inspiron 15-7537 USB Board Replacement: étape 12, image 2 de 2
    • Flip the computer and remove the two silver 5 mm screws on the corners of the base cover with the Phillips head screwdriver.

  13. Dell Inspiron 15-7537 USB Board Replacement: étape 13, image 1 de 1
    • Unscrew the three black 5 mm screws with the Phillips head screwdriver.

  14. Dell Inspiron 15-7537 USB Board Replacement: étape 14, image 1 de 2 Dell Inspiron 15-7537 USB Board Replacement: étape 14, image 2 de 2
    • Remove the three silver 2 mm screws (with large flat circular heads) from where the battery was taken out with the Phillips head screwdriver.

  15. Dell Inspiron 15-7537 USB Board Replacement: étape 15, image 1 de 2 Dell Inspiron 15-7537 USB Board Replacement: étape 15, image 2 de 2
    • Place a plastic spudger underneath the base cover and move it along the outside of the cover. Once the cover is disconnected lift the off the base cover.

    • To fully take off the base cover the wires that connect to the WiFi card need to be pulled off and pulled through its hole in the base cover

  16. Dell Inspiron 15-7537 USB Board Replacement, USB Board: étape 16, image 1 de 2 Dell Inspiron 15-7537 USB Board Replacement, USB Board: étape 16, image 2 de 2
    • Pull back the tape that is securing the cable to the USB board.

  17. Dell Inspiron 15-7537 USB Board Replacement: étape 17, image 1 de 3 Dell Inspiron 15-7537 USB Board Replacement: étape 17, image 2 de 3 Dell Inspiron 15-7537 USB Board Replacement: étape 17, image 3 de 3
    • Lift the black latch and remove the USB cable from the USB board.

Conclusion

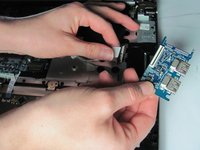
To reassemble your device, follow these instructions in reverse order.

Jean Whitmore

Membre depuis le 01/22/15

984 Réputation

7 tutoriels rédigés

Équipe

Cal Poly, Team 18-2, Maness Winter 2015 Membre de l'équipe Cal Poly, Team 18-2, Maness Winter 2015

CPSU-MANESS-W15S18G2

4 membres

8 tutoriels rédigés

0 commentaires

Ajouter un commentaire

Nombre de vues :

Dernières 24 heures : 0

7 derniers jours : 9

30 derniers jours : 12

Total : 1,963