Aller au contenu principal

Dell Inspiron 15R Keyboard Replacement

Ce dont vous avez besoin

  1. Dell Inspiron 15R Keyboard Replacement, Battery: étape 1, image 1 de 1
    • Turn the device over and locate the battery.

  2. Dell Inspiron 15R Keyboard Replacement: étape 2, image 1 de 2 Dell Inspiron 15R Keyboard Replacement: étape 2, image 2 de 2
    • Place thumbs on each latch and push outwards.

  3. Dell Inspiron 15R Keyboard Replacement: étape 3, image 1 de 1
    • Push and slide the battery away from you.

  4. Dell Inspiron 15R Keyboard Replacement, Keyboard: étape 4, image 1 de 3 Dell Inspiron 15R Keyboard Replacement, Keyboard: étape 4, image 2 de 3 Dell Inspiron 15R Keyboard Replacement, Keyboard: étape 4, image 3 de 3
    • Locate the RAM compartment and the screw on the right hand side. Remove the cover.

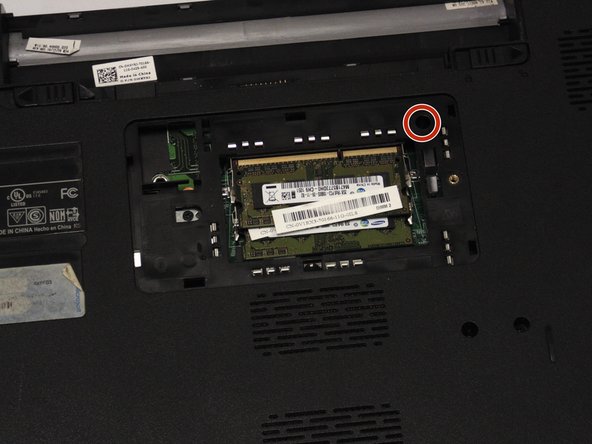
  5. Dell Inspiron 15R Keyboard Replacement: étape 5, image 1 de 2 Dell Inspiron 15R Keyboard Replacement: étape 5, image 2 de 2
    • Locate and remove the 2.5 mm x 5 mm screw on the upper right hand side of the compartment.

  6. Dell Inspiron 15R Keyboard Replacement: étape 6, image 1 de 1
    • Turn the device around and open it up.

  7. Dell Inspiron 15R Keyboard Replacement: étape 7, image 1 de 2 Dell Inspiron 15R Keyboard Replacement: étape 7, image 2 de 2
    • Using your index finger, push down on the F1 and F7 keys.

  8. Dell Inspiron 15R Keyboard Replacement: étape 8, image 1 de 2 Dell Inspiron 15R Keyboard Replacement: étape 8, image 2 de 2
    • Using your index finger, push down on the x icon and Home keys.

  9. Dell Inspiron 15R Keyboard Replacement: étape 9, image 1 de 3 Dell Inspiron 15R Keyboard Replacement: étape 9, image 2 de 3 Dell Inspiron 15R Keyboard Replacement: étape 9, image 3 de 3
    • Locate the keyboard lining (between the black and silver).

    • Place your spudger between the keyboard lining behind the F1 and F7 keys and pull up.

  10. Dell Inspiron 15R Keyboard Replacement: étape 10, image 1 de 2 Dell Inspiron 15R Keyboard Replacement: étape 10, image 2 de 2
    • Place your spudger between the keyboard lining behind the x icon and Home keys and pull up.

  11. Dell Inspiron 15R Keyboard Replacement: étape 11, image 1 de 2 Dell Inspiron 15R Keyboard Replacement: étape 11, image 2 de 2
    • Carefully pull and turn the keyboard over.

  12. Dell Inspiron 15R Keyboard Replacement: étape 12, image 1 de 2 Dell Inspiron 15R Keyboard Replacement: étape 12, image 2 de 2
    • Lift the black lever.

  13. Dell Inspiron 15R Keyboard Replacement: étape 13, image 1 de 2 Dell Inspiron 15R Keyboard Replacement: étape 13, image 2 de 2
    • Remove the keyboard cable

Conclusion

To reassemble your device, follow these instructions in reverse order.

Une autre personne a terminé cette réparation.

Trixie Gonzalez

Membre depuis le 02/14/15

843 Réputation

6 tutoriels rédigés

Équipe

San Diego State, Team 2-2, Sheppard Winter 2015 Membre de l'équipe San Diego State, Team 2-2, Sheppard Winter 2015

SDSU-SHEPPARD-W15S2G2

2 membres

6 tutoriels rédigés

0 commentaires

Ajouter un commentaire

Nombre de vues :

Dernières 24 heures : 0

7 derniers jours : 0

30 derniers jours : 3

Total : 1,319