Aller au contenu principal

Dell Inspiron B130 Screen Replacement

Ce dont vous avez besoin

  1. Dell Inspiron B130 Screen Replacement, Battery: étape 1, image 1 de 3 Dell Inspiron B130 Screen Replacement, Battery: étape 1, image 2 de 3 Dell Inspiron B130 Screen Replacement, Battery: étape 1, image 3 de 3
    • First, make sure your computer is turned off.

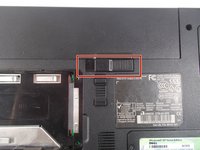
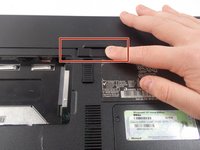
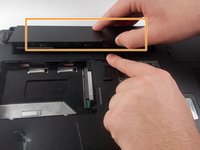
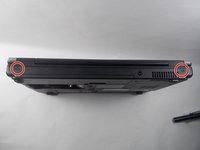
    • Remove the battery by flipping the two switches under the battery and pulling it out

  2. Dell Inspiron B130 Screen Replacement: étape 2, image 1 de 3 Dell Inspiron B130 Screen Replacement: étape 2, image 2 de 3 Dell Inspiron B130 Screen Replacement: étape 2, image 3 de 3
    • Push the tab from the battery, downwards to unlock the battery.

    • The tab should be in the position next to the unlocked indicator.

  3. Dell Inspiron B130 Screen Replacement: étape 3, image 1 de 3 Dell Inspiron B130 Screen Replacement: étape 3, image 2 de 3 Dell Inspiron B130 Screen Replacement: étape 3, image 3 de 3
    • Now, push the other tab (the one right under the battery) from right to left.

    • Now the battery will be loose; lift the battery up and out of the computer.

  4. Dell Inspiron B130 Screen Replacement, Keyboard: étape 4, image 1 de 1
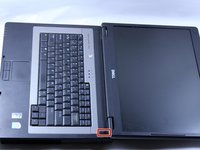
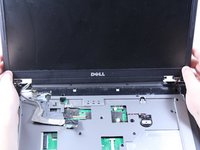
    • Put down the computer and open up the screen.

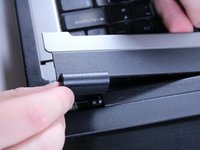
    • There is a long piece of plastic underneath the screen that you will have to remove.

  5. Dell Inspiron B130 Screen Replacement: étape 5, image 1 de 3 Dell Inspiron B130 Screen Replacement: étape 5, image 2 de 3 Dell Inspiron B130 Screen Replacement: étape 5, image 3 de 3
    • When you pry the plastic plate off, be careful and pry gently so you do not crack the plastic.

    • Insert the plastic opening tool into the little slot.

    • Lift up gently and remove the plastic cover.

  6. Dell Inspiron B130 Screen Replacement: étape 6, image 1 de 1
    • Remove the two 4mm screws at the top of the keyboard.

    • The keyboard is now loose but don't pull it out just yet. It is still connected underneath. Be gentle when lifting keyboard so you do not damage this connection.

  7. Dell Inspiron B130 Screen Replacement: étape 7, image 1 de 2 Dell Inspiron B130 Screen Replacement: étape 7, image 2 de 2
    • Lift keyboard up slightly and you will see the keyboard connection.

    • This black tab has to be lifted up to remove the keyboard.

    • Put your finger underneath the tab and pull back gently as indicated.

    • You can now remove the keyboard.

  8. Dell Inspiron B130 Screen Replacement, Screen: étape 8, image 1 de 3 Dell Inspiron B130 Screen Replacement, Screen: étape 8, image 2 de 3 Dell Inspiron B130 Screen Replacement, Screen: étape 8, image 3 de 3
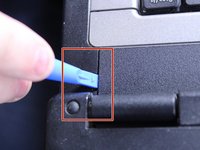
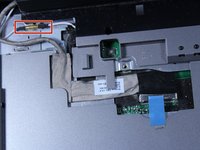
    • After opening the panel, you will see two cable connections attached to the screen.

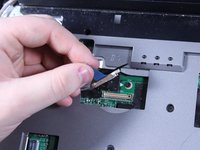
    • Identify the one with blue tape this is the display connector that needs to be removed.

  9. Dell Inspiron B130 Screen Replacement: étape 9, image 1 de 2 Dell Inspiron B130 Screen Replacement: étape 9, image 2 de 2
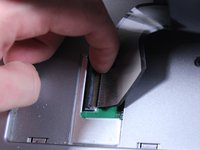
    • Locate the second connector next to the one removed in the previous step, This connector does not have blue tape but still needs to be detached. To remove it safely hold both sides of the connector firmly. Pull it straight apart avoid twisting or pulling at an angle to prevent damage.

  10. Dell Inspiron B130 Screen Replacement: étape 10, image 1 de 1
    • Locate the two 6mm screws positioned directly beneath the screen. Use a Phillips #1 screwdriver to remove both screws. Keep the screws in a safe place, as they will be needed for reassembly.

  11. Dell Inspiron B130 Screen Replacement: étape 11, image 1 de 2 Dell Inspiron B130 Screen Replacement: étape 11, image 2 de 2
    • Close the computer and flip it over so that the back is facing up.

    • Remove the two 6mm screws that are behind each of the screens pivot points. Use a Phillips #1 screwdriver to remove these screws.

    • Open up the screen and now it can be lifted up and off of the computer.

Conclusion

To reassemble your device, follow these instructions in reverse order.

Patrick McNeil

Membre depuis le 10/19/16

937 Réputation

8 tutoriels rédigés

Équipe

UMass Dartmouth, Team 1-8, Catania Fall 2016 Membre de l'équipe UMass Dartmouth, Team 1-8, Catania Fall 2016

UMASSD-CATANIA-F16S1G8

3 membres

9 tutoriels rédigés

0 commentaires

Ajouter un commentaire

Nombre de vues :

Dernières 24 heures : 1

7 derniers jours : 1

30 derniers jours : 15

Total : 409