Aller au contenu principal

Dell Inspiron E1705 Lower Case Replacement

Ce dont vous avez besoin

  1. Dell Inspiron E1705 Lower Case Replacement, Battery: étape 1, image 1 de 1
    • Make sure that the computer is turned off and is disconnected from external power source.

    • Turn it upside down and locate the battery release switch.

  2. Dell Inspiron E1705 Lower Case Replacement: étape 2, image 1 de 2 Dell Inspiron E1705 Lower Case Replacement: étape 2, image 2 de 2
    • While holding the switch in the open position, lift out the battery.

    • If you plan to work on any internal laptop components, press and hold the power button for 5 seconds. This will dissipate any residual charge on the motherboard to prevent electrical shock when you begin to handle it.

  3. Dell Inspiron E1705 Lower Case Replacement, Lower Case: étape 3, image 1 de 1
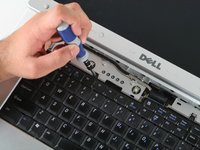
    • Remove the 12 Phillips #1 screws from the edges of the lower case.

    • You may also need to remove the central screw next to the lock icon.

  4. Dell Inspiron E1705 Lower Case Replacement: étape 4, image 1 de 3 Dell Inspiron E1705 Lower Case Replacement: étape 4, image 2 de 3 Dell Inspiron E1705 Lower Case Replacement: étape 4, image 3 de 3
    • Turn the computer back over and tilt the screen open.

    • Use the plastic opening tool to carefully pry the panel out as shown in the pictures

    • Remove the plastic panel carefully.

  5. Dell Inspiron E1705 Lower Case Replacement: étape 5, image 1 de 3 Dell Inspiron E1705 Lower Case Replacement: étape 5, image 2 de 3 Dell Inspiron E1705 Lower Case Replacement: étape 5, image 3 de 3
    • Use the small Phillips head screwdriver to remove the screws circled in red.

    • Gently lift the keyboard up and rest it just below the screen as shown in the picture.

    • The keyboard will still be connected to the motherboard.

  6. Dell Inspiron E1705 Lower Case Replacement: étape 6, image 1 de 2 Dell Inspiron E1705 Lower Case Replacement: étape 6, image 2 de 2
    • Before removing the keyboard completely, use the plastic opening tool to gently lift the clamp connecting the keyboard to the motherboard.

    • Once the keyboard has been disconnected, remove the keyboard completely.

  7. Dell Inspiron E1705 Lower Case Replacement: étape 7, image 1 de 3 Dell Inspiron E1705 Lower Case Replacement: étape 7, image 2 de 3 Dell Inspiron E1705 Lower Case Replacement: étape 7, image 3 de 3
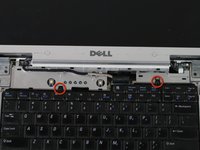
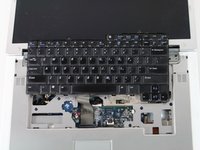
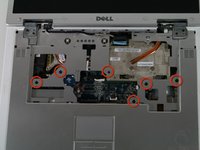
    • Using a Phillips head screwdriver, remove the screws shown in the image. They all have the letter "P" next to them.

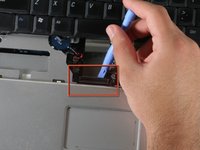
    • Carefully unplug the connections shown.

    • Don't forget the display cable. It is slightly to the right of the Dell logo at the top.

    • Also, the wireless cables on the right side may prevent moving the upper case out of the way.

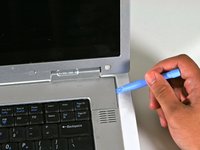
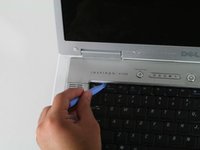
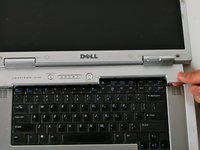
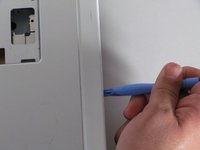
    • Once the screws have been removed and the connections unplugged, use the plastic opening tool to gently separate the panel from the lower case.

  8. Dell Inspiron E1705 Lower Case Replacement: étape 8, image 1 de 1
    • Remove the plastic case by gently bending back towards the screen. You can bend the screen all the way back if that helps.

    • For the motherboard the optical drive will be removed already. However for the lower case it is not necessary that it be taken out.

    • If you are having trouble removing the upper plastic case (and LCD) from the lower case, there may still be a wire connected to the Wi-Fi adapter. Turn the laptop over, open the Wi-Fi module access panel and remove the + and - leads for the Wi-Fi antenna.

Conclusion

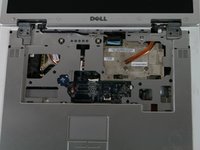
To reassemble your device, follow these instructions in reverse order.

2 autres ont terminé cette réparation.

Malik Shahbal

Membre depuis le 10/05/10

471 Réputation

5 tutoriels rédigés

Équipe

Cal Poly, Team 22-5, Maness Fall 2010 Membre de l'équipe Cal Poly, Team 22-5, Maness Fall 2010

CPSU-MANESS-F10S22G5

4 membres

11 tutoriels rédigés

0 commentaires

Ajouter un commentaire

Nombre de vues :

Dernières 24 heures : 0

7 derniers jours : 0

30 derniers jours : 1

Total : 3,190