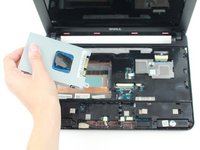
Aller au contenu principal

Dell Inspiron Mini 10 Hard Drive Replacement

Ce dont vous avez besoin

  1. Dell Inspiron Mini 10 Hard Drive Replacement, Battery: étape 1, image 1 de 1
    • To prevent injury and loss of data, ensure the device is turned off.

    • Slide the release latches out toward the edges to unlock the battery.

  2. Dell Inspiron Mini 10 Hard Drive Replacement: étape 2, image 1 de 1
    • Remove the battery by pulling it up and out.

  3. Dell Inspiron Mini 10 Hard Drive Replacement, Palm Rest: étape 3, image 1 de 1
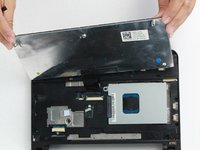
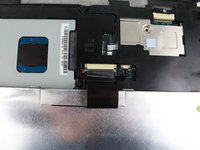
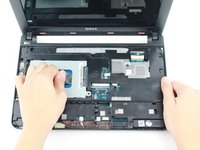
    • Using a prying tool, gently pry the palm rest off of the palm rest bracket. Start prying from one side and slowly work your way around.

    • Carefully remove the palm rest from the computer base since it is still connected by a cable and to avoid damage to the palm rest.

  4. Dell Inspiron Mini 10 Hard Drive Replacement: étape 4, image 1 de 1
    • Gently pull the touchpad cable off the palm rest bracket.

    • Lift the rest of the palm rest off the computer base.

  5. Dell Inspiron Mini 10 Hard Drive Replacement, Keyboard: étape 5, image 1 de 1
    • Remove the three 8mm Philips 0 screws securing the keyboard.

  6. Dell Inspiron Mini 10 Hard Drive Replacement: étape 6, image 1 de 1
    • Turn over the device and open the display.

    • Gently pry open the keyboard with the plastic opening tool, working under the edges to release the clips.

  7. Dell Inspiron Mini 10 Hard Drive Replacement: étape 7, image 1 de 2 Dell Inspiron Mini 10 Hard Drive Replacement: étape 7, image 2 de 2
    • Lift the keyboard off of the support bracket carefully since it is still connected by a ribbon cable.

  8. Dell Inspiron Mini 10 Hard Drive Replacement: étape 8, image 1 de 2 Dell Inspiron Mini 10 Hard Drive Replacement: étape 8, image 2 de 2
    • Push the clips out on either side of the ribbon cable to release it.

    • Gently disconnect the ribbon cable by pulling on the clear tab.

    • Remove the keyboard.

  9. Dell Inspiron Mini 10 Hard Drive Replacement, Hard Drive: étape 9, image 1 de 2 Dell Inspiron Mini 10 Hard Drive Replacement, Hard Drive: étape 9, image 2 de 2
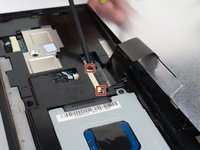
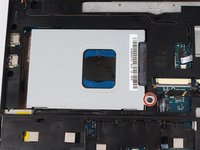
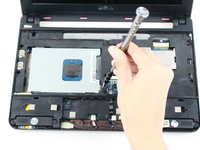
    • Remove the single 8mm screw attaching the hard-drive cage to the body of the device.

  10. Dell Inspiron Mini 10 Hard Drive Replacement: étape 10, image 1 de 2 Dell Inspiron Mini 10 Hard Drive Replacement: étape 10, image 2 de 2
    • Pull on the black tab and slide the hard-drive cage toward the USB port until is comes free.

  11. Dell Inspiron Mini 10 Hard Drive Replacement: étape 11, image 1 de 1
    • Unscrew the four 3mm screws, two on each side of the drive, and slide the drive free from the cage.

Conclusion

To reassemble your device, follow these instructions in reverse order.

3 autres ont terminé cette réparation.

Bariso Shuba

Membre depuis le 10/26/16

270 Réputation

3 tutoriels rédigés

Équipe

UW Tacoma, Team 1-4, Rose Fall 2016 Membre de l'équipe UW Tacoma, Team 1-4, Rose Fall 2016

UWT-ROSE-F16S1G4

4 membres

10 tutoriels rédigés

0 commentaires

Ajouter un commentaire

Nombre de vues :

Dernières 24 heures : 0

7 derniers jours : 10

30 derniers jours : 46

Total : 7,117