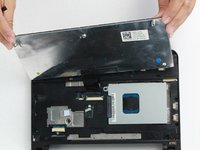
Aller au contenu principal

Dell Inspiron Mini 10 Keyboard Replacement

Ce dont vous avez besoin

  1. Dell Inspiron Mini 10 Keyboard Replacement, Battery: étape 1, image 1 de 1
    • To prevent injury and loss of data, ensure the device is turned off.

    • Slide the release latches out toward the edges to unlock the battery.

  2. Dell Inspiron Mini 10 Keyboard Replacement: étape 2, image 1 de 1
    • Remove the battery by pulling it up and out.

  3. Dell Inspiron Mini 10 Keyboard Replacement, Keyboard: étape 3, image 1 de 1
    • Remove the three 8mm Philips 0 screws securing the keyboard.

  4. Dell Inspiron Mini 10 Keyboard Replacement: étape 4, image 1 de 1
    • Turn over the device and open the display.

    • Gently pry open the keyboard with the plastic opening tool, working under the edges to release the clips.

  5. Dell Inspiron Mini 10 Keyboard Replacement: étape 5, image 1 de 2 Dell Inspiron Mini 10 Keyboard Replacement: étape 5, image 2 de 2
    • Lift the keyboard off of the support bracket carefully since it is still connected by a ribbon cable.

  6. Dell Inspiron Mini 10 Keyboard Replacement: étape 6, image 1 de 2 Dell Inspiron Mini 10 Keyboard Replacement: étape 6, image 2 de 2
    • Push the clips out on either side of the ribbon cable to release it.

    • Gently disconnect the ribbon cable by pulling on the clear tab.

    • Remove the keyboard.

Conclusion

To reassemble your device, follow these instructions in reverse order.

Danielle Jarecki

Membre depuis le 10/21/16

334 Réputation

5 tutoriels rédigés

Équipe

UW Tacoma, Team 1-4, Rose Fall 2016 Membre de l'équipe UW Tacoma, Team 1-4, Rose Fall 2016

UWT-ROSE-F16S1G4

4 membres

10 tutoriels rédigés

0 commentaires

Ajouter un commentaire

Nombre de vues :

Dernières 24 heures : 0

7 derniers jours : 2

30 derniers jours : 9

Total : 1,309