Aller au contenu principal

Dell Inspiron i3558-5500BLK Hard Drive Replacement

Ce dont vous avez besoin

  1. Dell Inspiron i3558-5500BLK Hard Drive Replacement, Keyboard: étape 1, image 1 de 2 Dell Inspiron i3558-5500BLK Hard Drive Replacement, Keyboard: étape 1, image 2 de 2
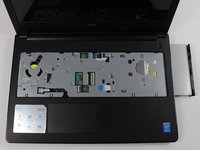
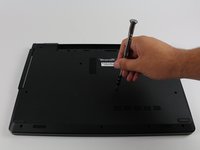
    • With the laptop open and facing upright, use the Spudger to pull at the notches shown in the image.

  2. Dell Inspiron i3558-5500BLK Hard Drive Replacement: étape 2, image 1 de 3 Dell Inspiron i3558-5500BLK Hard Drive Replacement: étape 2, image 2 de 3 Dell Inspiron i3558-5500BLK Hard Drive Replacement: étape 2, image 3 de 3
    • Gently turn the keyboard over to reveal the ribbon cable underneath. Remove the cable from the motherboard by lifting the white release tab and gently pulling the cable away from the socket.

    • Lift the keyboard away from the baseboard to remove.

  3. Dell Inspiron i3558-5500BLK Hard Drive Replacement, Battery: étape 3, image 1 de 3 Dell Inspiron i3558-5500BLK Hard Drive Replacement, Battery: étape 3, image 2 de 3 Dell Inspiron i3558-5500BLK Hard Drive Replacement, Battery: étape 3, image 3 de 3
    • With the back of the laptop facing upright, press the switch shown to loosen the battery and remove it.

  4. Dell Inspiron i3558-5500BLK Hard Drive Replacement, Back Cover: étape 4, image 1 de 2 Dell Inspiron i3558-5500BLK Hard Drive Replacement, Back Cover: étape 4, image 2 de 2
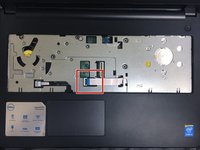
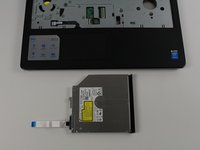
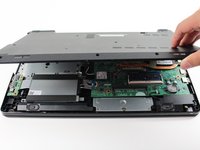
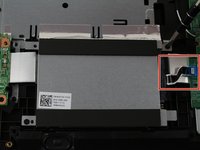
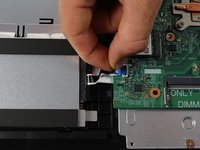
    • With the laptop facing upright - remove the ribbon cable from the optical drive by lifting the white release tab and gently pulling the cable away from the socket.

  5. Dell Inspiron i3558-5500BLK Hard Drive Replacement: étape 5, image 1 de 2 Dell Inspiron i3558-5500BLK Hard Drive Replacement: étape 5, image 2 de 2
    • Slide the optical drive out of the port on the right-side of the laptop.

  6. Dell Inspiron i3558-5500BLK Hard Drive Replacement: étape 6, image 1 de 3 Dell Inspiron i3558-5500BLK Hard Drive Replacement: étape 6, image 2 de 3 Dell Inspiron i3558-5500BLK Hard Drive Replacement: étape 6, image 3 de 3
    • With the back of the laptop facing upright, remove the following screws:

    • Ten 0.5 mm Phillips screws from the backboard

    • One 0.2 mm Phillips screw from the battery port

    • Three 0.1 mm Phillips screws from the optical drive slot.

  7. Dell Inspiron i3558-5500BLK Hard Drive Replacement: étape 7, image 1 de 2 Dell Inspiron i3558-5500BLK Hard Drive Replacement: étape 7, image 2 de 2
    • Gently pry the back cover from the opposite side of the battery to reveal the internal components.

  8. Dell Inspiron i3558-5500BLK Hard Drive Replacement, Hard Drive: étape 8, image 1 de 2 Dell Inspiron i3558-5500BLK Hard Drive Replacement, Hard Drive: étape 8, image 2 de 2
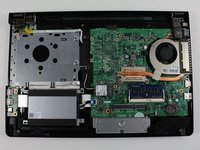
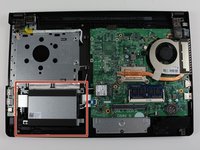
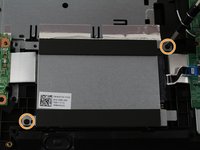
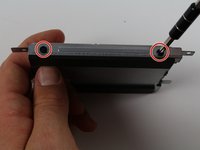
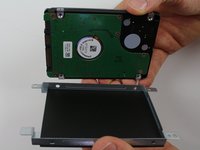
    • Identify the hard drive as shown in the image.

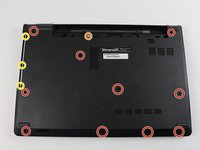
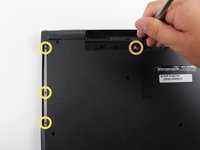
    • Remove the 0.5 mm Phillips screws that secure the hard drive to the palm-rest.

  9. Dell Inspiron i3558-5500BLK Hard Drive Replacement: étape 9, image 1 de 2 Dell Inspiron i3558-5500BLK Hard Drive Replacement: étape 9, image 2 de 2
    • Disconnect the hard drive ribbon cable from the mother board as shown by lifting the release tab and gently pulling the cable away from the socket.

    • To avoid data loss, do not remove the hard drive while the computer is on, or in sleep mode.

  10. Dell Inspiron i3558-5500BLK Hard Drive Replacement: étape 10, image 1 de 1
    • Carefully lift the hard drive off the palm rest.

    • Hard drives are fragile. Exercise care when handling the hard drive.

  11. Dell Inspiron i3558-5500BLK Hard Drive Replacement: étape 11, image 1 de 1
    • Disconnect the interposer from the hard drive.

  12. Dell Inspiron i3558-5500BLK Hard Drive Replacement: étape 12, image 1 de 2 Dell Inspiron i3558-5500BLK Hard Drive Replacement: étape 12, image 2 de 2
    • Remove the 0.2 mm Phillips screws that secure the hard drive bracket to the hard drive.

    • Lift the hard drive bracket off of the hard drive.

Conclusion

To reassemble your device, follow these instructions in reverse order.

Joe Giesa

Membre depuis le 09/27/17

104 Réputation

1 tutoriel rédigé

Équipe

Cal Poly, Team S9-G5, Banghart Fall 2017 Membre de l'équipe Cal Poly, Team S9-G5, Banghart Fall 2017

CPSU-BANGHART-F17S9G5

4 membres

13 tutoriels rédigés

Un commentaire

Hi, appreciate your guide. What size hard drive will fit in here? I’m trying to replace it with an SSD, but want to get it right. Thanks!

Dean Tripp - Réponse

Ajouter un commentaire

Nombre de vues :

Dernières 24 heures : 0

7 derniers jours : 4

30 derniers jours : 12

Total : 1,383