Cette version peut contenir des modifications incorrectes. Passez au dernier aperçu vérifié.
Ce dont vous avez besoin
-
-
Éteignez l’ordinateur, détachez-le de toute source d’alimentation et assurez-vous qu'il est fermé avec son loquet bien fermé.
-
Retournez l’ordinateur portable de sorte que son fond est face à vous.
-
-
-
À l’aide de deux index, faites glisser les loquets de la batterie vers l’extérieur.
-
Tout en maintenant les loquets vers l’extérieur, utilisez vos pouces pour faire glisser la batterie vers vous.
-
Une fois que la batterie est délogée, vous pouvez lâcher les loquets et retirer la batterie.
-
-
Cette étape n’est pas traduite. Aidez à la traduire
-
With the battery removed, turn the laptop face up and open the lid a complete 180 degrees.
-
Using a plastic opening tool, pry off the corner of the keyboard bezel by undoing the tab.
-
Once you've removed the corner of the bezel, you can use your hands to slowly, but with moderate force, pull the rest of the bezel slightly up and towards you to release the remaining tabs.
-
-
Cette étape n’est pas traduite. Aidez à la traduire
-
Remove the three 3mm Phillips #0 screws securing the keyboard.
-
-
Cette étape n’est pas traduite. Aidez à la traduire
-
Slowly bring the keyboard up and fold it back onto the touchpad.
-
-
Cette étape n’est pas traduite. Aidez à la traduire
-
Use a plastic opening tool to unhook the blue latch that secures the keyboard cable.
-
Using the blue tab, pull the keyboard cable connector from its socket on the motherboard.
-
-
Cette étape n’est pas traduite. Aidez à la traduire
-
Find and remove the display's ribbon cable by gently pulling on the blue tab indicated in the picture.
-
While tracing the path of the cable back to the display, unhook the cable from the tabs of the body using the spudger.
-
-
Cette étape n’est pas traduite. Aidez à la traduire
-
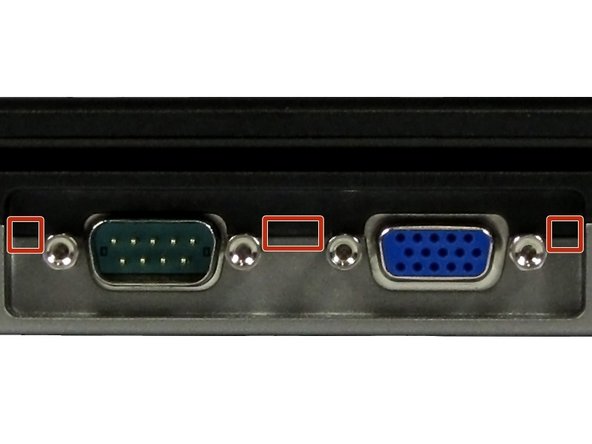
Using the spudger, peel off the 6 circular rubber pads on the display to reveal the bezel screws beneath them. Put the rubber pads aside in a labeled container.
-
Careful: do not remove the two longer pads on the left and right side of the bezel; they do not contain any screws!
-
-
-
Cette étape n’est pas traduite. Aidez à la traduire
-
Using the Phillips #0 screwdriver, remove each of the six screws (M2.5-5mm) on the bezel and put them in a labeled container.
-
-
Cette étape n’est pas traduite. Aidez à la traduire
-
Using the spudger, slowly pry off the the bezel from the rest of the laptop. This can be done by placing the spludge in the small opening that separates the the two adjoining screen pieces along the edge. Slowly slide along this opening till the screen is free.
-
-
Cette étape n’est pas traduite. Aidez à la traduire
-
Remove the 8 screws (M2-3mm) indicated in the picture. Place these screws in a labeled container as they are different than the bezel screws.
-
Do not remove these screws
-
-
Cette étape n’est pas traduite. Aidez à la traduire
-
Remove the connector to the coin using the spudger.
-
Slide the coin battery out of its slot by wiggling its connector with a gentle tug.
-
You may also need to use the spudger to carefully push out the battery from the top of the slot where the yellow square is.
-
-
Cette étape n’est pas traduite. Aidez à la traduire
-
Carefully, close the laptop and turn it over.
-
Remove the seven screws (M2.5-8mm) indicated to the left and place them in a labeled container.
-
-
Cette étape n’est pas traduite. Aidez à la traduire
-
Remove the hard drive screws and place them in a labeled container.
-
Slide out the hard drive and set it aside.
-
Loosen, but do not remove, the two screws at the edge of the laptop.
-
Turn the laptop back over and open the screen to continue disassembly.
-
-
Cette étape n’est pas traduite. Aidez à la traduire
-
Remove the black and white cables on the wireless card using the tweezers by pulling upward.
-
While tracing the path of the black and white cables back to the display, unhook the cablse from the tabs of the body using the spudger. Both wires need to be completely out of all the tabs, loose and unattached.
-
-
Cette étape n’est pas traduite. Aidez à la traduire
-
Remove the two screws (M2.5-8mm) on the back panel of the laptop to release the hinges and place them into a labeled container.
-
Pull up on the full screen to completely remove it from the bottom half of the laptop.
-
-
Cette étape n’est pas traduite. Aidez à la traduire
-
Remove the three (M2.5-8mm) "P" screws indicated to the left and place them in a labeled container.
-
-
Cette étape n’est pas traduite. Aidez à la traduire
-
Using the spudger, unhook the touchpad's ribbon cable from the left side of the board indicated in the picture.
-
-
Cette étape n’est pas traduite. Aidez à la traduire
-
Using the spudger, go around the perimeter of the laptop and separate the black-grey palm rest layer from the lighter-grey base layer.
-
It's easiest to start in an opening near the display input ports on the back of the laptop and make your way around.
-
Once all of the tabs have been unlatched, remove the palm rest layer.
-
-
Cette étape n’est pas traduite. Aidez à la traduire
-
Flip over the palm rest layer to reveal the touchpad.
-
Remove the four screws (M2-5mm) indicated in the picture to the left and place them in a labeled container.
-
-
Cette étape n’est pas traduite. Aidez à la traduire
-
Remove the connector on the touchpad using a spudger.
-
-
Cette étape n’est pas traduite. Aidez à la traduire
-
Dislodge the connector to the speaker using the spudger.
-
Lift the speaker out of its designated area.
-


Annulation : je n'ai pas terminé ce tutoriel.
2 autres ont terminé cette réparation.
Équipe

Cal Poly, Team 6-1, Johann Winter 2013 Membre de l'équipe Cal Poly, Team 6-1, Johann Winter 2013
CPSU-JOHANN-W13S6G1
4 membres
10 tutoriels rédigés
2 commentaires
Misleading guide.
You don't have to remove screen bezel in order to access the speaker - you just need to remove the whole display assembly, which takes 4 screws and two cables.
Then, it incorrectly displays the palmrest removal procedure. According to this guide, you have to pry it of in the back of the laptop, while in reality there's an easy and an undamaging way to do so: while having all the required screws removed, "slide" the whole palmrest towards the front of the laptop (to the direction where touch pad is located) and the back of the palmrest should lift very easily from then on.
Paulius :)
2 Additional issues need to be addressed. They both relate to preparation for this job.
1) Since you are tearing down computer depending on age of unit, it might be advisable to purchase a replacement CMOS battery before starting. (CR2032)
2) Recommend a back up just in case.
Other than that, great job