Introduction
The replacement of your Dell Latitude E6420 laptop’s CPU may be needed in certain circumstances. This may include simply upgrading to a newer model when your current model has become obsolete or a failure of the current CPU. A common sign that your CPU may need to be replaced is the freezing of your laptop. Freezing of the laptop and the unresponsiveness may indicate that your CPU will need to be replaced. Another issue may be that the laptop will not boot up and the screen may even be blank even though your device is being powered. Convenience may also be a reason to upgrade your CPU. An upgrade will increase processing power and improving performance, making applications and programs load faster. The newer CPU may be more compatible with newer software and hardware. It may also be more energy efficient extending battery life for your device. For this replacement, no special skills are needed.
Ce dont vous avez besoin
-
-
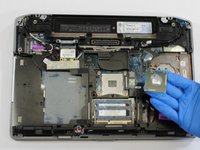
Remove the eight screws holding down the rear panel using a Phillips #0 Screwdriver. Carefully remove base cover by hand.
-
-
-
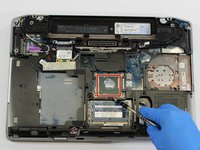
Remove the battery by pushing the tabs outward, then removing the battery from the device.
-
-


To reassemble your device, follow these instructions in reverse order.
To reassemble your device, follow these instructions in reverse order.
Annulation : je n'ai pas terminé ce tutoriel.
6 autres ont terminé cette réparation.

Équipe

The Citadel Military College of South Carolina, Team S2-G12, Eggleston Spring 2020 Membre de l'équipe The Citadel Military College of South Carolina, Team S2-G12, Eggleston Spring 2020
CMCSC-EGGLESTON-S20S2G12
3 membres
6 tutoriels rédigés